The robots meta tag and X-Robots-Tag made clear
The robots meta tag and the X-Robots Tag are used to instruct crawlers on how to index a website’s pages and display them in search results for users. The robots meta tag can be found in the HTML code of a web page, whereas the X-Robots Tag is included in the HTTP header of a URL.
Once the robot finds a page, the indexing process begins. See the steps below:
- Load the content.
- Search engine robots analyze it.
- Decide whether or not to include the page in the database (search index).
The steps above indicate that you can use both robots meta tags and the X-Robots Tags to control which content appears in the SERP and how.
Now, let’s get down to the details.
-
Both the robots meta tag and X-Robots-Tag are used to control page indexing and serving in search results, but the latter provides instructions to robots before they crawl pages, conserving the crawl budget.
-
The robots.txt file instructs search bots on how to crawl pages, while the robots meta tag and X-Robots-Tag influence how content is included in the index. All three components are vital for technical optimization.
-
If robots.txt prevents bots from crawling a page, the robots meta tag or x-robots directives won’t work because the bot won’t see them.
-
Use meta robots directives to keep certain pages out of search results, like duplicate content or test pages. They help manage your site’s crawl budget and the page’s link juice.
-
Use X-Robots-Tag when you need to block non-HTML files from indexing, optimize the crawl budget on large sites, and set site-wide directives. However, make sure to check whether local search engine bots support it if you’re dealing with them.
-
Both robot tags support different directives like index/noindex, nosnippet, max-snippet, etc. Search engines ill follow the most restrictive instructions when directives are in conflict. You can use as many tags as you need for different purposes or combine multiple directives into one tag for the same search engine. For specific crawlers, you’ll need separate tags, but you can still combine instructions in each tag.
-
You can add the robots meta tag through the CMS admin panel, HTML editing, or plugins. X-Robots-Tag requires that you edit configuration files in the website’s root directory.
-
You can check your robots directives implementation with a variety of tools, including Google Search Console’s URL Inspection to get details on its indexing status, SE Ranking’s Website Audit to get comprehensive crawlability checks, and SE Ranking’s Index Status Checker to monitor indexing status.
-
Be careful when using robots directives. Avoid adding noindex instructions with robots.txt. Remove temporary noindex tags when pages go live, keep noindexed pages in sitemaps until fully deindexed, and always monitor indexing status after making site changes.
-
Errors in configuring the robots meta tag and the X-Robots-Tag can lead to indexing issues and website performance problems. Set the directives carefully or entrust the task to an experienced webmaster.
X-Robots-Tag vs. meta robots tag: Key differences
Controlling how search engines handle web pages is crucial. It allows website owners to influence how their content is discovered, indexed, and presented in SERPs. Two commonly used control methods include implementing the X-Robots-Tag and the meta robots tag. Both options serve the same purpose, but they differ in terms of implementation and functionality.
Let’s explore the characteristics of each and compare them side by side.
| Parameter | Meta robots tag | X-robots-tag |
|---|---|---|
| Type | HTML meta tag | HTTP header |
| Scope | Applies specifically to the HTML page it’s included in | Applies to the HTTP response for diverse file types, including HTML, CSS, JavaScript, images, etc. |
| Where to set | Within the <head> section of a page | On the server side |
| Controls page indexing | Yes | Yes |
| Allows bulk editing | It’s possible but complicated | Yes |
| Controls file type indexing | No | Yes |
| Compatibility | Widely supported | Limited |
| Ease of implementation | Easy | Moderate, better suits tech-savvies |
| Syntax example | <meta name=”robots” content=” noindex, nofollow” /> | X-Robots-Tag: noindex, nofollow |
Let’s look at thet pros and cons of each method:
Robots meta tag pros:
- Offers a straightforward, granular, page-level approach to managing indexing instructions.
- Can be easily added to individual HTML pages.
- More widely supported by various search engines, even local and less popular ones.
Robots meta tag cons:
- Limited to HTML pages only, excluding other resources.
- Complicated bulk editing process. You may need to include them manually on every single HTML page.
X-Robots-Tag pros:
- Can be applied to any resource referenced by the HTTP response, even the non-HTML one.
- Enables management of indexing instructions for multiple pages or entire website sections.
X-Robots-Tag cons:
- Requires server-level access and knowledge of server configuration, which can be challenging for website owners who don’t have direct control over server settings or lack technical experience.
- May not be supported by all search engines and web crawlers.
Regardless of the method you choose, it’s crucial to configure both robots meta tags and the X-Robots-Tag correctly to avoid unintended consequences. Misconfigurations can result in conflicting directives and can block search engines from indexing your entire site or specific pages.
Robots.txt file vs. meta robots tag
Robots.txt and meta robots tags are often confused with one another because they seem similar, but they actually serve different purposes.
The robots.txt file is a text file located in the root directory of a website. It acts as a set of instructions for web robots, informing them about which parts of the website are preferred for them to access and crawl.
Meta robots tags and the X-Robots-Tag give web crawlers indexing instructions on which pages to index and how. They can also dictate which parts of the page or website to index and how to handle non-HTML files.
So, the robots.txt file serves as a separate file and provides crawling instructions to search bots. The robots meta directive, on the other hand, provides indexing instructions to specific pages, files, and website sections.
By employing these methods strategically, you can control website accessibility and influence search engine behavior.
To learn even more about this, we recommend watching this video guide where Martin Splitt, Developer Advocate for Google Search, breaks down how instructions for robots work, and how to use them effectively to control crawler access.
When to use meta robots directives
Let’s examine how the robots meta tag and the X-Robots-Tag assist with search engine optimization and when to use them.
1. Control page indexing
Robots meta tags and the X-Robots-Tag give you greater flexibility in controlling page indexing, but not all pages can attract organic visitors. Some pages can even harm the site’s search visibility if indexed. That’s why, out of all website pages, some need to be blocked from indexing:
- Duplicate pages
- Sorting options and filters
- Search and pagination pages
- Technical pages
- Service notifications (about a signup process, completed order, etc.)
- Landing pages designed for testing ideas
- Pages undergoing development
- Outdated pages that don’t bring any traffic
Not only do these directives control entire HTML pages, but they also allow you to manage indexing for specific sections within them.
You are also free to choose the application level, whether at the page level using robots meta tags or at the site level using X-Robots-Tags.
2. Manage link equity
Blocking links from crawlers by using the nofollow directive can help with maintaining the page’s link juice. This prevents it from passing to other sources through external or internal links.
3. Optimize crawl budget
The bigger a site is, the more important it is to direct crawlers to the most valuable pages. If search engines crawl a website inside and out, the crawl budget will simply end before bots reach the content that’s helpful for both users and SEO. This prevents important pages from getting indexed, or at least from getting indexed on schedule.
4. Control snippets
In addition to controlling page indexing, meta robots tags can control snippets displayed on the SERP. You get a range of options for fine-tuning the preview content shown for your pages, enhancing your website’s overall visibility and appeal in search results.
Here are a few examples of tags that control snippets:
- nosnippet instructs search engines not to display the page’s meta descriptions.
- max-snippet:[number] specifies how long a snippet should be (character count).
- max-video-preview:[number] describes how long a video preview should be (seconds).
- max-image-preview:[setting] defines the image preview size (none/standard/large).
You can combine several directives into one, for instance:
<meta name=”robots” content=”max-snippet:[70], max-image-preview:standard” />
However, if you want to set up different restrictions for different crawlers, create separate directives for each.
Meta robots directives and search engine compatibility
The robots meta tags and X-Robots-Tag use the same directives to instruct search bots. Let’s review them carefully.
| Directive | Its function | BING | |
| index/noindex | Instructs to index/not index a page. Used for pages that are not supposed to be shown in the SERPs. | + | + |
| follow/nofollow | Instructs to follow/not follow the links on a page. | + | – |
| archive/noarchive | Instructs to show/not show a cached version of a web page in search. | – | + |
| nocache | Instructs not to store a cached page. | – | + |
| all/none | All is the equivalent of index, and follow is used for indexing text and links. None is the equivalent of noindex, and nofollow is used for blocking the indexing of text and links. | + | – |
| nosnippet | Instructs not to show a snippet or video in the SERPs. | + | + |
| max-snippet | Limits the maximum snippet size. Indicated as max-snippet:[number] where number is a number of characters in a snippet. | + | + |
| max-image-preview | Limits the maximum size for images shown in search. Indicated as max-image-preview:[setting] where setting can have none, standard, or large value. | + | + |
| max-video-preview | Limits the maximum length of videos shown in search (in seconds). It also allows setting a static image (0) or lifting any restrictions (-1). Indicated as max-video-preview:[value]. | + | + |
| notranslate | Prevents search engines from translating a page in the search results. | + | – |
| noimageindex | Prevents images on a page from being indexed. | + | – |
| unavailable_after | Tells not to show a page in search after a specified date. Indicated as unavailable_after: [date/time]. | + | – |
| indexifembedded | Allows content indexing on the page with noindex tag when that content is embedded in another page through iframes or a similar HTML tag. Both tags must be present for this directive to work. | + | – |
All of the abovementioned directives can be used with both the robots meta tag and X-Robots-Tag to help search engine bots understand your instructions.
Note that search engines index the site’s entire pages and follow links by default, so there is no need to indicate index and follow directives for that purpose.
Conflicting directives
If combined, Google will choose the restrictive instruction over the permissive one. For example, the meta name=”robots” content=”noindex, index”/> directive means that the robot will choose noindex, and that the page text won’t be indexed.
Be careful when using the noindex directive—it may unintentionally prevent valuable pages from appearing in search results. If you’re seeing unexpected drops in visibility, our indexing issues guide can help you troubleshoot.
The search engine will consider the cumulative effect of the negative rules that apply if multiple crawlers are specified along with different rules. For example:
<meta name="robots" content="nofollow">
<meta name="googlebot" content="noindex">
This directive means that the pages won’t be indexed, and the links won’t get followed when crawled by Googlebot.
Note: If you’re trying to control which version of a page is indexed, remember that rel="canonical" plays a key role alongside meta robots. Learn how to use it properly in our canonical tag guide to avoid sending mixed signals to search engines. You can also explore the difference between canonical and hreflang tags.
Combined indexing and serving rules
You can use as many meta tags as you need separately or combine them into one tag separated by commas. For instance:
- <meta name=”robots” content=”all”/><meta name=”robots” content=”noindex, follow”/> means that the robot will choose noindex and the page text won’t be indexed, but it will follow and crawl the links.
- <meta name=”robots” content=”all”/><meta name=”robots” content=”noarchive”/> means that all instructions will be considered. The text and links will be indexed while links leading to a page’s copy won’t be.
- <meta name=”robots” content=”max-snippet:20, max-image-preview:large”> means that the text snippet will contain no more than 20 characters, and a large image preview will be used.
If you need to set directives to specific crawlers, creating separate tags is a must. But the instructions within one bot can still be combined. For example:
<meta name="googlebot" content="noindex, nofollow">
<meta name="googlebot-news" content="nofollow">
The robots meta tag: Syntax and utilization
The robots meta tag is inserted into the page’s HTML code and contains information for search bots. It’s placed in the <head> section of the HTML document and has two obligatory attributes: name and content. When simplified, it looks like this:
<meta name="robots" content="noindex" />
The name attribute
In meta name=”robots”, the name attribute specifies the name of the bot that the instructions are designed for. It works similarly to the User-agent directive in robots.txt, which identifies the search engine crawler.
The “robots” value is used to address all search engines. But if you have to set the instructions, particularly for Google, you’ll have to write meta name=”googlebot”. Some other Google crawlers include:
- googlebot-news
- googlebot-image
- googlebot-video
Bing crawlers include:
- bingbot
- adIdxbot
- bingpreview
- microsoftpreview.
Some other search crawlers are:
- Slurp for Yahoo!
- DuckDuckBot for DuckDuckGo
- Baiduspider for Baidu
The content attribute
This attribute contains instructions on indexing both the page’s content and its display in the search results. The directives explained in the table above are used in the content attribute.
Note that:
- Both attributes are not case-sensitive.
- If attribute values aren’t included or written incorrectly, the search bot will ignore the blocking instruction.
Using the robots meta tag
- Method 1: in an HTML editor
Managing pages is similar to editing text files. You have to open the HTML document in an editor, add robots to the <head> section, and save.
Pages are stored in the site’s root catalog, which can be accessed through your personal account with a hosting provider or via FTP (File Transfer Protocol). Save the source document before making changes to it.
- Method 2: Through the CMS admin panel
CMSs make it easier to block a page from indexing. Most CMSs provide built-in options in their admin interface to add robots meta tags.
In WordPress, navigate to Appearance > Theme Editor in your admin panel. Select your theme’s header.php file. In the <head> section, you can add robots meta tags to help manage search engine crawling and indexing behavior.
In Magento, navigate to Content > Design > Configuration in your admin panel. Under Search Engine Robots, you can define crawler access and visibility settings. Apply these settings site-wide or customize them for specific pages as needed.
Shopify lets you control robots meta tags with theme file editing. Add tags to your theme.liquid file’s <head> section, where you can specify how search engines interact with specific pages.
Wix lets you manage robots meta tags in the Pages & Menu > SEO Basics > Advanced SEO > Robots Meta Tag section. Here you can configure search crawler permissions using simple checkboxes. You can also add additional tags, e.g., notranslate, indexifembedded.
- Method 3: using CMS plugins
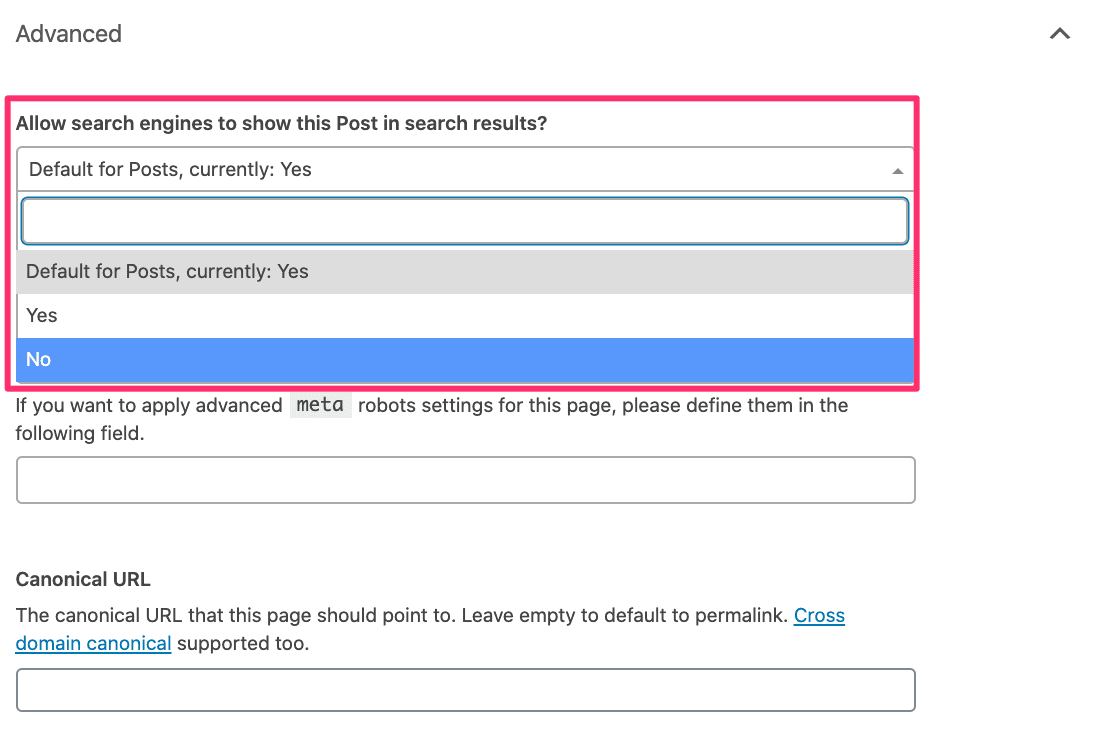
Using a plugin is usually the easiest way to add robots meta tags to your webpages because it typically doesn’t require you to edit your site’s code. The plugin you should use depends on the CMS you’re using. For example, Yoast SEO for WordPress has this functionality. It allows you to block indexing or prevent the crawling of links when editing a page.
X-Robots-Tag: Syntax and utilization
The X-Robots-Tag is a part of the HTTP response for a given URL and is typically added to the configuration file. It acts similarly to the robots meta tag and impacts how pages are indexed. But there are some instances where it is recommended to use the X-Robots Tag, specifically for indexing instructions.
Here is a simple example of the X-Robots-Tag:
X-Robots-Tag: noindex, nofollow
When you need to set rules for a page or file type, the X-Robots-Tag looks like this:
<FilesMatch "filename">
Header set X-Robots-Tag "noindex, nofollow"
</FilesMatch>
The <FilesMatch> directive searches for files on the website using regular expressions. If you use Nginx instead of Apache, this directive is replaced with location:
location = filename {
  add_header X-Robots-Tag "noindex, nofollow";
}
If the bot name is not specified, directives are automatically used for all crawlers. If a distinct robot is identified, the tag looks like this:
Header set X-Robots-Tag "googlebot: noindex, nofollow"
When to use X-Robots-Tag
- Deindexing non-HTML files
Since not all pages have the HTML format and <head> section, some content can’t be blocked from indexing using the robots meta tag. This is when x-robots come in handy.
For example, when you need to block .pdf documents:
<FilesMatch "\.pdf$">
    Header set X-Robots-Tag "noindex"
</FilesMatch>
- Saving the crawl budget
The robots meta tag provides crawling directives after the page is loaded, while the x-robots tag gives indexing instructions before the search bot gets to the page. Using x-robots helps search engines spend less time crawling the pages. This optimizes the crawl budget so search engines can spend more time crawling important content, making the X-Robots Tag especially beneficial for large-scale websites.
- Setting crawling directives for the whole website
By using the X-Robots-Tag in HTTP responses, you can establish directives that apply to the entire website, rather than separate pages.
- Addressing local search engines
While the biggest search engines understand the majority of restrictive directives, small local search engines may not know how to read indexing instructions in the HTTP header. If your website targets a specific region, it’s important to familiarize yourself with local search engines and their characteristics.
The primary function of the robots meta tag is to hide pages from SERPs. On the other hand, the X-Robots-Tag lets you set broader instructions for the whole website. You can use it to inform search bots before they crawl web pages and save your crawl budget.
How to apply the X-Robots-Tag
To add the X-Robots-Tag header, use the configuration files in the website’s root directory. The settings will differ depending on the web server.
Apache
It’s also recommended to edit the following server documents: .htaccess and httpd.conf. If you need to prevent all .png and .gif files from being indexed in the Apache web server, add the following:
<Files ~ "\.(png|gif)$">
 Header set X-Robots-Tag "noindex"
</Files>
Nginx
Editing the configuration file conf is also necessary. To prevent all .png and .gif files from being indexed in the Nginx web server, add the following:
location ~* \.(png|gif)$ {
 add_header X-Robots-Tag "noindex";
}
Important: Before editing the configuration file, save the source file to eliminate website performance issues in case there are some errors.
Do you need to use both the robots meta tag and X-Robots-Tag?
The short answer is no. Use whichever method works best for your situation. There is no need to implement both. Search engines will follow your indexing instructions whether you use meta robots tags or X-Robots-Tag. Using both won’t make crawlers more likely to follow your rules. It will also have zero impact on how fast the changes take effect.
Examples of the robots meta tag and the X-Robots-Tag
noindex
Telling all crawlers not to index text on a page and not to follow the links:
<meta name="robots" content=" noindex, nofollow" />
X-Robots-Tag: noindex, nofollow
nofollow
Telling Google not to follow the links on a page:
<meta name="googlebot" content="nofollow" />
X-Robots-Tag: googlebot: nofollow
none
Telling Google not to index and follow the links in an HTML document:
<meta name="googlebot" content="none" />
X-Robots-Tag: googlebot: none
nosnippet
Telling search engines not to display snippets for a page:
<meta name="robots" content="nosnippet">
X-Robots-Tag: nosnippet
max-snippet
Limiting the snippet to 35 symbols maximum:
<meta name="robots" content="max-snippet:35">
X-Robots-Tag: max-snippet:35
max-image-preview
Telling search engines to show large image versions in the search results:
<meta name="robots" content="max-image-preview:large">
X-Robots-Tag: max-image-preview:large
max-video-preview
Telling search engines to show videos without length limitations:
<meta name="robots" content="max-video-preview:-1">
X-Robots-Tag: max-video-preview:-1
notranslate
Telling search engines not to translate a page:
<meta name="robots" content="notranslate" />
X-Robots-Tag: notranslate
noimageindex
Telling crawlers not to index the images on a page:
<meta name="robots" content="noimageindex" />
X-Robots-Tag: noimageindex
unavailable_after
Telling crawlers not to index a page after a сertain date (February 1, 2025, for example):
<meta name="robots" content="unavailable_after: 2025-02-01">
X-Robots-Tag: unavailable_after: 2025-02-01
Checking robots directives
Via Google Search Console
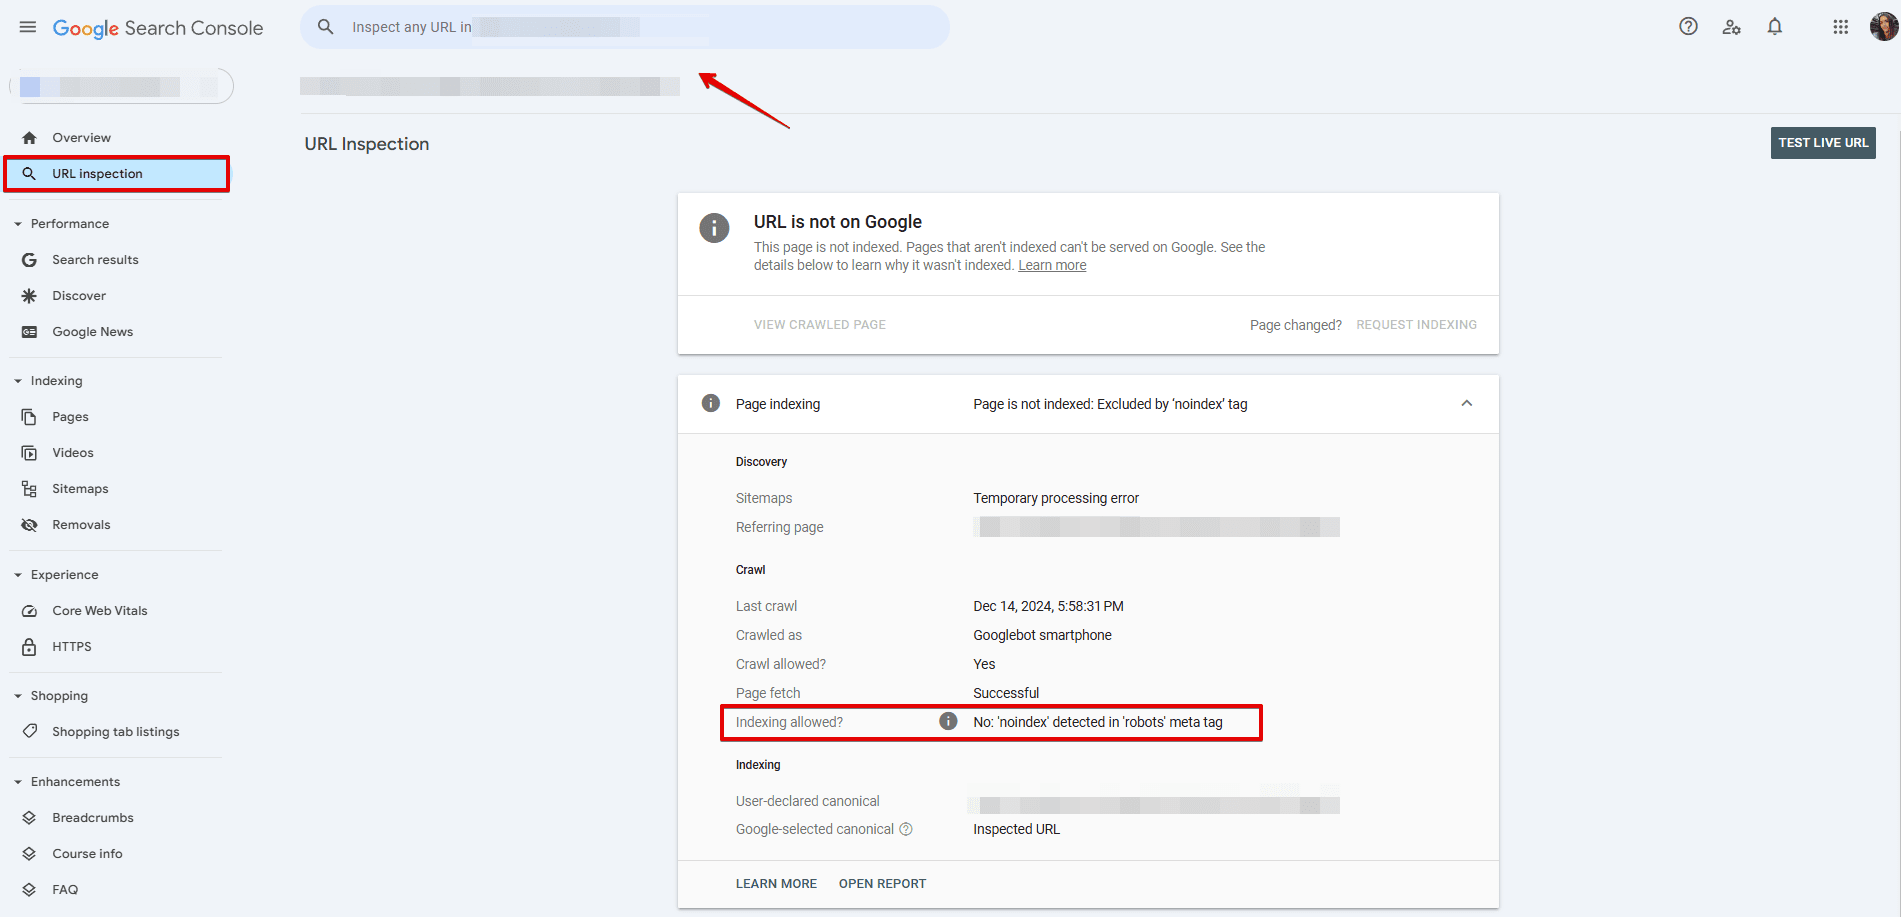
You can check page indexation details using Google Search Console’s URL Inspection tool. This tool shows you whether a page is blocked from indexing and explains why.
To access the URL inspection tool, navigate to the left-hand sidebar and click on “URL Inspection.” Enter the URL you want to check in the search bar. Under the “Crawl” section within the Page indexing details, you’ll see whether the page is or isn’t indexed and why. In the provided screenshot, the page isn’t indexed due to the presence of a noindex directive in the robots meta tags.
If a page is blocked by the X-Robots-Tag, it will be indicated in the report, as in the screenshot below.

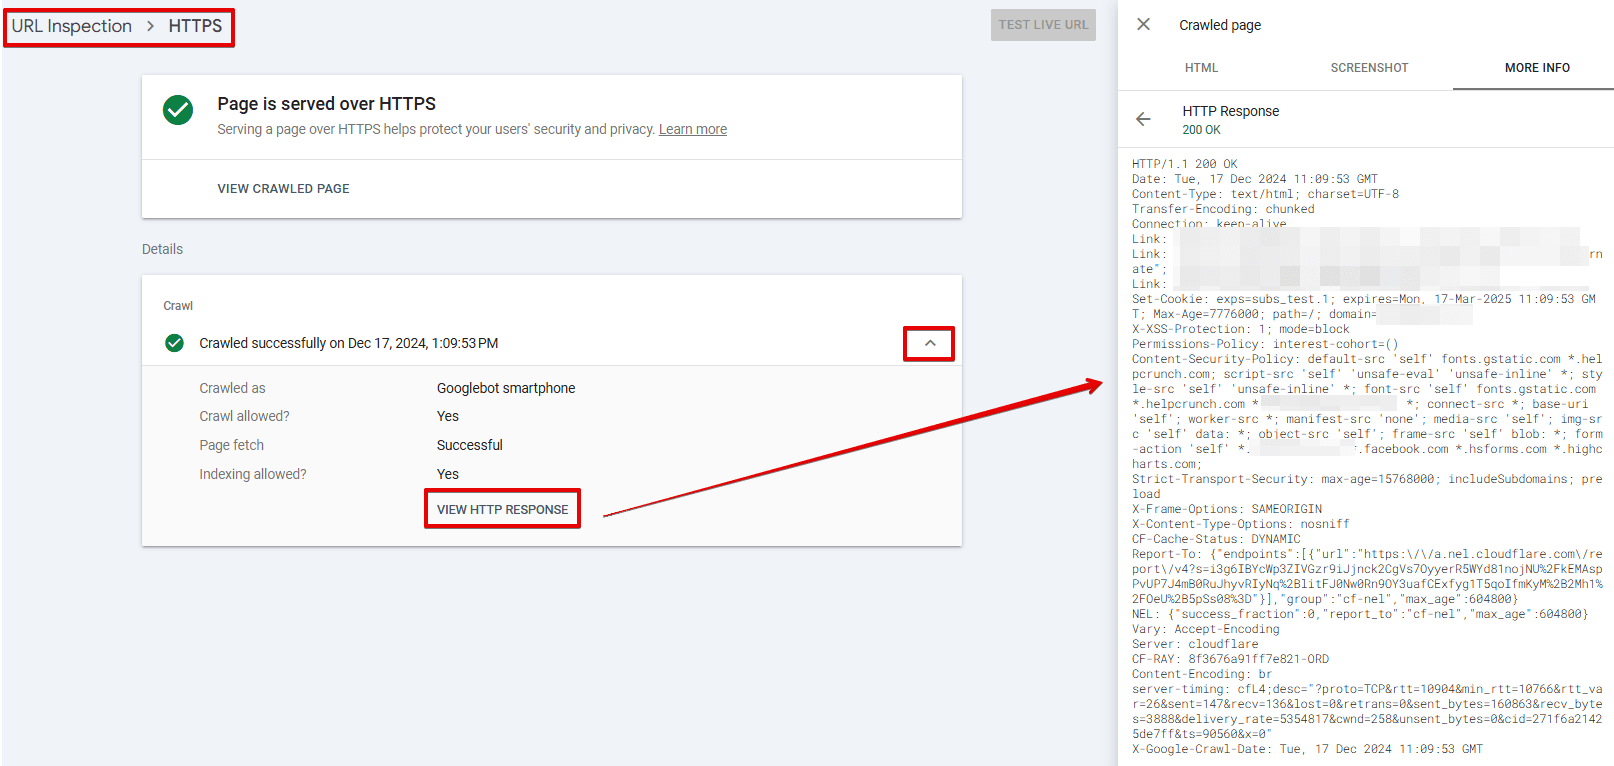
To see the full HTTP response received by Googlebot from the checked page, you have two options:
- To get real-time data, click on Test live URL under the same URL Inspection. Once the test is completed, click on the View crawled page. You’ll see the information about the HTTP response in the More info section.
- To see the last crawl data, click on the HTTPS > Crawl > View HTTP response directly in the URL Inspection.
Using a Website Audit tool
If, upon checking the page, you find that the robots meta tag doesn’t work, verify that the URL isn’t blocked in the robots.txt file. You can check it in the address bar or use Google’s robots.txt tester.
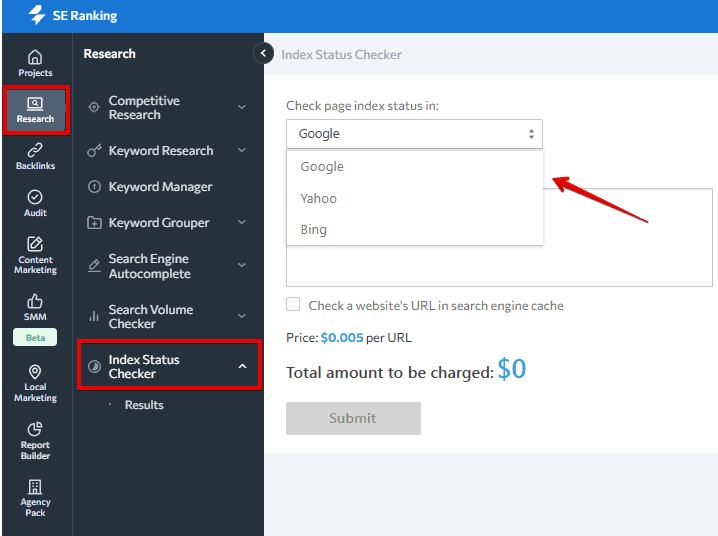
SE Ranking also enables you to check which website pages are in the index. To do so, go to the Index Status Checker tool.
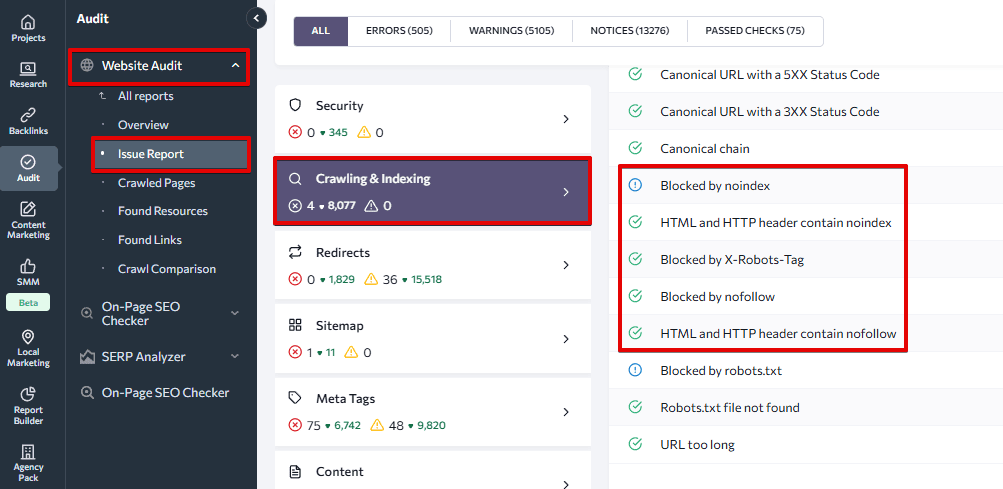
In addition, the upgraded Website Audit 2.0 tool features an updated Crawling & Indexing category, where it flags pages blocked by robots.txt, X-Robots-Tag, or those containing noindex or nofollow directives in HTML or HTTP headers.
It takes time for search engines to index or deindex a page. To make sure your page isn’t indexed, use webmaster services or browser plugins that check meta tags (for example, SEO META in 1 CLICK for Chrome).
Common mistakes when using robots and X-Robots-Tags
Using the robots and X-Robots-Tag can be tricky, which is why it’s common for websites to suffer from related errors. Conducting a technical SEO audit can help in identifying and addressing these issues. To give you a better idea of what to expect when analyzing your website, we put together a list of the most common problems.
Conflict with robots.txt
Official X-Robots-Tag and robots guidelines state that a search bot must still be able to crawl the content that’s intended to be hidden from the index. If you disallow a certain page in the robots.txt file, crawlers cannot access the robots directives.
If a page has the noindex attribute but is disallowed in the robots.txt file, it can be indexed and shown in the search results. An example of this is when the crawler finds it by following a backlink from another source.
To manage how your pages are displayed in search, use the robots meta tag and x-robots.
Adding a page to robots.txt instead of using noindex
Some people incorrectly use the robots.txt file as an alternative to the noindex directive because of a misconception that it will prevent a page from being indexed. Adding a page to the robots.txt file typically results in disallowing crawling, not indexing. This means that crawlers can still index that page (like with the backlinks that we mentioned in the previous section).
So, if you don’t want your page indexed, it is recommended to allow it in the robots.txt file and use a noindex directive. On the other hand, if your goal is to prevent search bots from visiting your page during website crawling, then disallow it in the robots.txt file.
Using robots directives in the robots.txt file
Another common mistake when using robots meta tags and X-Robots-Tags is including them in the robots.txt file. This applies specifically to the nofollow and noindex directives.
Google has never officially confirmed that this method works. What’s more, the search engine found out through its research that employing these directives may conflict with other rules, potentially harming the site’s presence and position in search results. So, ever since September 2019, Google has deemed this practice ineffective and no longer accepts robots directives in the robots.txt file.
Not removing the noindex in time
When working with staging pages, it’s common practice to include a noindex robots directive to prevent search engines from indexing and displaying these pages in search results. While this approach is acceptable, it’s crucial to remember to remove this directive once the page is live.
Failure to do this can lead to a decline in traffic, as search engines won’t include the page in their index. This also becomes a major issue if you don’t notice it in time (for example, during website migration). This inconvenience can grow into an even bigger issue if left unaddressed.
Removing a URL from the sitemap before it gets deindexed
If the noindex directive is added to a page, it’s bad practice to instantly remove the page from the sitemap file. This is because your sitemap allows crawlers to quickly find all pages, including those intended to be removed from the index.
A better alternative is to create a separate sitemap.xml with a list of all pages containing the noindex directive. Then remove URLs from the file as they get deindexed. If you upload this file to Google Search Console, robots are likely to crawl it quicker.
Learn more about common issues and best practices in SEO mapping.
Not checking index statuses after making changes on a website
Sometimes valuable content, or even the entire website, will be blocked from indexing by mistake. Avoid this by checking your pages’ indexing statuses after making changes to them.
How not to get important pages deindexed
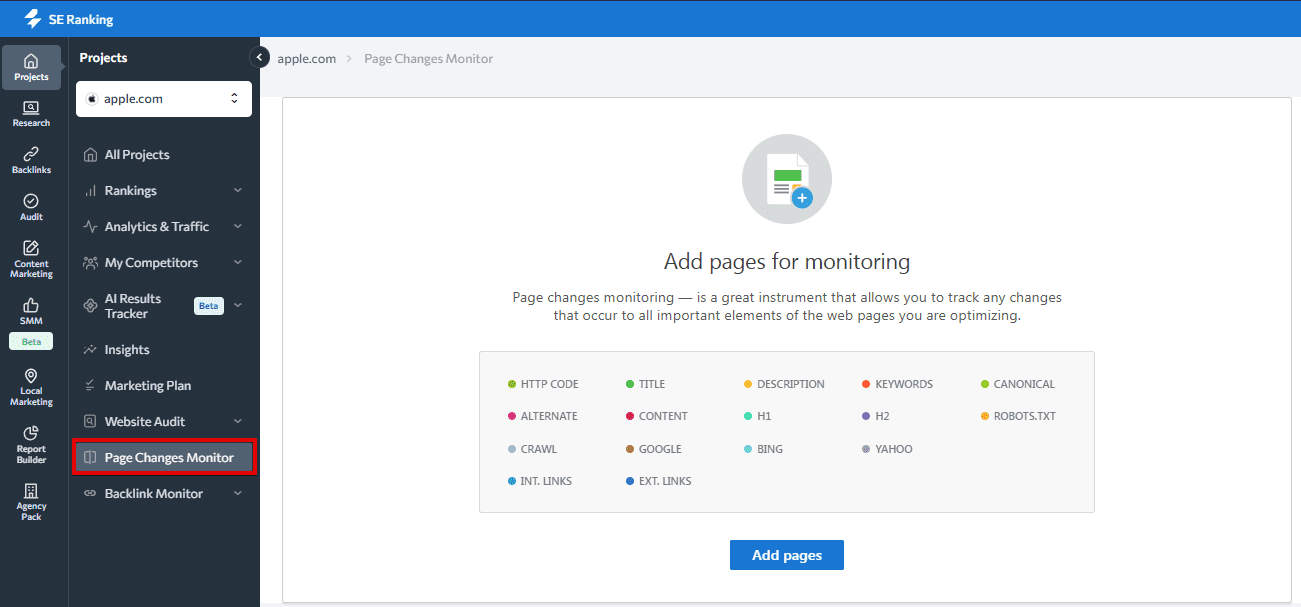
You can monitor changes in your site’s code using SE Ranking’s Page Changes Monitor. This tool allows you to track both HTML code and index statuses for major search engines.
What should you do when a page disappears from search?
When one of your important pages doesn’t show up in SERPS, check if directives are blocking it from being indexed or if there is a disallow directive in the robots.txt file. Also, see if the URL is included in the sitemap file. You can also use Google Search Console to tell search engines that you need to have your page indexed and inform them about your domain’s updated sitemap.
If you’re allowing indexing with the robots meta tag, make sure the content is easy to parse—this includes having a clear page structure using proper heading tags. Our guide to HTML headings explains how to do this effectively.
Summary
The robots meta tag and the X-Robots-Tag are both used to control how pages are indexed and displayed in search results. But they differ in their implementation: the robots meta tag is included in the page code, while the X-Robots-Tag is specified in the configuration file.
Here’s one last recommendation before we wrap up. Choose the method that works best for your website and its needs. Ensure search engines clearly understand and follow your indexing instructions and regularly check that everything is working as expected.
