How to create a sitemap: A comprehensive guide to sitemap SEO
Search robots typically explore your site by following links. The problem is crawlers may never reach some pages this way: either because your website is too big or because no links point to your pages. This is why sitemaps exist.
In this post, we’ll explore the benefits of an XML sitemap for a website, discuss different types of sitemaps, and learn how to create a proper sitemap. We also included a bonus infographic at the end that summarizes the sitemap building tips covered in this post.
-
Sitemaps guide crawlers to the important pages of a website, ensuring none get overlooked due to poor internal linking or complex site structures.
-
While not mandatory for every site, sitemaps are needed for large or newly launched websites, and websites frequently updated with new content, images, videos, or news articles.
-
An XML sitemap can help improve indexation speed and coverage, making it easier for search engines to find, understand, and properly rank a site’s most valuable pages.
-
To create a well-structured sitemap, carefully select high-quality, indexable pages and avoid confusing search engines by excluding pages that return error codes, are blocked by robots.txt, or are marked as noindex.
-
You can create a sitemap manually if your website isn’t that big. Otherwise, it’s better to use CMS plugins or sitemap generators like the built-in one within SE Ranking’s Website Audit Tool.
-
Once your sitemap is ready, add it to Google Search Console and reference it in the robots.txt file. This helps search engines process and index the sitemap.
What is a sitemap?
A sitemap is a file that lists all the URLs on a website. This makes it easier for crawlers and users to navigate the site.
Search crawlers use sitemaps to keep important content from going unnoticed. Sitemaps guide search engine crawlers to areas of the website they may have never visited before, and ultimately help search engines navigate and index site content more efficiently.
Sitemaps also tell search engines which pages and files on your site you consider most important. They provide additional metadata about each file, including the last modified date and frequency of changes.
Does your website need a sitemap?
According to Google, it may be necessary to include a sitemap in the following situations:
- Your website is large: Managing interlinking on a large site can be challenging. Googlebot is also less likely to discover some of your new pages. An XML sitemap can remedy this issue by helping Google discover deeply rooted content.
- Your website is new and lacks backlinks: Web crawlers rely on links from other websites to crawl and discover new pages. Googlebot has a harder time finding these pages without external links pointing to them. Sitemaps help Google find your content much faster.
- Your website has tons of fresh media content: Google can examine additional information from sitemaps for search purposes, especially if your site contains rich media or is featured in Google News.
On the other hand, a sitemap may not be necessary for smaller websites with approximately 500 pages or fewer, thorough internal linking, and few media filesor news pages that would otherwise be crucial for rankings. Creating a sitemap won’t hurt, but it won’t help much either here. The decision is up to you.
What are the benefits of having an XML sitemap?
It is recommended to create a sitemap if you have a large website with numerous media files, or if you’re starting a new project. However, most SEOs agree that having a sitemap is important for indexation and rankings. Let’s go over those benefits next:
Faster indexation
Creating XML sitemaps helps search engines understand which pages to index. Including a URL in the sitemap signals to Google that the page is high in quality. This helps search engines discover new pages more quickly, resulting in a faster indexation process and improved website visibility in search results.
Note that Google can choose to ignore your request, as all pages must comply with Google’s quality standards to get indexed.
Better deep page indexation
Sitemaps are the key to getting deep pages indexed. Deep pages are several clicks away from the homepage and cannot be discovered as easily using regular website navigation methods.
Including deep pages in the sitemap ensures that search engines know they exist and can easily find them.
Sitemaps are especially beneficial if your website has complex structures, such as pages behind form submissions or pages that can only be accessed through search functionalities.
Monitoring indexed pages
While the sitemap itself does not directly help with monitoring indexed pages, it provides a reference point for search engines to compare the indexed pages with those listed in the sitemap.
Combining the sitemap with Google Search Console can help you find out which URLs in the sitemap are indexed.
Periodically compare your sitemap with the actual indexed pages to identify any discrepancies or missing pages. If certain pages listed in the sitemap are not indexed, it may indicate issues with indexing or crawling, such as technical errors, blocking directives, or content quality problems.
Including regional versions of your pages
To inform Google about the regional versions of your pages, you can list them in your sitemap along with special hreflang attributes.
This is not the only method for properly organizing a multilingual website, but some webmasters believe it is the easiest way.

Better user experience
A well-structured visual sitemap can also help users navigate your site. Users will visit your sitemap if they aren’t able to find what they are looking for under the main navigation menu. They may also use it to see how many topics or products you have. This is why it’s important to keep your HTML sitemap user-friendly. To do this, organize pages by category and use descriptive anchors.
According to Google, adding a sitemap to your website is always beneficial, and it will never penalize you for having one.
Sitemap formats
There are two main types of sitemaps: HTML and XML sitemaps. Other, less-often-used sitemaps include text sitemaps, RSS, mRSS, and Atom 1.0. Each serves a different purpose, with XML sitemaps being crucial for SEO and indexing, and HTML sitemaps for improving user navigation and accessibility. The organization of your pages determines how visitors navigate your site and impacts your ability to generate leads. A well-structured site makes it easier to guide users through the customer journey, from discovery to conversion.
Let’s look at these types in more detail.
HTML sitemap
An HTML sitemap is a web page with a list of links pointing to the most important sections and pages of a website. Here are some nice examples of well-designed HTML sitemaps: FedEx and Lufthansa.

The HTML sitemap’s overarching purpose is to help people (not robots) navigate the website quickly and to provide an overview of its primary sections. On the other hand, according to John Mueller, if your website already has a clear navigational structure, you don’t need to create an HTML sitemap. Instead, all you have to do is improve the site’s existing structure.
XML sitemap
An XML sitemap is an XML file, typically named sitemap.xml, located in the root folder of a website. It specifies links, page modification dates, and other parameters relevant to search engines. Since all of their parameters are marked with special tags, XML files resemble a website’s HTML code:

While XML sitemaps may not look visually appealing, they are very important for SEO. Creating an XML sitemap gives crawlers a comprehensive understanding of your website’s structure, helps them find new content easily, and much more.
In addition to the standard XML sitemap that lists website URLs, Google lets you create custom sitemaps for image and video content, and news sitemaps. An XML sitemap is usually located in the root folder: exampledomain.com/sitemap.xml
RSS, mRSS, and Atom 1.0 sitemaps
CMSes automatically create RSS, mRSS, and Atom 1.0 sitemap formats. These formats have a similar structure to XML sitemaps.
Text sitemap
The text sitemap is a simple solution for small websites. You can create a .txt file and list all the URLs you want Google to crawl. For example, if your website has just 10 pages, you can list them one per line in a .txt file. Similarly to the XML sitemap, this sitemap must be located in the root folder: exampledomain.com/sitemap.txt.
Other Sitemap Types
Separate sitemap files for images, news, and videos are recommended. Each specialized sitemap can include format-specific details like video length, ratings, or the publication date.
An image sitemap is specifically designed to provide search engines with information about the images on a website. They are used to inform Google about the images on your site that the search engine might not otherwise discover, including images reached through JavaScript code.

Creating a video sitemap helps Google find and understand the video content on your site, especially newly added content or videos that may not be easily discovered by crawlers. For a video sitemap, you can specify details such as video length, rating, family-friendliness, and more.

According to Google, you don’t need to list videos that are unrelated to the content of the host page. For example, videos that serve as minor additions or are unrelated to the main text content should not be included. Also, all files referenced in the video sitemap should not be disallowed for crawling by robots.txt rules and should not be blocked by firewalls or similar mechanisms. These files must also be accessible without metafiles and require login credentials.
News sitemaps
News sitemaps are made for websites that publish news articles. They give search engines information about new articles, including URLs, publication dates, titles, and other important details like when the articles were published or what language they are in.

News sitemaps help search engines identify and index time-sensitive news content more effectively, which can improve a site’s visibility in news-related search results.
Google needs to be able to discover news articles fast. In fact, Google only lets you include fresh articlesthat werepublished within the last two days in news sitemaps. This ensures users only get up-to-date information. A single news sitemap can include no more than 1000 articles, but older content should be removed. The last—and probably the most important condition—is that your website should be registered with Google News.
How to create an XML sitemap file
Let’s look at some of the most common approaches to creating a sitemap.
Webmasters typically choose one of the options below:
- Manual sitemap creation
- Sitemap generators
- CMS plugins
Let’s review each approach.
CMS plugins
The easiest way to generate an XML sitemap is through your CMS. Since CMS platforms store information about all your website’s pages and any adjustments you make, they can automatically feed all that data into a dynamic sitemap.
Some CMS platforms have built-in sitemap-generating capabilities. This is the case for Magento, Shopify, Wix, and Squarespace. For other popular CMS platforms like WordPress, Joomla, Drupal, or OpenCart, you will need to use special plugins.
| WordPress | Yoast SEO, Google XML Sitemaps, WordPress XML Sitemap Plugin, All in One SEO Pack |
| Joomla | OSMap, JSitemap, Sitemap Cache |
| Drupal | Simple XML sitemap |
| OpenCart | All In One Seo Extension, XML Sitemap, XML Sitemap Generator by Cuispi |
The table above shows a list of the top sitemap plugins for CMS platforms. To pick the right one for your site, pay special attention to the plugin’s features. SEO-friendly solutions should let you exclude inappropriate pages like 404s, redirects, noindex, and canonicalized pages from your XML sitemap. Also, look for customization options so you can easily modify which pages are included in the file.
Sitemap generators
If your site is not built on a CMS or the CMS options available are not suitable, you can use dedicated sitemap tools, which can create an XML file with all the necessary pages. This is often easier than installing another plugin.
There are both free and paid options available in the market, so carefully study what each tool can do. While you can generate a customizable, dynamic sitemap with a paid generator, most free solutions are too basic and lack key features. Free generators often create a static sitemap with all site pages, including canonicalized, noindex, and redirect URLs.
If using a paid solution or CMS is not an option for you, consider creating a sitemap with SE Ranking’s Website Audit tool. It can generate a static sitemap for your website (based on the latest crawl) in just a few minutes.
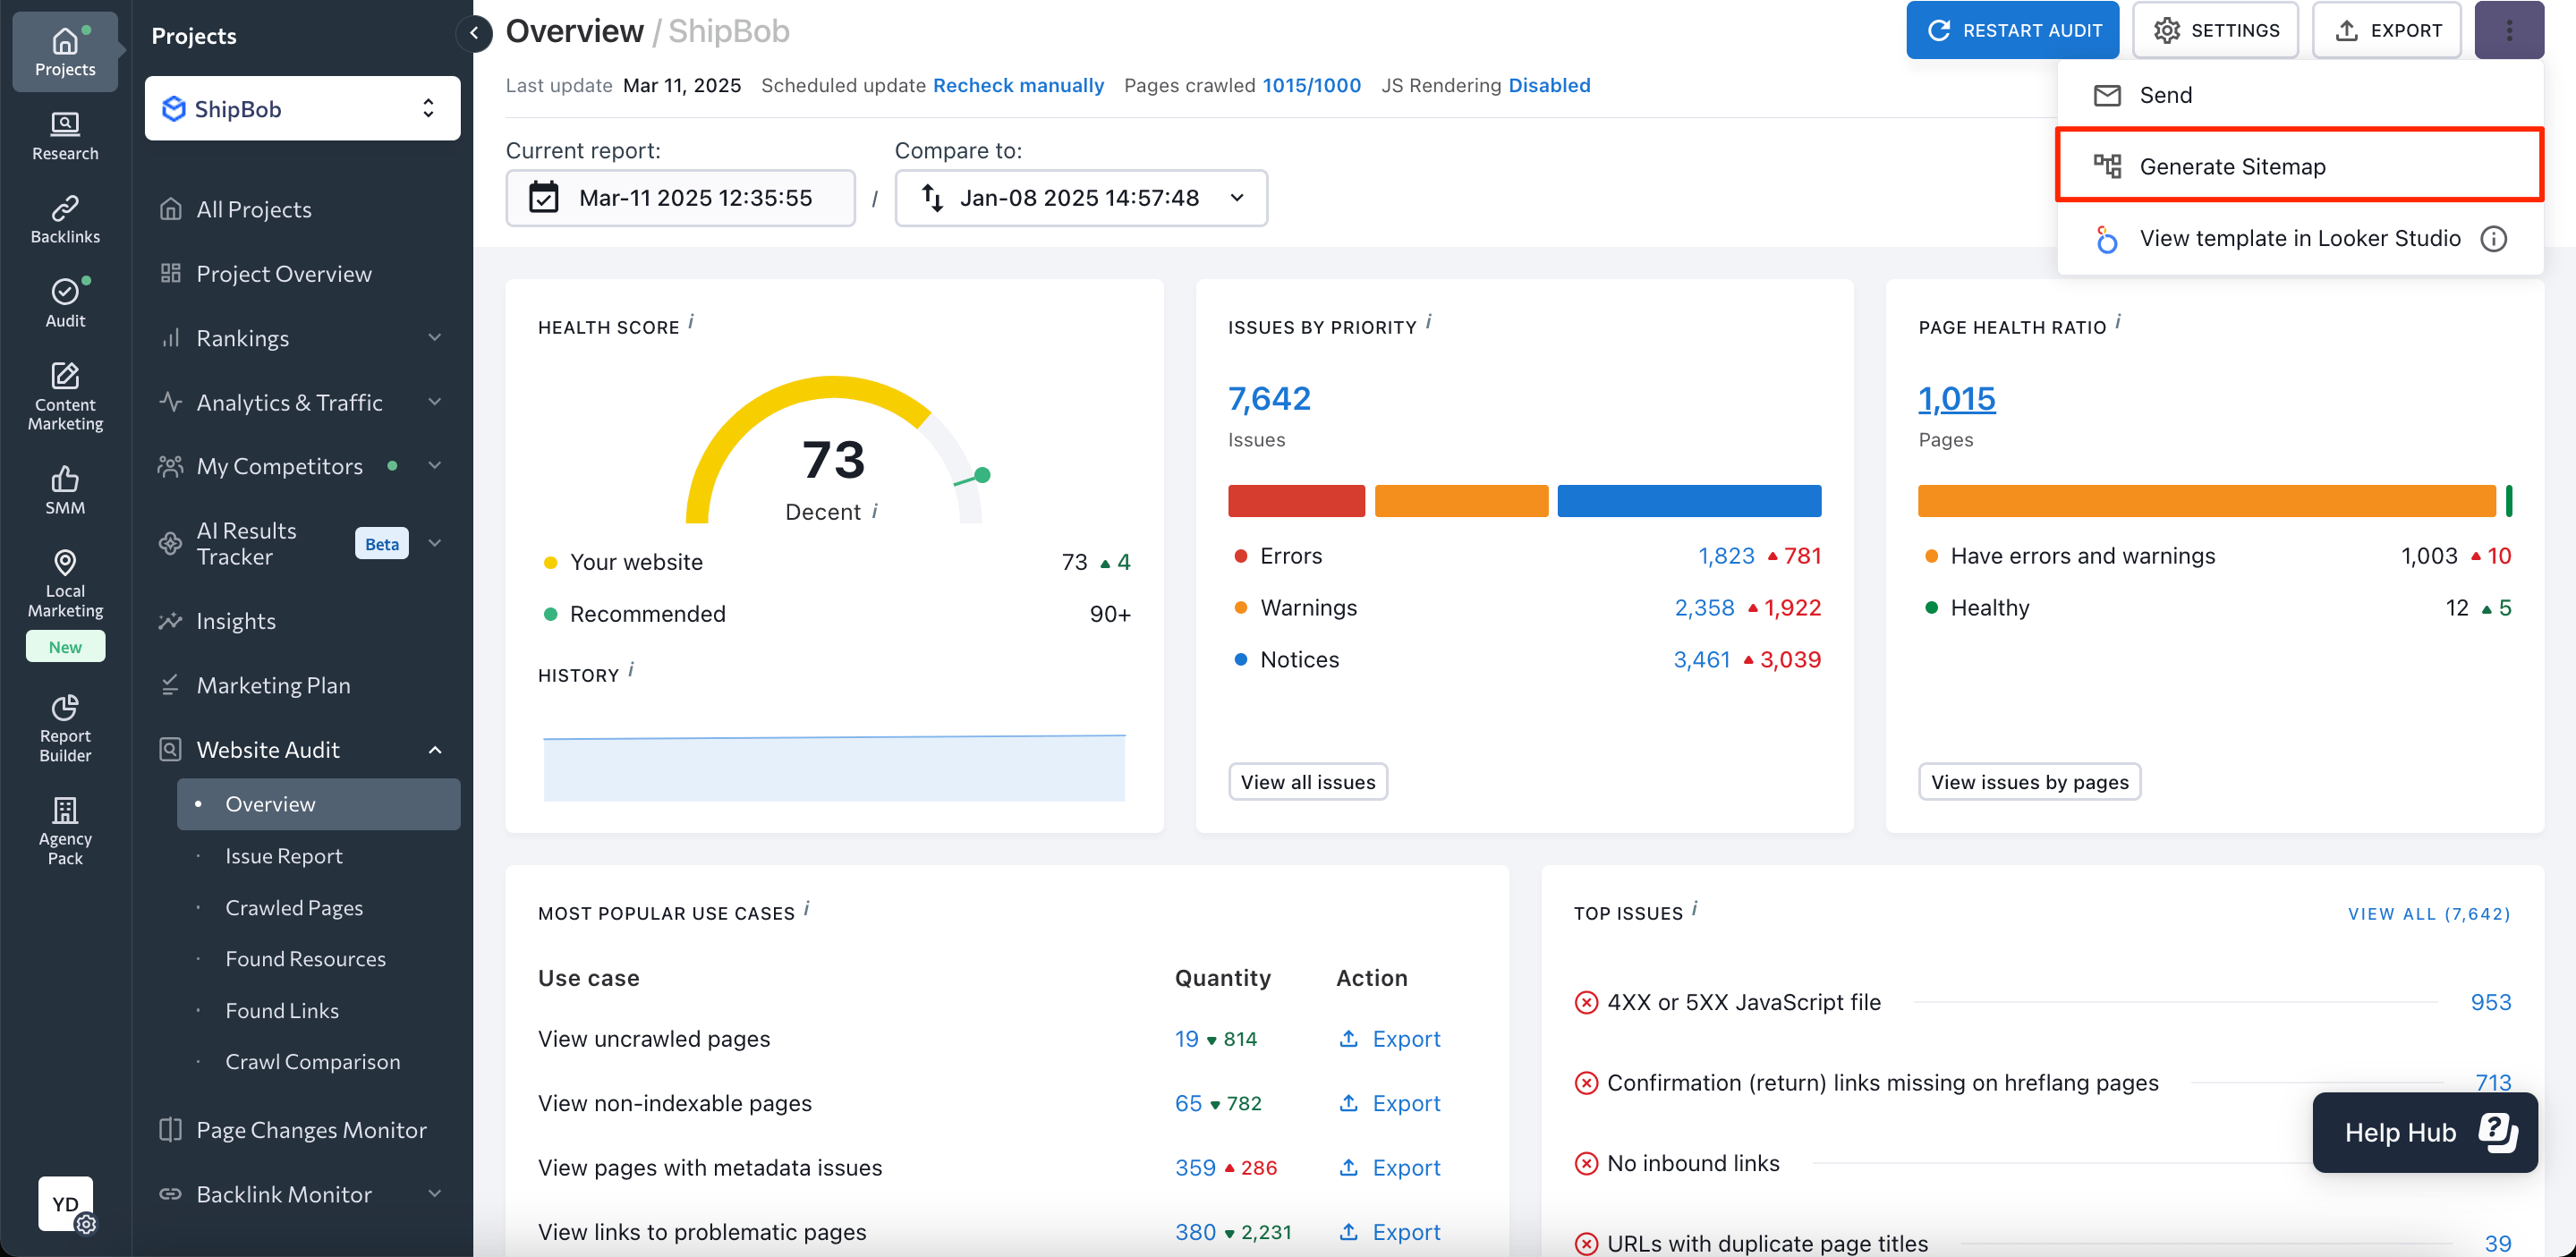
By default, the tool only includes 200 OK pages in an XML sitemap while omitting 4xx, 3xx, noindex, and other pages that you would typically want to exclude.

Make sure your crawl limits are high enough when generating your XML sitemap with SE Ranking’s Website Audit tool. Check that the crawl limit covers all your website’s pages to avoid missing important pages in your sitemap.
If none of the ready-made solutions work for your website, you can create a custom XML sitemap. Since this requires coding skills, you must hire a developer to craft a proper dynamic sitemap for your website.
Manually creating a sitemap
If you don’t have a big site, you can create a sitemap file on your own. Simply open any text editor and create a sitemap file using the XML code. Here is a simple XML sitemap example:
<?xml version="1.0" encoding="UTF-8"?>
<urlset xmlns="http://www.sitemaps.org/schemas/sitemap/0.9">
  <url>
    <loc>https://www.example.com/url1/</loc>
    <lastmod>2024-11-20</lastmod>
  </url>
  <url>
    <loc>https://www.example.com/url2/</loc>
    <lastmod>2024-11-19</lastmod>
  </url>
  <url>
    <loc>https://www.example.com/url3</loc>
    <lastmod>2024-11-18</lastmod>
  </url>
</urlset>
Sitemaps.org, a helpful source recommended by Google, lists tags for you to use in your XML file. Now, let’s go through each tag type. We’ll determine which purpose each tag serves and how to use it properly.
Mandatory tags:
- <urlset> is a mandatory element that encapsulates a sitemap and indicates which version of the XML Sitemap protocol standard is used (via the xmlns attribute). Protocol standard is also called namespace.
- <url> is another mandatory element that marks a block with all information about a single URL.
- <loc> is the compulsory last element that indicates the page URL itself. All listed URLs should be fully qualified and contain the site protocol (HTTP or HTTPS) and the www prefix if it is included in your domain name.
Optional tags:
- <lastmod> indicates the last time the content on the page was updated. It is treated as a signal for crawlers to figure out how often to crawl pages, according to Gary Illyes, an analyst at Google. However, as revealed from the Google API leak in 2024, Google may or may not trust it, which means that you should only update the <lastmod> tag in case major changes happen.
Outdated tags:
- <changefreq> defines how often a page can change. You can set this parameter as always, hourly, daily, weekly, monthly, yearly, or never.
- <priority> sets the crawling priority of a page (valid values range from 0.0 to 1.0).
But, according to the last edition of Google’s guide to building sitemaps, updated in December 2024, Google indicated that the above-mentioned tags will be ignored.
Google’s requirements for sitemap files
To ensure your sitemap is indexed by Google, follow the sitemaps protocol.
Begin by using the same syntax when specifying the URL.
The XML sitemap files should be UTF-8 encoded and all the data values (including URLs) must be entity escaped.
News, image, and video sitemaps will require different tags, like <news:news>. All tags required for use in your image/news/video sitemaps are described in this documentation:
Lastly, you can use any file name you like, as long as the characters are allowed for URLs. Just keep in mind that there was a bug spotted where URLs had hyphens in their filenames.
Managing your sitemaps with a sitemap index file
Search engines have limited ability to crawl XML sitemaps. The maximum file size when uncompressed should be 50 MB, containing no more than 50,000 URLs. Google imposed these limitations to prevent web servers from getting overloaded when serving large files. If you have a huge website and sitemap file, you must split it into several smaller ones. From there, you can create a sitemap index file that lists these smaller sitemaps and submit the index file to Google.
To do this:
- Create several separate sitemap files and compress them with a tool like gzip, which can save bandwidth if needed. Compressed files will have the .gz extension, for example, sitemap.xml.gz.
- Add all separate sitemaps to the sitemap index file, as shown in the example below:

The example shows a sitemap index file in XML format. It lists two sitemaps.
For more information, consult Google’s Documentation.
Deciding which pages to include in a sitemap
This section is extremely important, so read carefully!
A common misconception is that you need to include all your website’s pages in an XML sitemap to help Google crawl and index your site. However, Google doesn’t need to see all pages on your site. Instead, you only need to inform Google about high-quality pages that you believe deserve high rankings. This prompts Google to prioritize only those pages, but remember that Google may or may not. follow your advice. See below a list of the pages that should (and should not) be included in your sitemap.
Pages returning 200 OK code
As a rule of thumb, all the pages you add to a list must be 200 OK pages, and they must be filled with high-quality, user-focused content. Exclude all pages that do not meet these criteria.
Check out this guide on HTTP status codes. It’s easy to follow and helps with understanding the different status codes.
You should also highlight the most important types of 200 OK pages to include in a sitemap:
- Home Page
- Main menu pages
- Category pages
- Subcategories
- Blog pages
- Internal pages
- Contact pages
- Pages with brand information
Since these pages are crucial for your rankings and overall business success, you must make sure Google is aware of them.
Pages that should not be included in the sitemap
3XX pages
A 3XX response code indicates that a page was redirected to a new address. Pages like these shouldn’t be in your XML sitemap.
Instead, focus on including the final destination URLs in your sitemap, as these are the ones that serve the content after the redirect. This helps search engines better understand your website’s structure and properly index and rank your content.
4XX pages
4XX response codes indicate that the requested page does not exist or has restricted access. Exclude these pages from your sitemap.
404 pages are deleted pages, so if they were removed on purpose, don’t include them in your XML sitemap.
Soft 404 pages are also not suitable for SEO. They return a 200-level success status code despite having little or no content, containing redirects to the homepage, or including 404 pages blocked by robots.txt. It’s strongly recommended to take the time to fix this issue.
You can create a custom 404 page for a smooth user experience.
Another popular 4XX status code is 401, which indicates that Google is “not authorized” to access the page. These pages are normally intended for logged-in users and should not be indexed by Google, meaning they aren’t worth including in your sitemap.
5XX pages
5XX status codes indicate an issue with your web server. The most common is the 503 Service Unavailable error, which says that the server is temporarily down. This can occur if the web server is under maintenance or overloaded.
If the error occurs only once, there is no cause for concern as it is likely due to scheduled web server maintenance. But if the problem persists, you’ll have to figure out the underlying cause and resolve it immediately. Otherwise, Google may conclude that your website is poorly maintained.
Adding or removing 5XX pages from your sitemap won’t make a difference. Instead, focus on fixing the issue to return a response code of 200 OK.
You can easily identify these pages by checking the website audit tool in SE Ranking. Once you launch the check, navigate to the Crawling & Indexing section of the Issues Report.

Non-indexable pages
Every website has several important utility pages for users, but not for search engines, including login pages, pages available only after logging in, sorting and filtering pages, etc. A common practice is to block these pages with the robots.txt file to prevent Google from accessing them. You can also let Google crawl the page but restrict its indexing with special directives (noindex or all).
None of these pages should be on your XML sitemap to begin with. If a page cannot be indexed but is featured on your sitemap, it both confuses Google and wastes your crawl budget. The same goes for pages blocked by robots.txt—Google won’t crawl them.
It is also a good idea to audit your site to make sure the noindex directive and robots.txt file are used properly and that you didn’t accidentally block the wrong pages.
To find these pages, go to the Crawling&Indexing section of the SE Ranking’s Issues Report.

Clicking on the respective page count takes you to a full list of URLs marked as noindex or blocked by robots.txt. It also shows other important parameters such as the number of internal links pointing to the page, all robots meta tags and x-robots tags, and page titles. You’ll also immediately see whether each page is currently included in your XML sitemap.
If you’re not an SE Ranking user yet, you can test the platform out for free with our 14-day trial.
Non-canonical pages
A canonical tag is used to indicate which of two or more similar pages is the primary one. Google’s job is to index and rank the preferred page and ignore duplicate or near-duplicate ones. Similar pages marked with canonical tags can have either completely different URLs or similar URLs (e.g. URLs generated in the process of sorting and filtering, URLs with UTM tags and tracking parameters).
Sometimes, canonical tags are also used to ensure a page is accessible through both HTTP and HTTPS, as well as with and without the www prefix. In this case, the main version of the page (for instance the HTTPS non-www variation) is marked with rel=canonical. Most websites, however, prefer server-side redirects. This is because they are more straightforward and are guaranteed to ensure only the preferred website variation gets indexed.
Canonical tags work differently than redirects and are more like recommendations than directives. Google can also follow or ignore them. This is why having non-canonical URLs in your sitemap can be confusing to search engines. If the page is not marked as canonical, Google will assume you don’t want it to be indexed. At the same time, adding the page to your XML sitemap encourages Google to index the page. This will cause Google to index all page versions, leading to keyword cannibalization.
See our guide on keyword cannibalization to learn how it hurts your site’s performance. You’ll also get tips and tricks for detecting and preventing it.
The search engine may also index the non-canonical URL, further highlighting why it’s important to make it crystal clear which page is the primary one.
Static vs dynamic sitemaps
By now you may be wondering how much time you would need to spend on updating your sitemap whenever you publish a new page or revamp an existing one. Keeping your XML sitemap up-to-date can be difficult if you create a static sitemap. The good news is that this hassle is easy to avoid if you create a dynamic sitemap.
Dynamic sitemaps update automatically whenever you make changes to your website. For example, whenever you delete a page, and it becomes 404, the page will be removed from the sitemap. If you mark a page as noindex or add it to the robots.txt file, it will also be deleted from the sitemap. On the other hand, whenever you create a new page and mark it as canonical — it will immediately be added to your sitemap. All you have to do is set up the tool properly to ensure it generates your sitemaps dynamically.
The dynamic sitemap is a perfect solution for keeping your sitemap up-to-date because it’s created every time a search engine requests it. But since it can put additional load on the server, we only recommend its use for bigger sites with frequent updates.
Combining image, video and news sitemaps
Your site content may occasionally fall into multiple categories, such as news articles with embedded images and videos. You can tackle this by combining image, video, and news sitemaps into one large file.
To do this:
- For each sitemap you want to use in a shared sitemap, specify the corresponding namespace declaring the supported tags. This is done using the xmlns attribute in the urlset tag.
- To combine sitemaps, add the tags from the desired sitemaps, one after the other, to the appropriate <url> tag, as described in each sitemap documentation.

Refer to the Google Documentation for more details.
Adding a sitemap to the robots.txt file
Adding a reference to it in your robots.txt file is the safest and easiest way to inform search engines about your sitemap. The robots.txt file is typically rooted in the root directory of your web server, so all you have to do is include the sitemap command, as shown in the screenshot below.

This practice helps search engines discover your website and understand it more efficiently, making it easier to see and index your web pages.
Although making your sitemaps public in the robots.txt file is useful for indexing, they can be easily found by anyone. This can be an issue if you want to keep those pages away from the public eye.
To learn more, refer to our comprehensive guide on how to create a robots.txt file.
How to submit your sitemap to Google
Depending on the tool used to generate your sitemap, you may need to manually add it to your site, or it might already be in place—this is often the case for dynamic lists generated by a CMS. Normally, when an XML sitemap is automatically added to a website, it can be found at yoursite.com/sitemap.xml.
If you used a tool to generate your XML sitemap file, manually upload it to your website’s root folder. Use your cPanel or an FTP client, for example, Total Commander or FileZilla, to do this. Make sure to check the sitemap’s validity before uploading, especially if the file was created manually. You can use a free tool, like this one, to see if your XML sitemap is operating as intended.

Once you have a valid sitemap on your website, you can submit it to Google Search Console (GSC) through the Sitemaps report. Just click Add a new sitemap, enter your sitemap URL, and then hit the Submit button.

Check the Status column to see if Google could properly process your sitemap. If everything goes well, it will return a Success status. If the website sitemap was parsed but Google detected errors, the status will return Has errors. Finally, if Google fails to crawl your sitemap, you’ll end up with the Couldn’t fetch status.
Fix all the sitemap errors to ensure your sitemap status is Success.

In the same table of your Sitemap report, you’ll see how many URLs were discovered. It should ideally match the same number of URLs that you added to your sitemap.
Finally, click on the button with three dots to go to the Page indexing report. This will give you a better understanding of how Google crawls and indexes your site. Study the report to remove low-quality pages from your XML sitemap more effectively and add otherwise missed pages.
Common sitemap errors
Consider the following sitemap errors and how to address them:
- Invalid XML format: Sitemaps must adhere to the XML format rules. Structure your sitemap with the correct XML syntax. Use XML validators, as mentioned earlier, to validate your sitemap.
- URLs blocked by robots.txt, not accessible, or not followed: Depending on whether you want to index these URLs, you’ll have to either lift the block or remove them from your sitemap.
- Missing or incorrect URLs: Verify that all URLs included in your sitemap are correct and accessible. Check for any missing or broken links and update them accordingly. Also, include each URL’s canonical version to prevent duplicate content issues.
- Large sitemap size: If your sitemap exceeds the maximum allowed size (usually 50 MB or 50,000 URLs), divide it into multiple sitemaps and create a sitemap index file to reference them.
- Path mismatch: Ensure consistency in your sitemap regarding the presence of “www” in the URLs. If your sitemap is located at https://example.com/sitemap.xml, none of the URLs it features should include www. If your sitemap is located at https://www.example.com/sitemap.xml, all of the URLs it lists should include www.
We have a dedicated guide that covers common sitemap errors to help you resolve these issues.
Consider using the Website Audit tool to detect sitemap errors and consolidate them into a separate report. It will show you whether you have issues with noindex pages in the XML sitemap, non-canonical pages in the XML sitemap, 3XX/4XX/5XX pages in the XML sitemap, and much more.

Regularly monitoring your sitemap, evaluating its structure, and addressing any errors or issues promptly helps search engines effectively crawl and index your website.
To conclude
Congrats! You’ve finished our crash course on SEO site mapping. We also compiled all the sitemap best practices into the infographic below. Follow these best practices, and you’ll have no trouble ensuring Google can find and crawl all the high-quality pages on your site.
Bonus: Infographic on creating a proper sitemap