Exploring GA4 custom dimensions: How to set up, use, edit, and delete them
GA4’s term, Custom dimensions, refers to the attributes that can be used to collect and analyze data that the platform doesn’t track by default. This makes it possible to generate data-rich reports with insights specifically tailored to your marketing goals.
GA4 data is organized into three scopes: user, event, and item.
You can set up to 25 user-scoped custom dimensions, 50 event-scoped custom dimensions, and 10 item-scoped dimensions as standard GA4 properties. The enterprise version of GA4 (Google Analytics 360) allows up to 100 user-scoped, 125 event-scoped, and 25 item-scoped custom dimensions.
To configure a custom dimension, you first need to set up event tracking through services like Google Tag Manager and then register the logged event parameter as a custom dimension within the GA4 interface.
Upon creating custom dimensions, it will take a minimum of 24-48 hours for the platform to collect and present your data.
Since GA4 is an event-based platform, the tool will include your custom dimensions data in the majority of its reports. The most convenient places to find your custom dimensions in GA4 are (1) Events report under the Data Display block and (2) Events reports within the Engagement section. Plus, you can generate custom reports based on data collected from within these dimensions.
Even Google Analytics 4’s default dimensions give you access to good analytics insights. But is it still possible to make informed decisions with merely “good” data? Spoiler alert: not anymore.
To turn good data findings into great, you’ll need to tailor your insights specifically to your unique business goals. And configuring GA4’s custom dimensions might be one of the easiest and most effective ways to leverage insights to enrich your reports.
In this article, we’ll explore:
- What the custom dimensions in GA4 are
- The available types and scopes of custom dimensions
- Why you should use custom dimensions
- How GA4 custom dimensions differ from those within Universal Analytics.
We’ll also walk you through the step-by-step process of creating, editing, and deleting custom dimensions. We’ll then provide a list of practical tips for configuring custom dimensions to get the most out of them.
Let’s get started!
What is a dimension & custom dimension?
To begin with, let’s define what a dimension is. And more specifically, let’s also look at what a custom dimension in GA4 is.
GA4 dimensions are specific attributes/characteristics designed to categorize your data. Your dimensions can range from the traffic source and device used to the user location and transaction ID.
But simply focusing on “out of the box” data dimensions will not be of much help in most cases. In addition to generic data, businesses looking for rare insights must modify standard data collection parameters through the use of custom attributes.
Custom dimensions, as the name suggests, are manually created attributes that are tailored to the individual preferences of businesses. They provide additional context to tracked elements. For example, depending on your goals, you can set up custom dimensions like “Subscription Level,” “Content Author,” “Product Availability,” “Customer Loyalty Level,” and so on.
Now let’s look at why configuring custom dimensions is so important.
Why use custom dimensions?
Now that you know what custom dimensions are, you probably already have a good idea as to why using them is so essential; to get more in-depth data that’s tailored to individual business needs. But there’s so much more to unpack. Let’s look at the potential benefits of custom data analysis.
Here are some basic use cases:
- User segmentation: By configuring custom attributes based on different audience segments (e.g., demographics or behavior), you can track how particular user groups interact with your website. This helps you refine your marketing strategy and maximize SEO ROI.
- Campaign tracking: When running several marketing campaigns at once, you can identify the campaigns driving traffic and which ones aren’t.
- Event tracking: Custom dimensions can provide additional context into the event tracking process. For instance, when tracking basic ecommerce metrics like the shopping cart abandonment and bounce rates, you could create custom attributes for the user’s membership level, geographic location, or preferred product category.
Here are some specific examples of how marketing agencies can benefit from GA4’s custom dimensions:
- Agencies working with e-learning companies can use custom dimensions to track their clients’ online course completion rates. This can help them discover which courses are most effective at engaging students and which ones are not performing well.
- Agencies specializing in marketing to healthcare professionals can use custom dimensions to track their clients’ medical webinar performance. By focusing on webinars that are highly effective at engaging the right audience, these agencies can produce similar webinars on an ongoing basis to replicate their success.
When using GA4 for SEO purposes, you can set up custom dimensions to gain valuable insights for keyword research (keyword group, keyword match type), user journey analysis (entry page, pageview count, time on site), content audit (content type, date of content’s last update), and many other tasks.
Though using analytics tools should be an integral part of your SEO strategy, it’s difficult (not to say impossible) to perform a data-driven analysis that provides deep insights without adding advanced SEO tools like Site Traffic Checker.
By coupling data provided by rank tracking tools like this with GA4 insights, you can achieve significant results on the SERPs. This data might include organic traffic, total traffic cost, keywords driving your audience along with essential SEO metrics, and competitors’ SEO and PPC strategies.
If you prefer not to switch between different tabs, you can integrate GA4 with SE Ranking. This gives you the option to see all the essential data highlights for making well-informed marketing decisions, all within one interface.
Types and scopes of GA4 custom dimensions
There are two types of dimensions in GA4: predefined and custom.
Custom dimensions can have three scopes (characteristics describing what each dimension applies to): event scope, user scope, and item scope.
- Event-scoped custom dimensions
Since GA4 is generally based around events, it’s no surprise that event-scoped (also known as hit-scoped) custom dimensions are its primary focus. You can use these dimensions to track any activity that’s essential for your marketing goals, including page views, downloads, button clicks, etc.
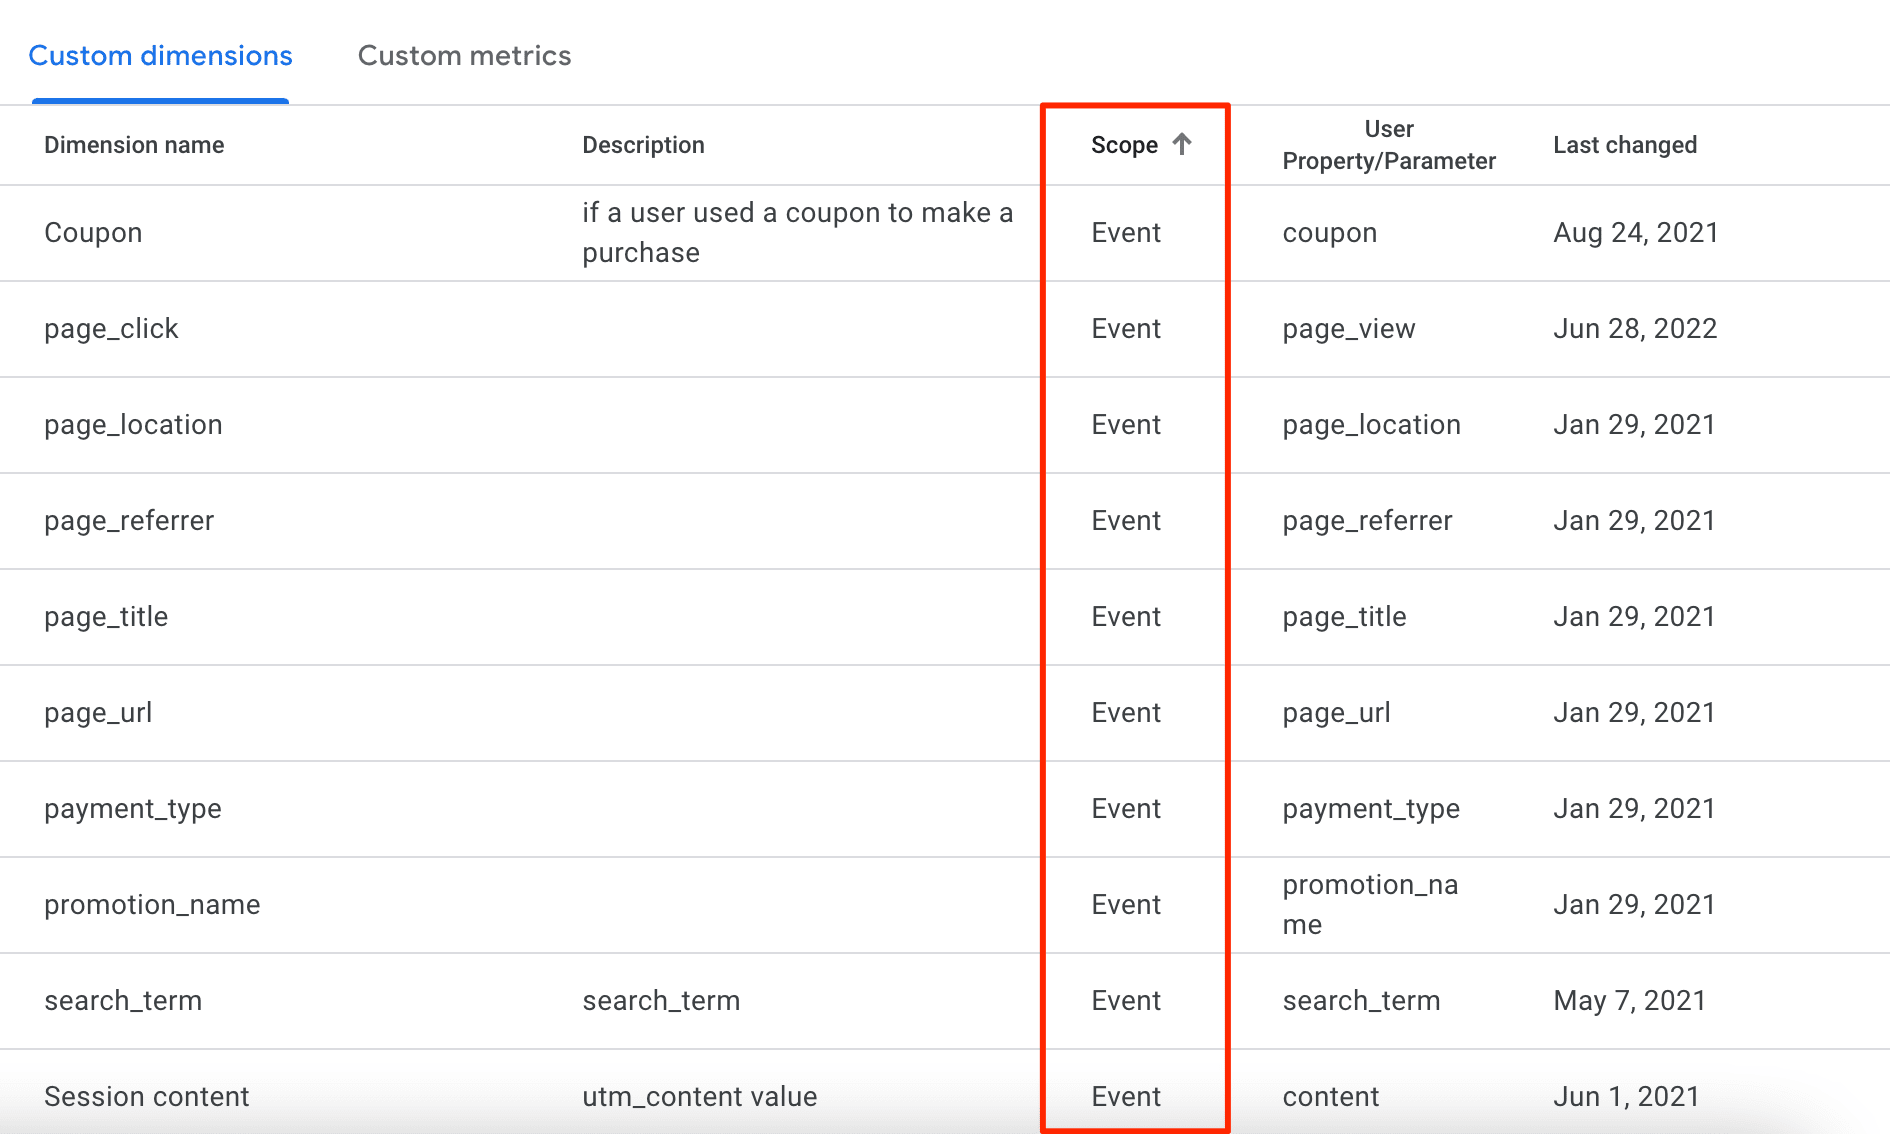
If you’re running an online store and want to go beyond generic metrics, check out our GA4 e-commerce guide. It walks you through configuring ecommerce-specific tracking in GA4 to unlock deeper insights into user behavior, transactions, and revenue performance.
- User-scoped custom dimensions
Basically, user-scoped custom dimensions have a value that is calculated and sent once for each user. This could include anything from the user’s age, gender, and interests, to any other segmentation-oriented parameter for your audience.

- Item-scoped custom dimensions
Finally, item-scoped custom dimensions are especially useful for expanding your reports with additional insights on products on your website or app. For example, you can use these parameters to gather data on the product’s color, size, rating, or status.

Custom dimensions in GA4 vs Universal Analytics
As you make the shift to GA4, you’ll notice many differences in terms of the functionalities offered by it. Let’s begin by focusing on custom dimensions and explore how this feature makes GA4 different from its previous version, Universal Analytics.
- Different scopes
While Google’s new GA4 operates solely on user-scoped, event-scoped, and item-scoped custom dimensions, Universal Analytics lets you define the scope of your hit, session, user, or product.
Switching to GA4 means you’ll have to adjust your dimensions to fit within the corresponding scope. For instance, to migrate your session-scoped dimensions from Universal Analytics, make sure to set them up as event-scoped in GA4.
- Different processes for creating custom dimensions
In terms of GA4, the process of creating custom parameters is based on two main steps:
- Sending an event parameter along with an event.
- Registering the logged event parameter as a custom dimension in the user interface.
In contrast, you had to perform the following when creating custom dimensions in Universal Analytics:
- Setting the name and scope of the custom dimension in the user interface.
- Writing a code to send the values of the custom dimension to the report.
How to configure a custom dimension in GA4
Having a GA4 account is a given. You’ll need it to create custom dimensions and track business-specific insights. If you don’t have one yet, here’s a complete guide on how to set up GA4 correctly.
If you already have one, you can proceed to the most interesting part, configuring custom attributes.
Setting up GA4 custom dimensions
How many steps you’ll need to follow when setting up custom dimensions will largely depend on the type of dimensions you plan on creating (event-scoped, user-scoped, or item-scoped).
Let’s go over the basics of configuring the most common type of custom dimensions—event-scoped.
Before you can gather data on particular events, you’ll first need to set up tracking with the help of Google Tag Manager.
Here’s how to do it:
- Log into your Tag Manager account. If you don’t have one, make sure to install and set up Google Tag Manager first.
- Add a new tag and set up the event.
The second step might seem complicated at first glance, but don’t worry! We’ll break it down step-by-step so you can follow along easily.
Click on Add New Tag at the top of Tag Manager’s Overview page.

Then, add a name to your tag and navigate to the Tag Configuration section.
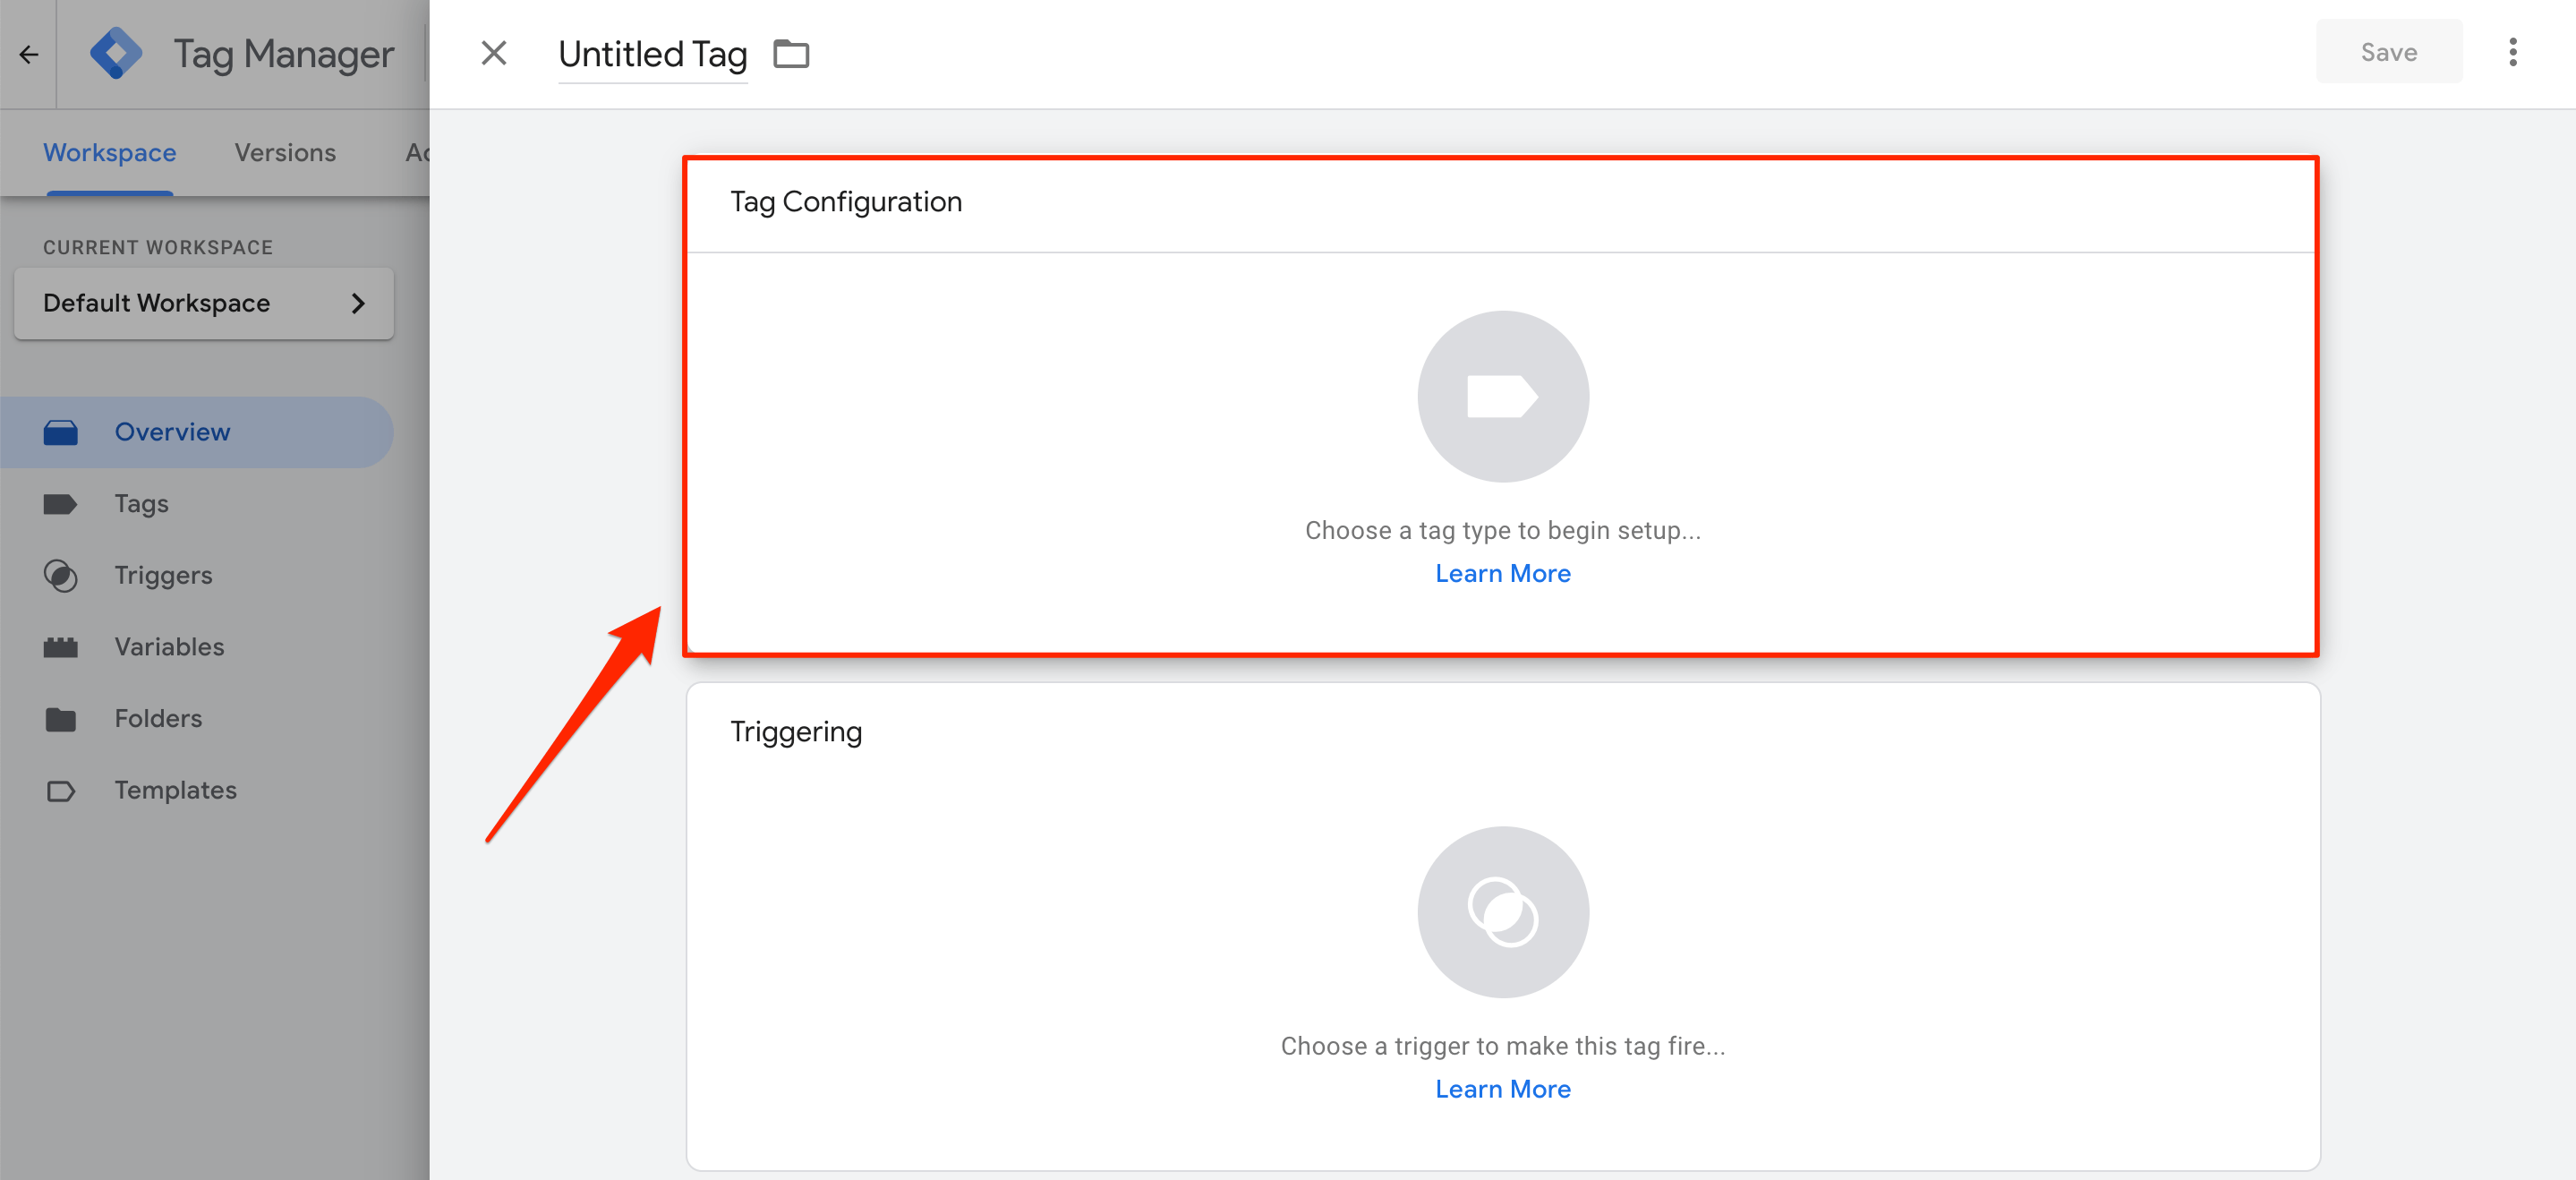
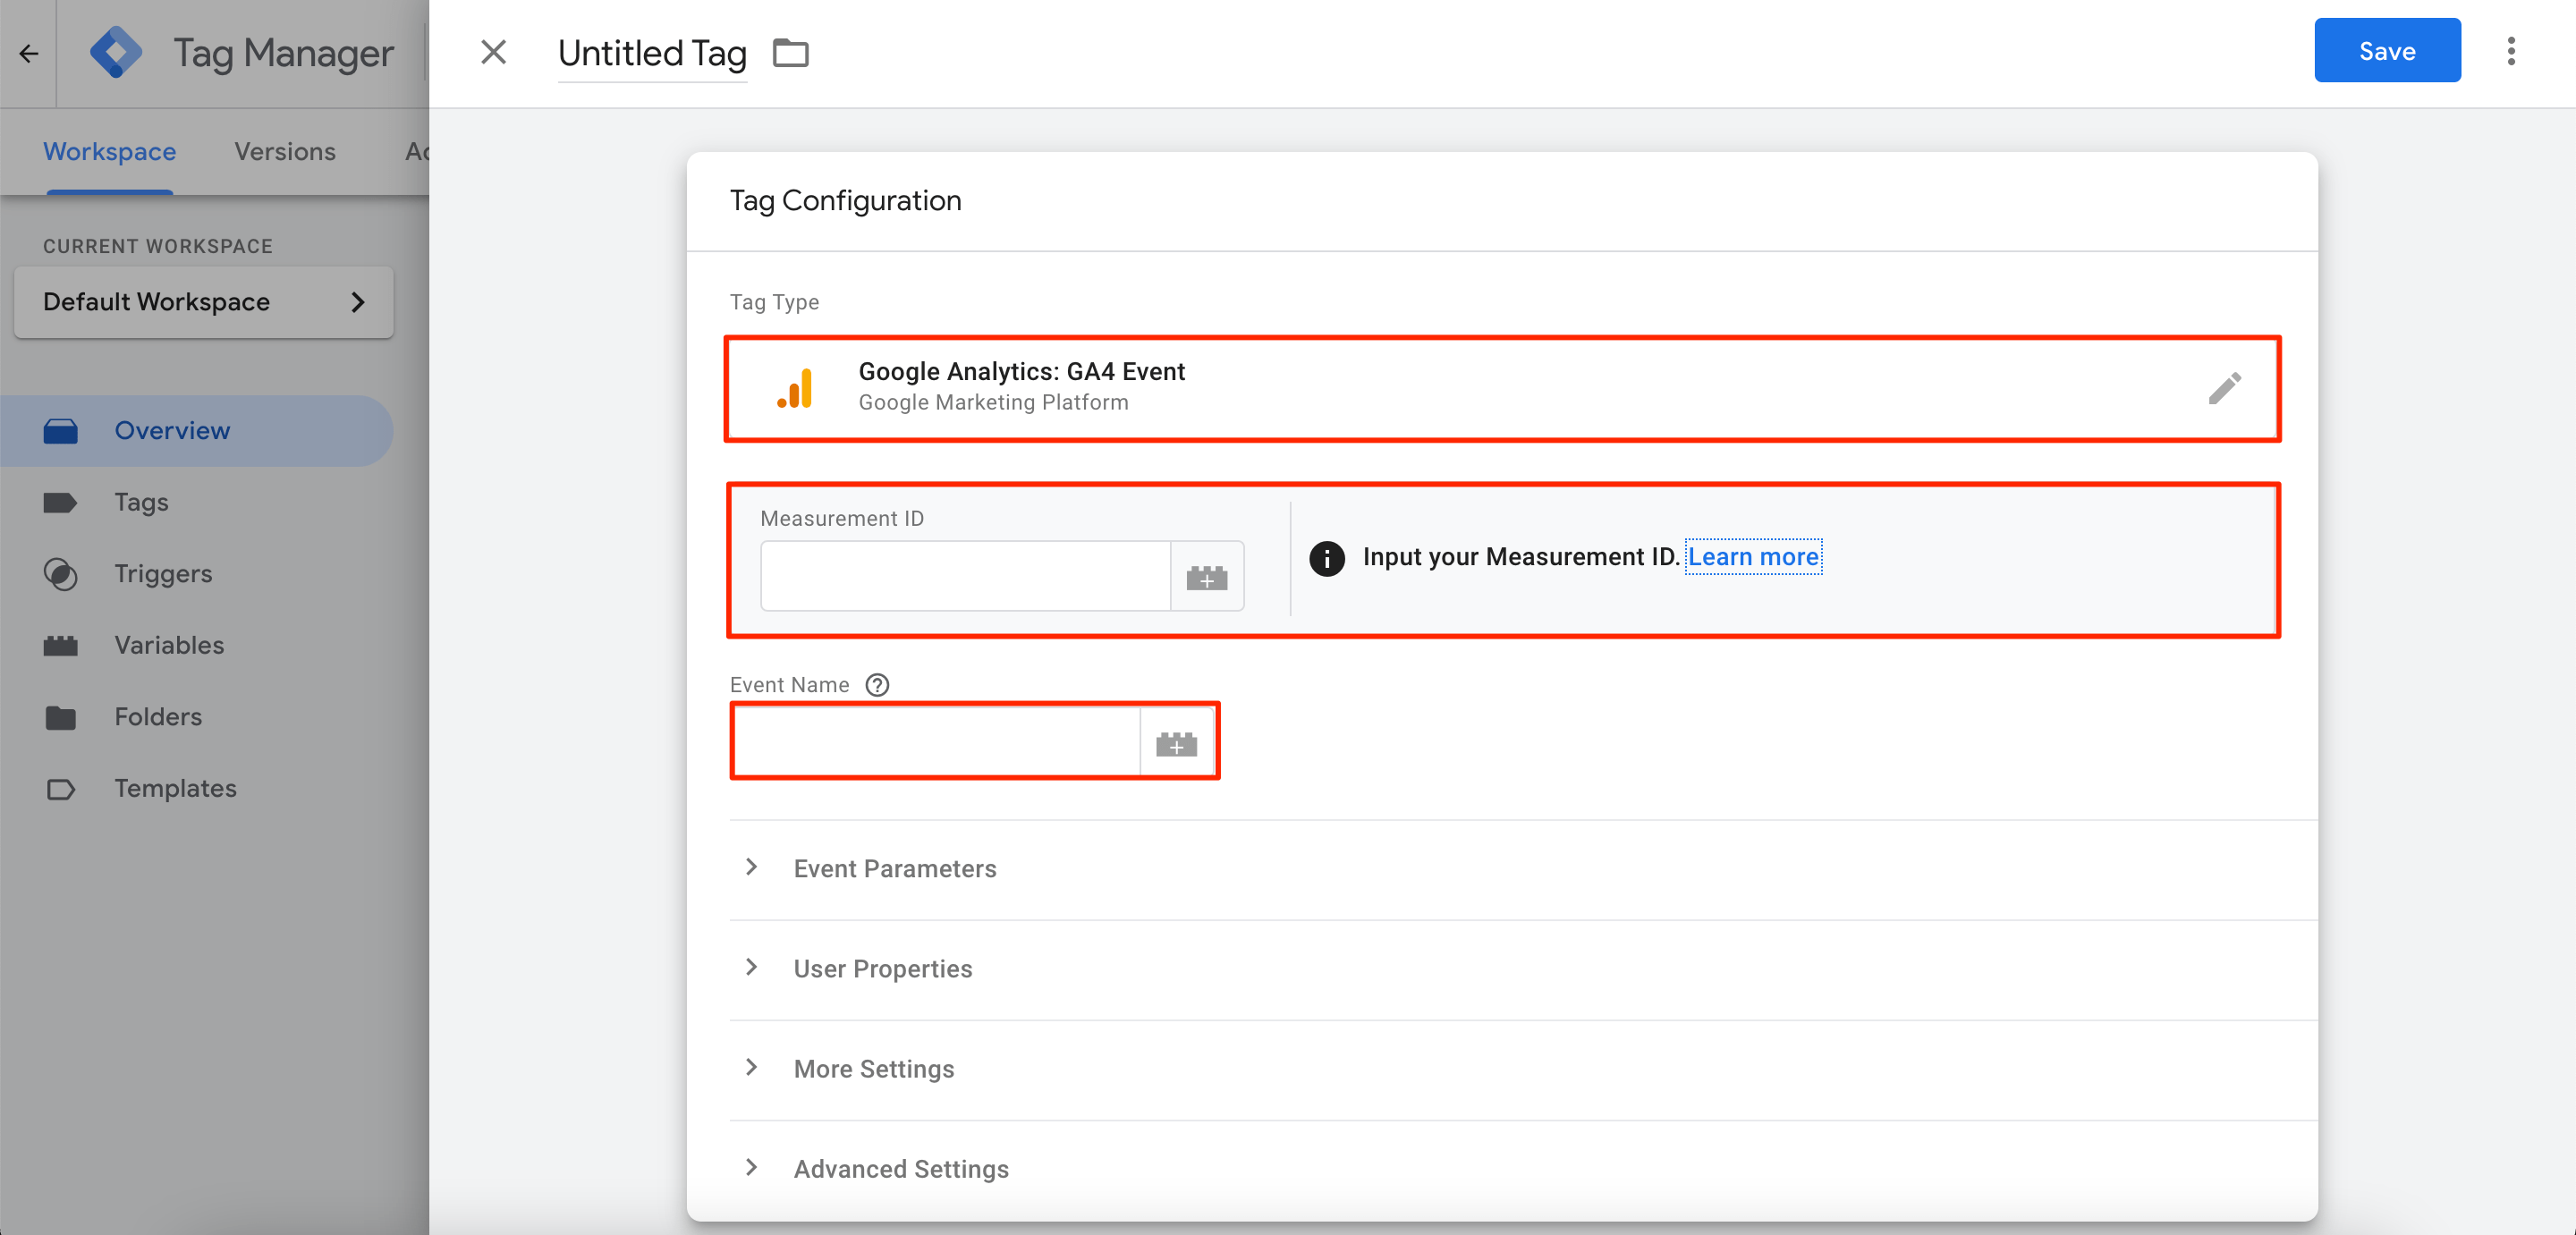
From here, select the Google Analytics: GA4 Event tag type, and then enter the Event Name and Measurement ID of your GA4 property.
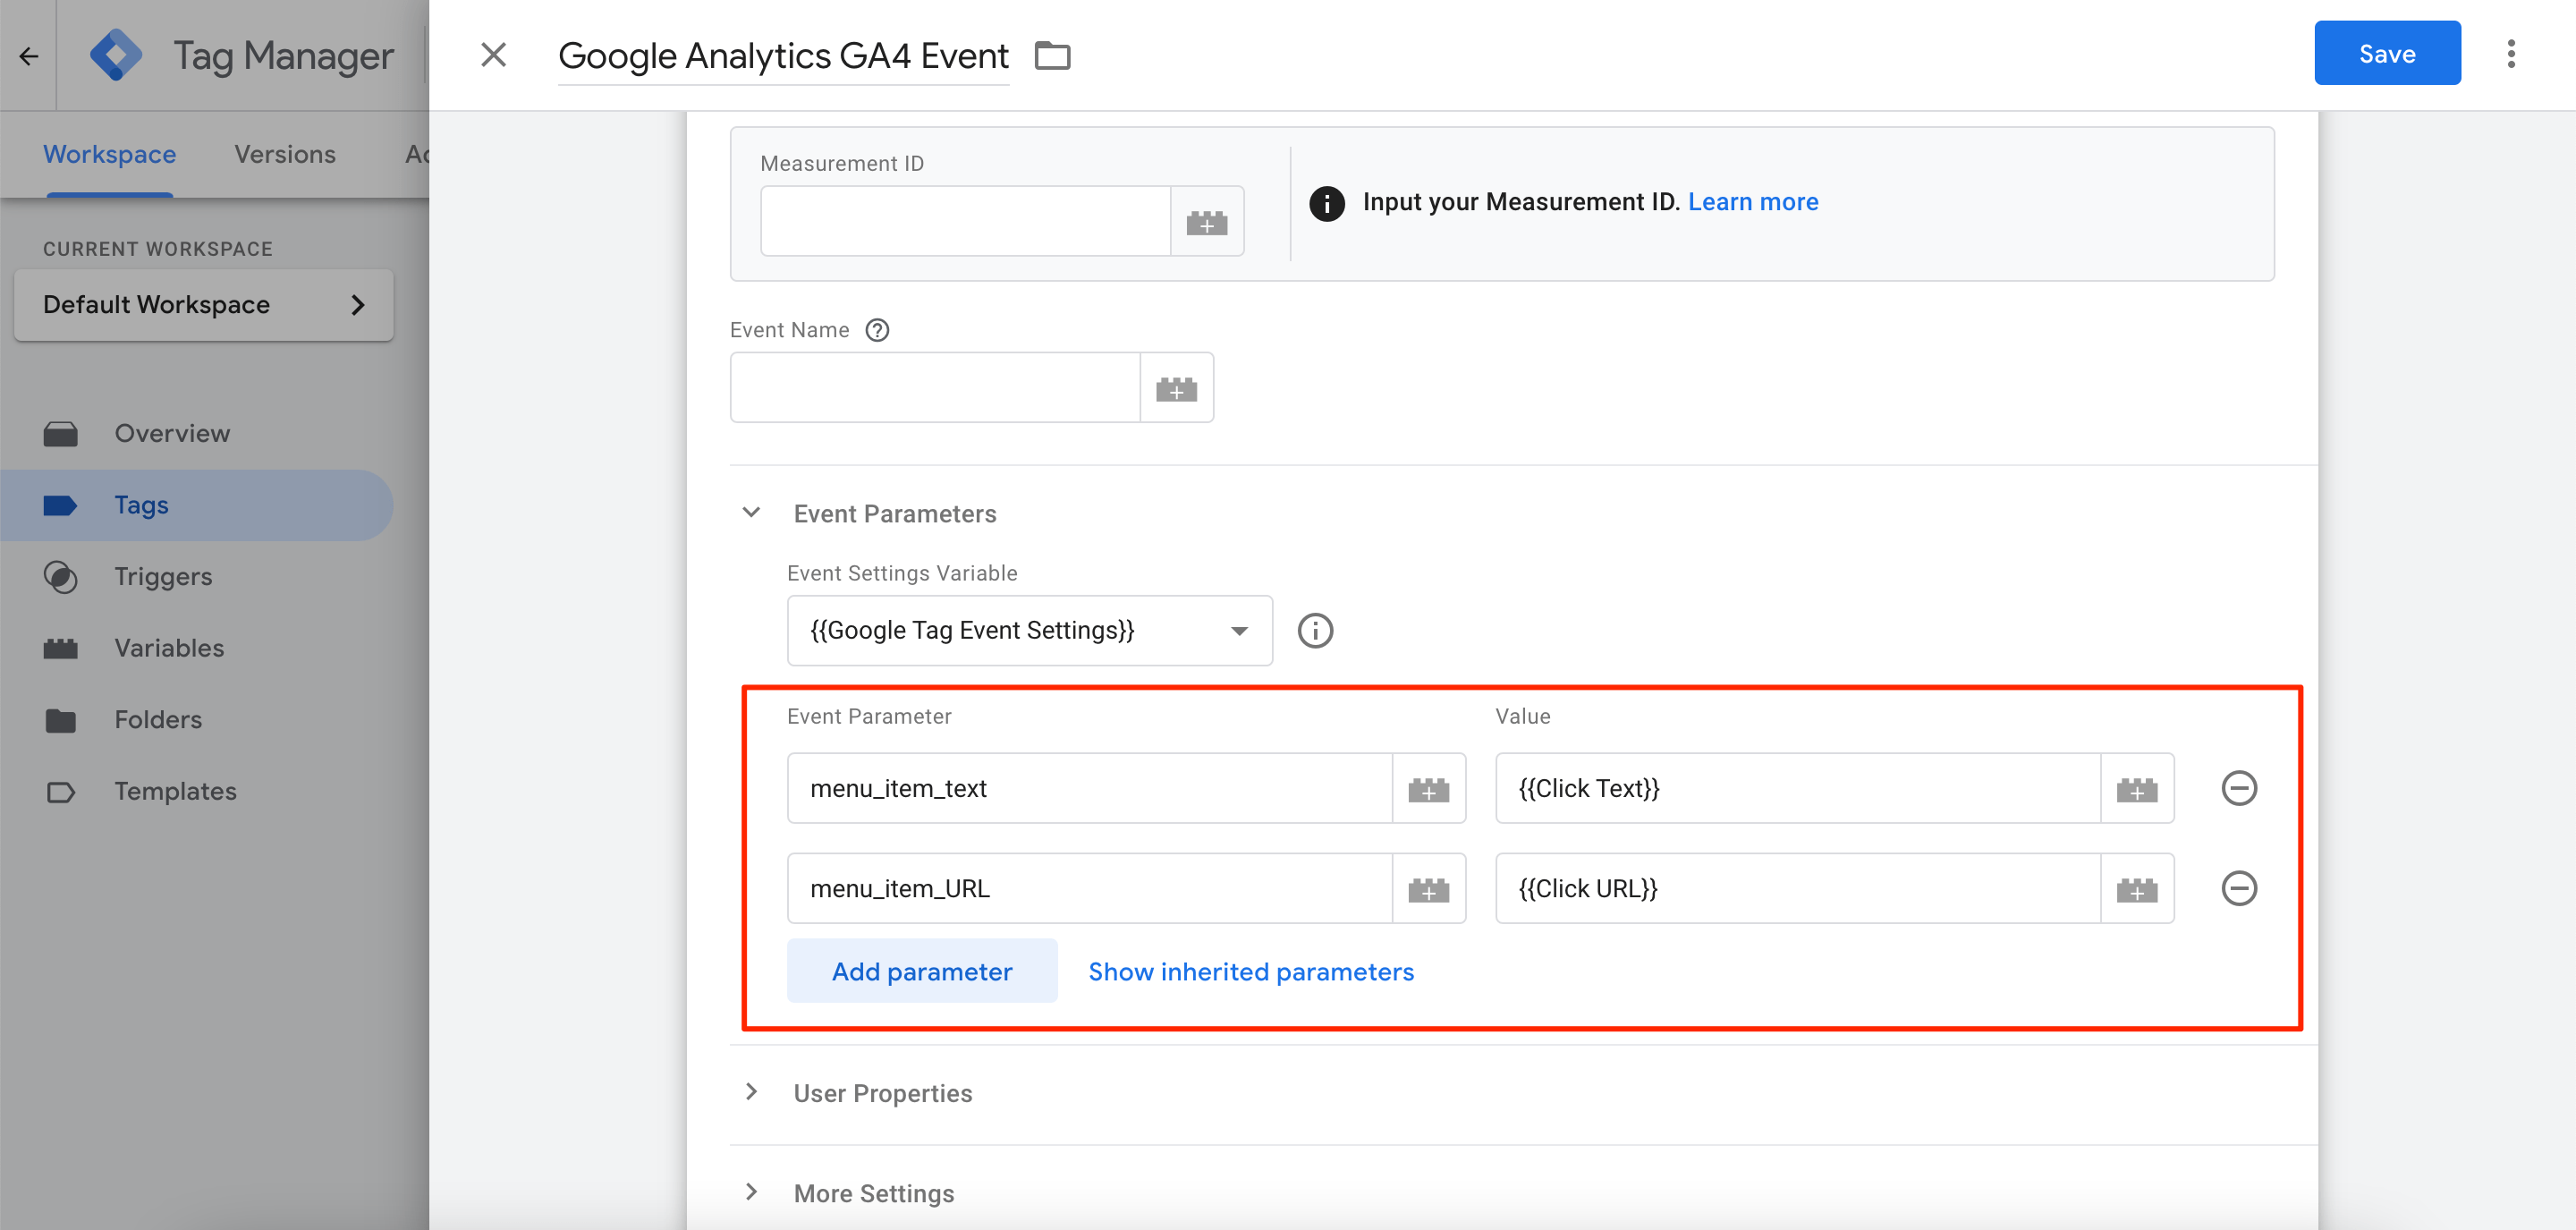
Now, click on the Event Parameters section and add the events you want to track.
After completing the step above, go straight to the Triggering section.
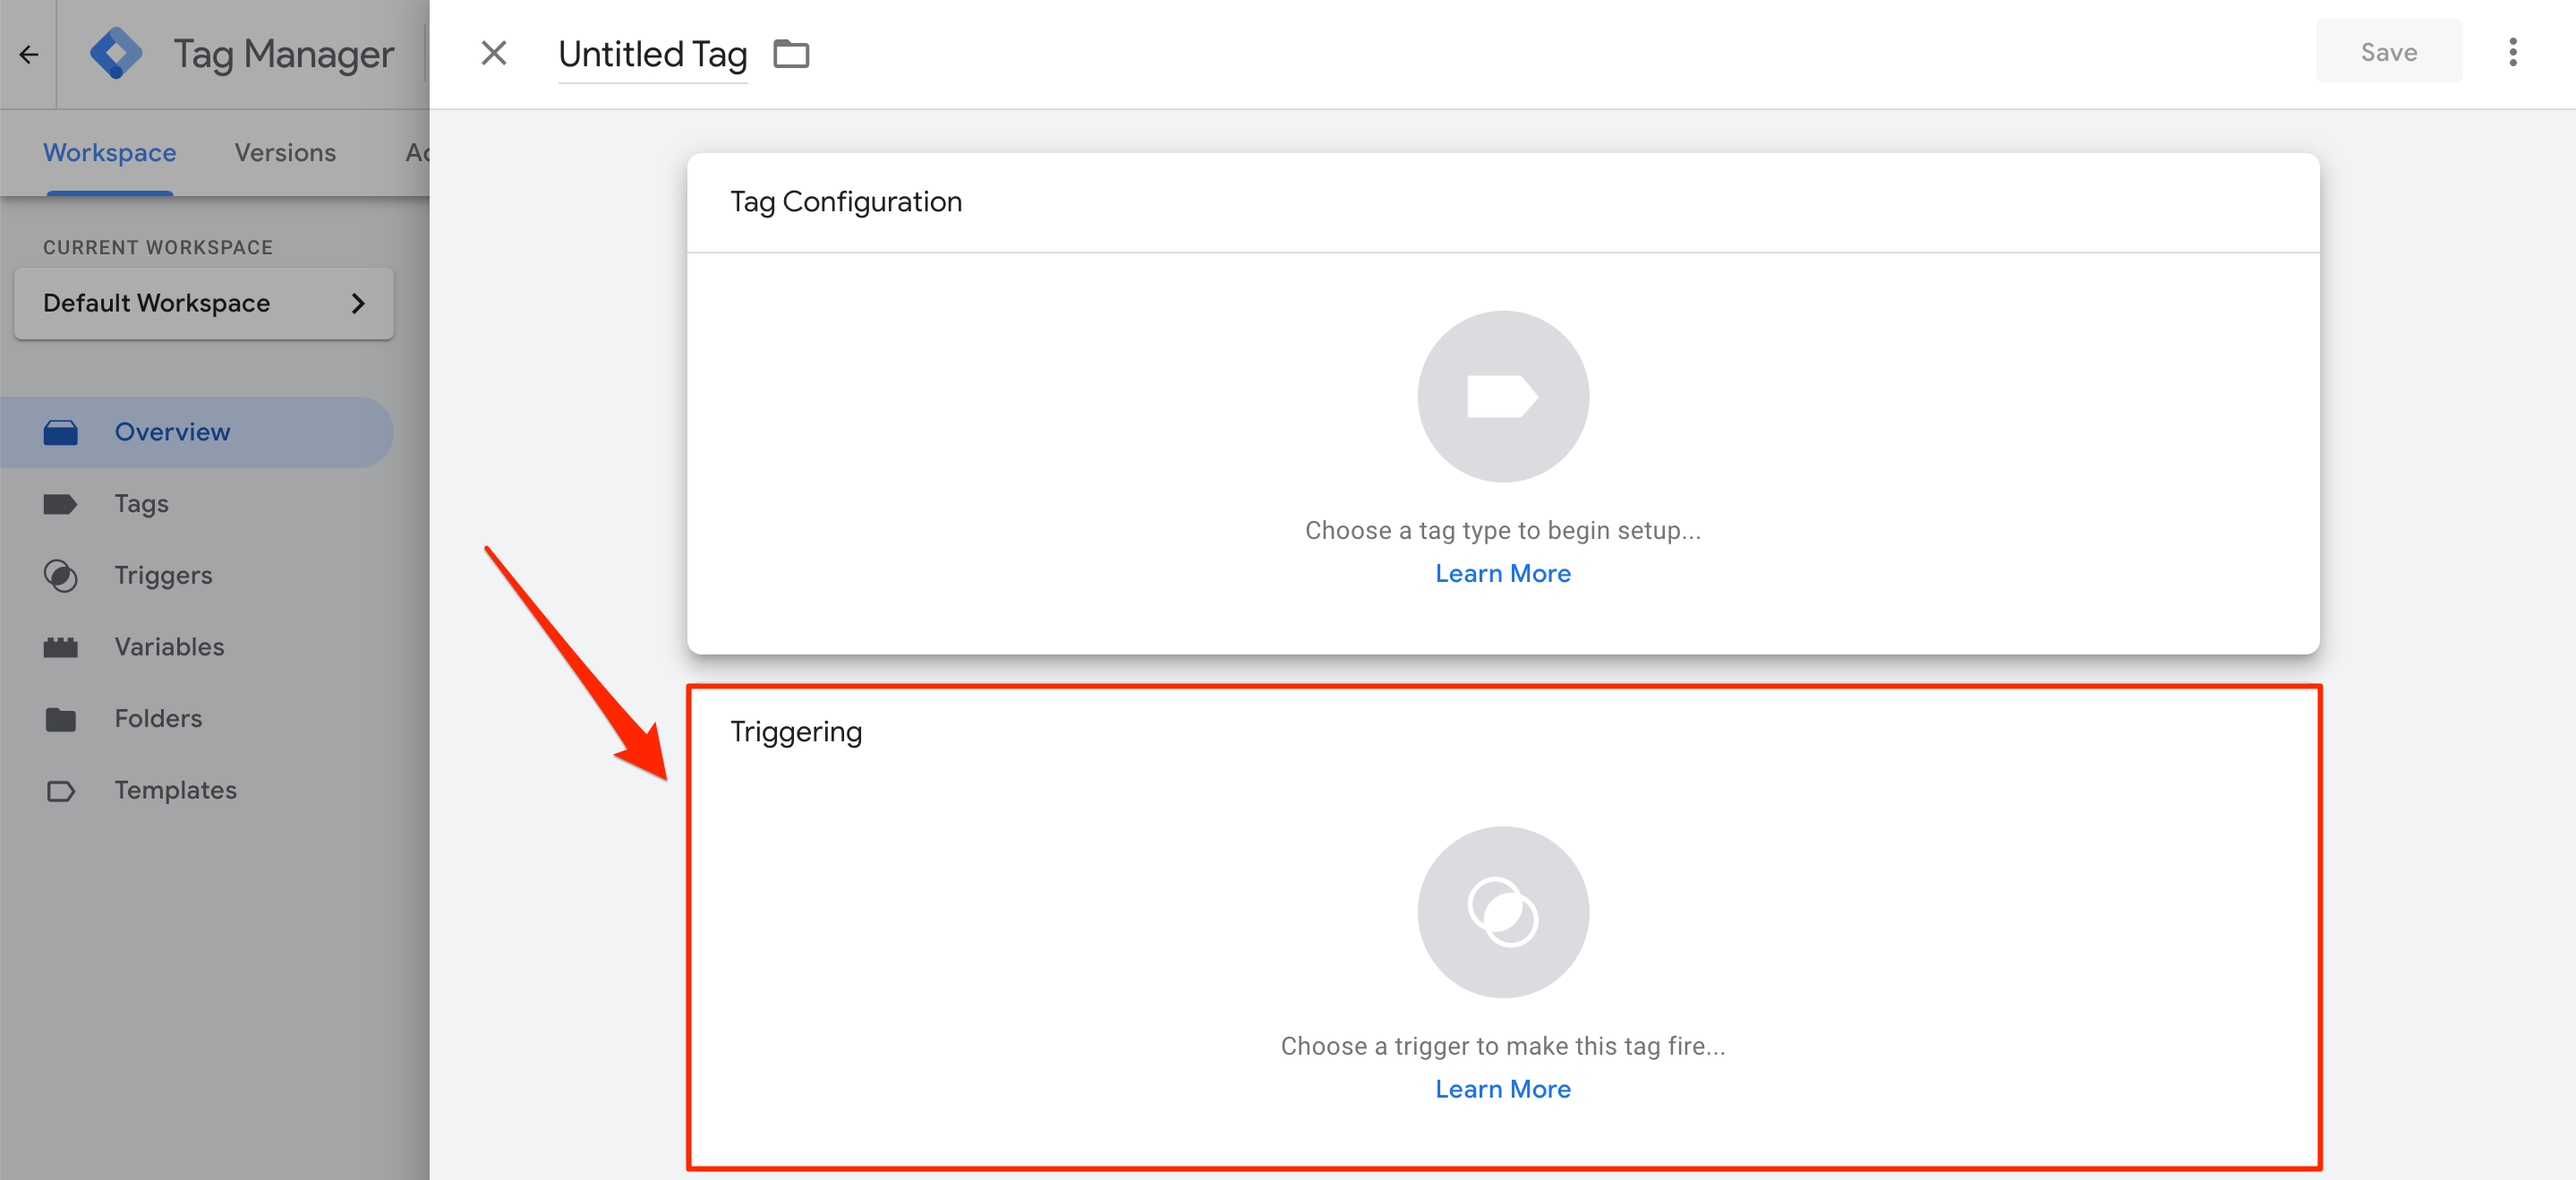
Create a trigger with appropriate conditions, select the trigger type, and then confirm your decision by clicking on the Save button.
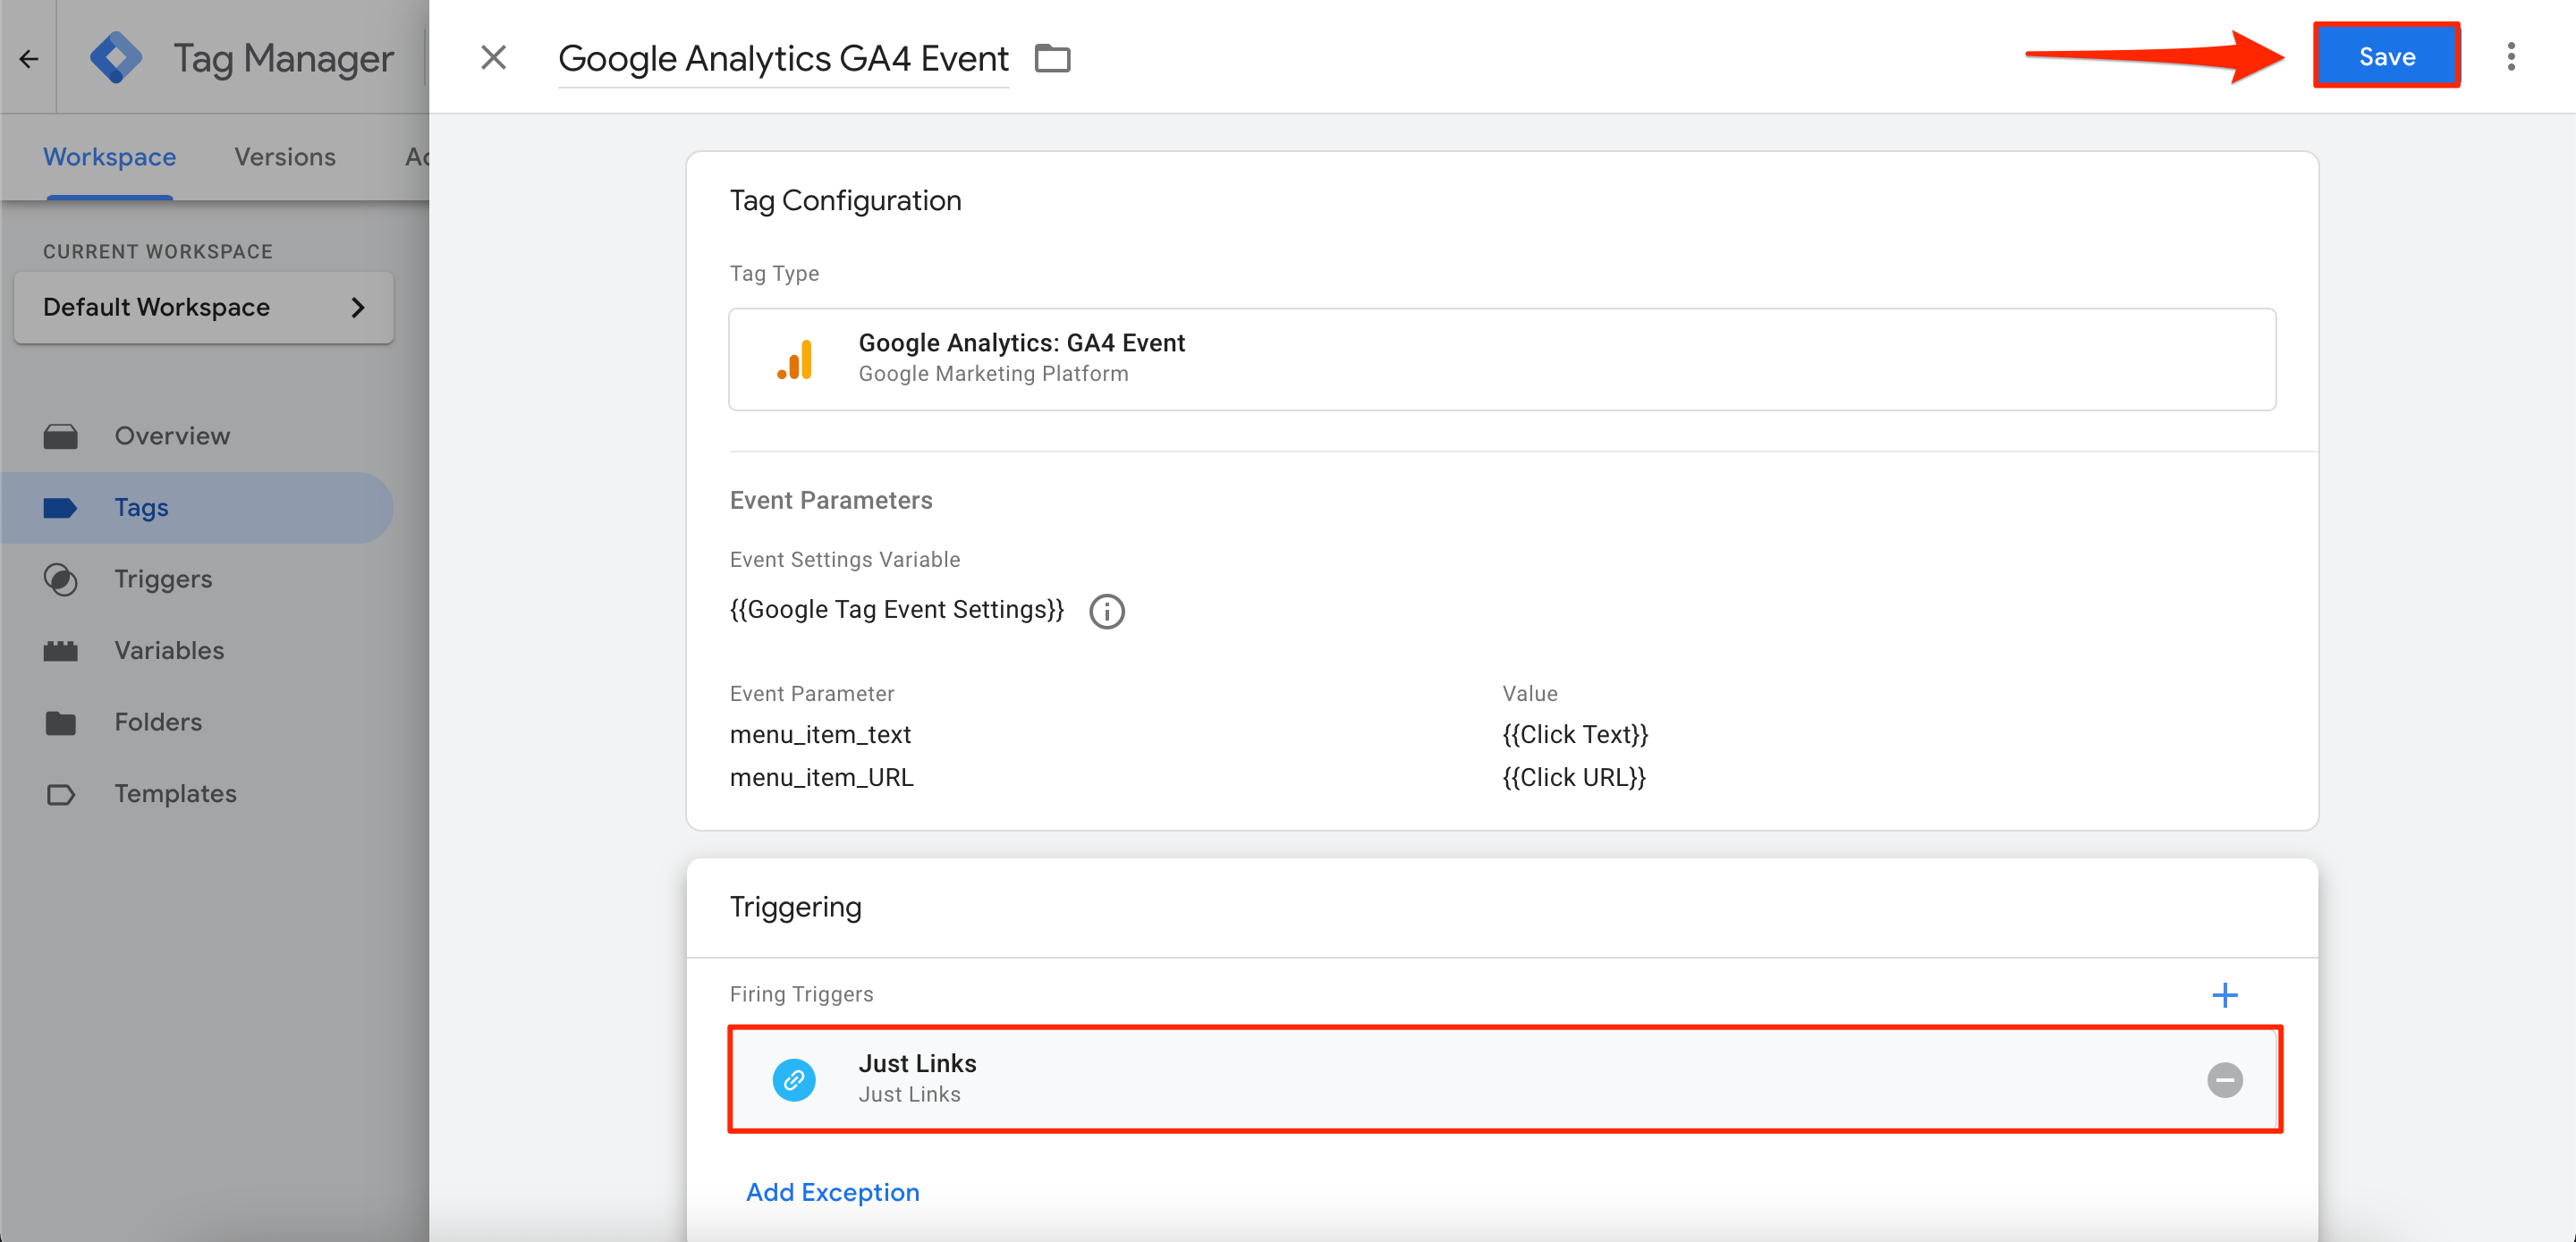
FYI: there are many built-in triggers to choose from (e.g., form submissions, scroll depth, button clicks, custom events, and more). Each of them has its own set of rules that should be followed for your tag to start firing. For instance, if you want your tag to fire on every page when the page loads, choose the All Pages option.
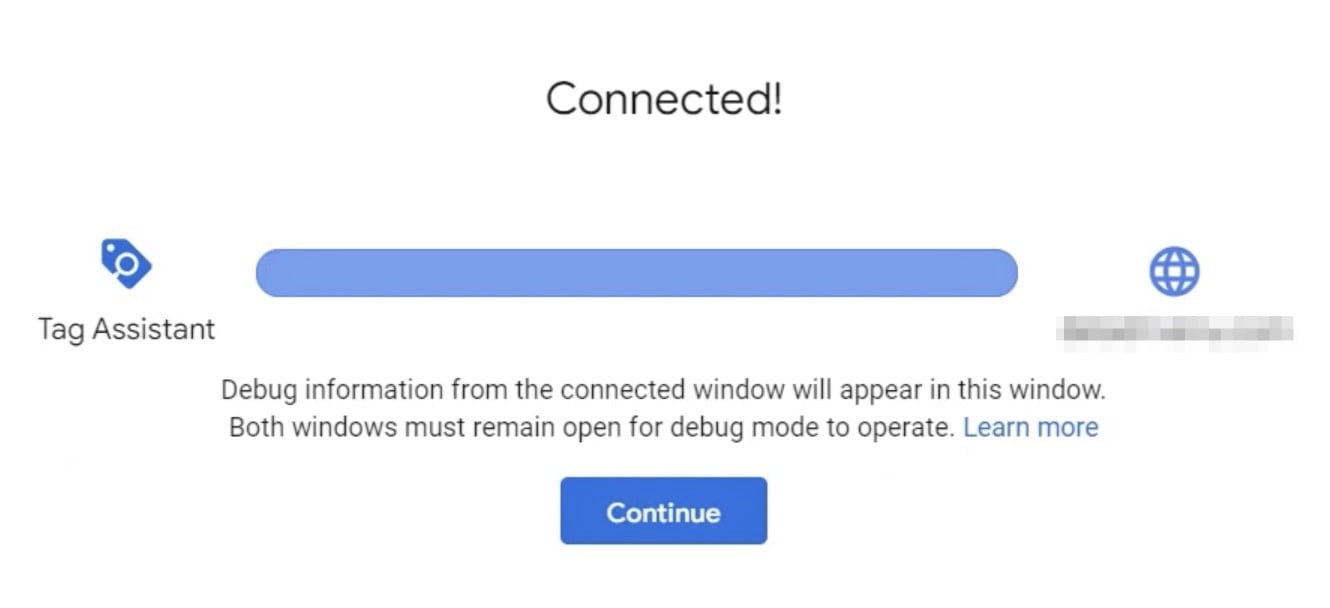
From here, go back to the Overview page and enable the Preview mode to test out implemented changes.

Connect the Tag Assistant to your site and start debugging your tags in the preview window.
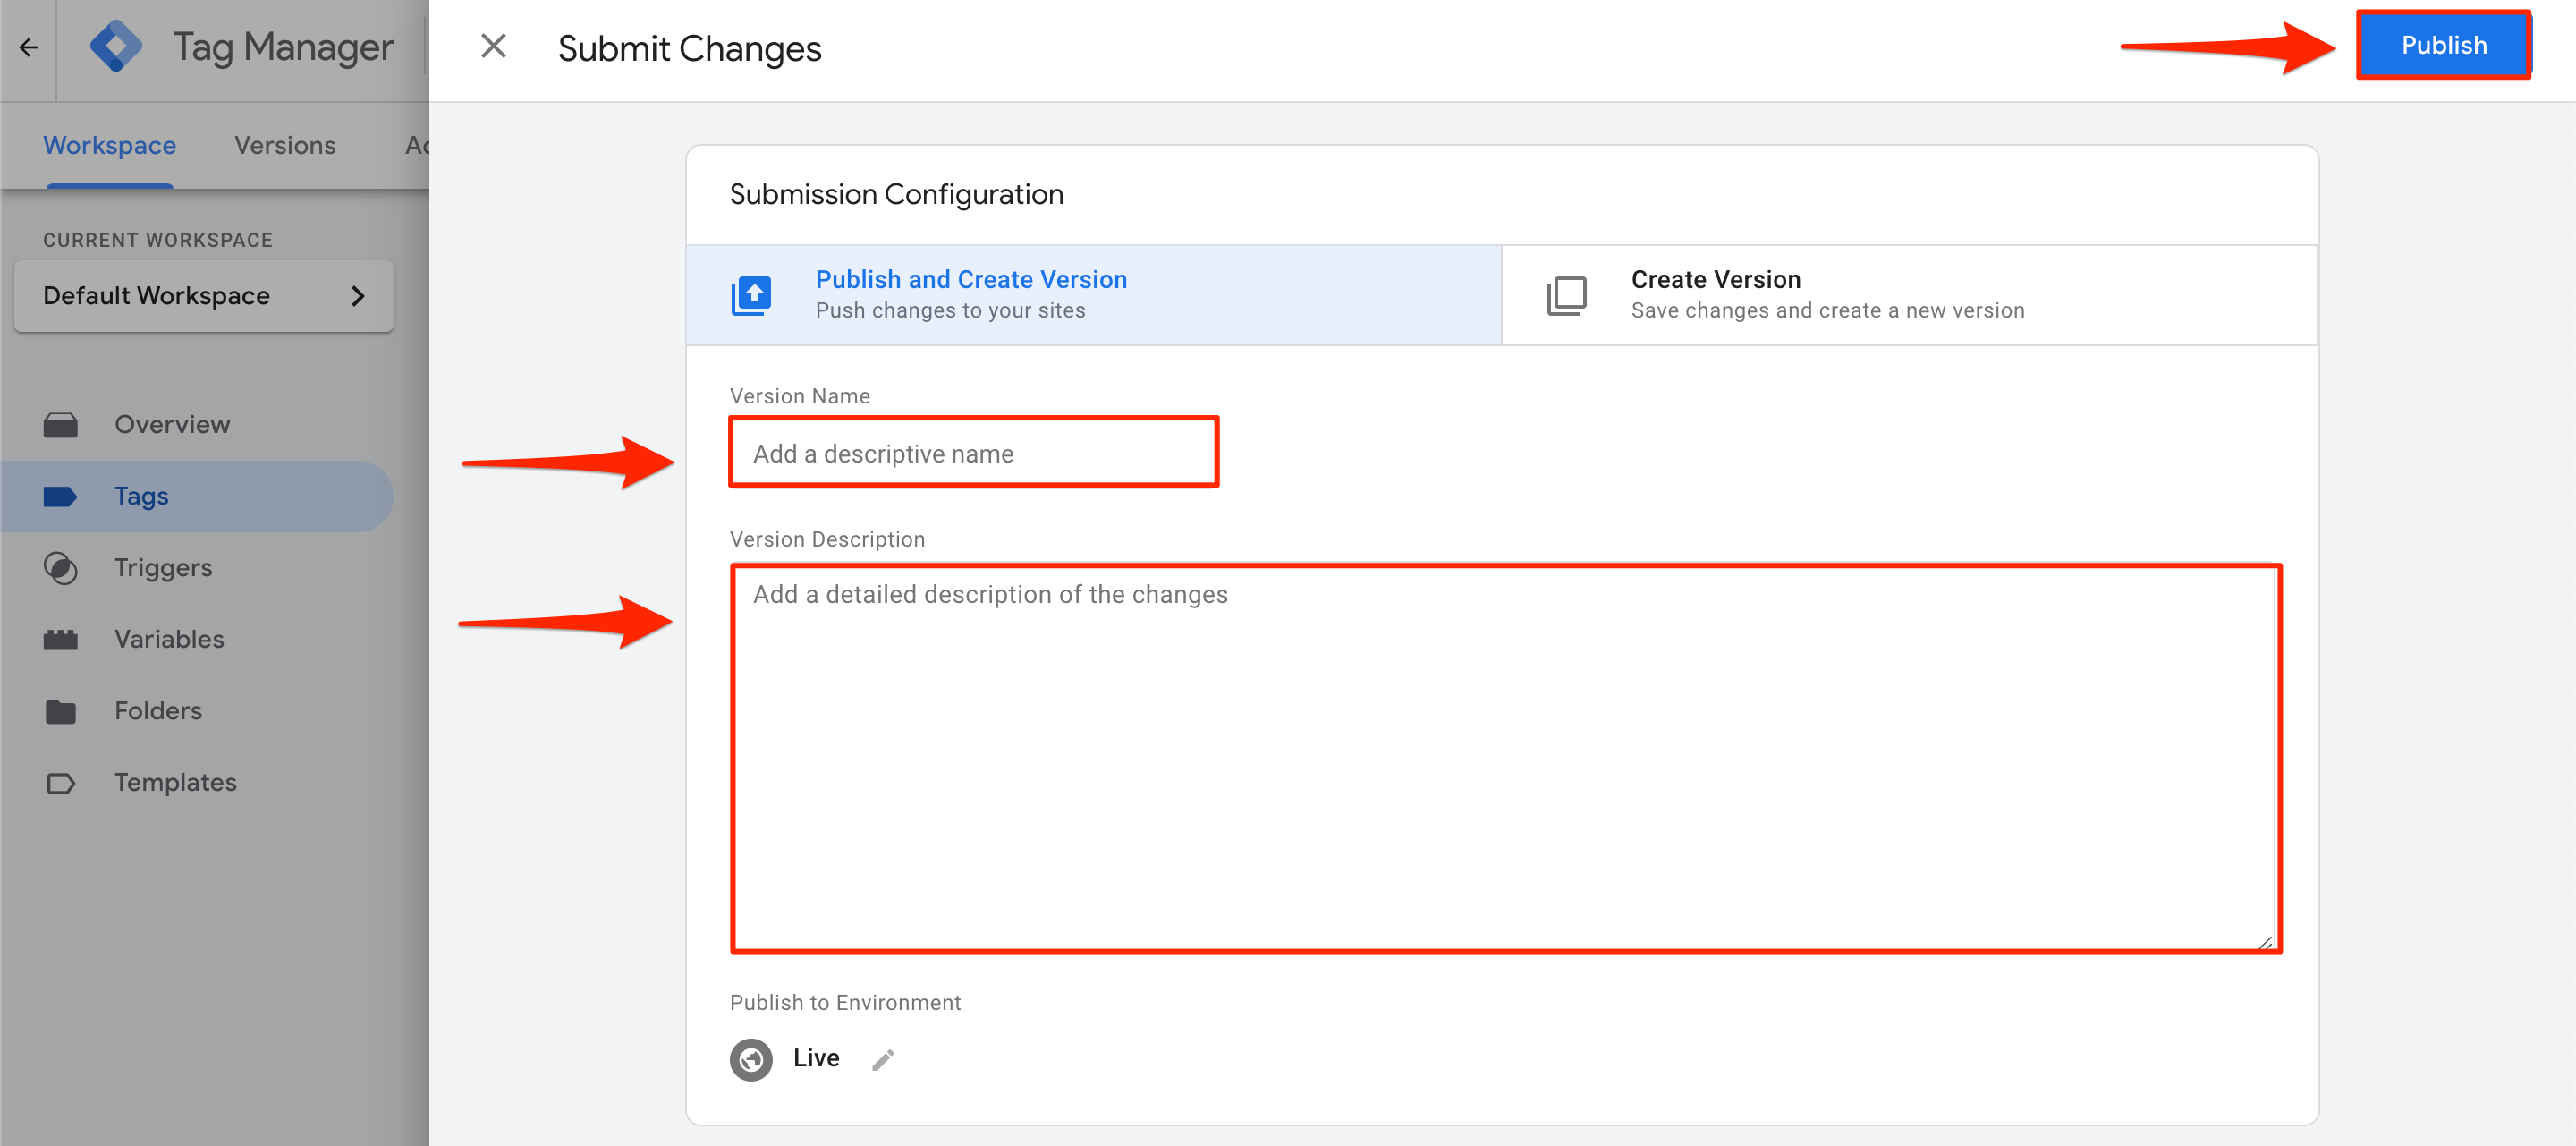
Finally, enter a meaningful Version Name and Version Description. These should be descriptive of the tracked event (e.g., these fields can reflect on your objectives).
Now submit these changes by clicking the Publish button.
Go to GA4 to register these parameters as custom dimensions.
Open your GA4 property and go to Admin > Custom Definitions.
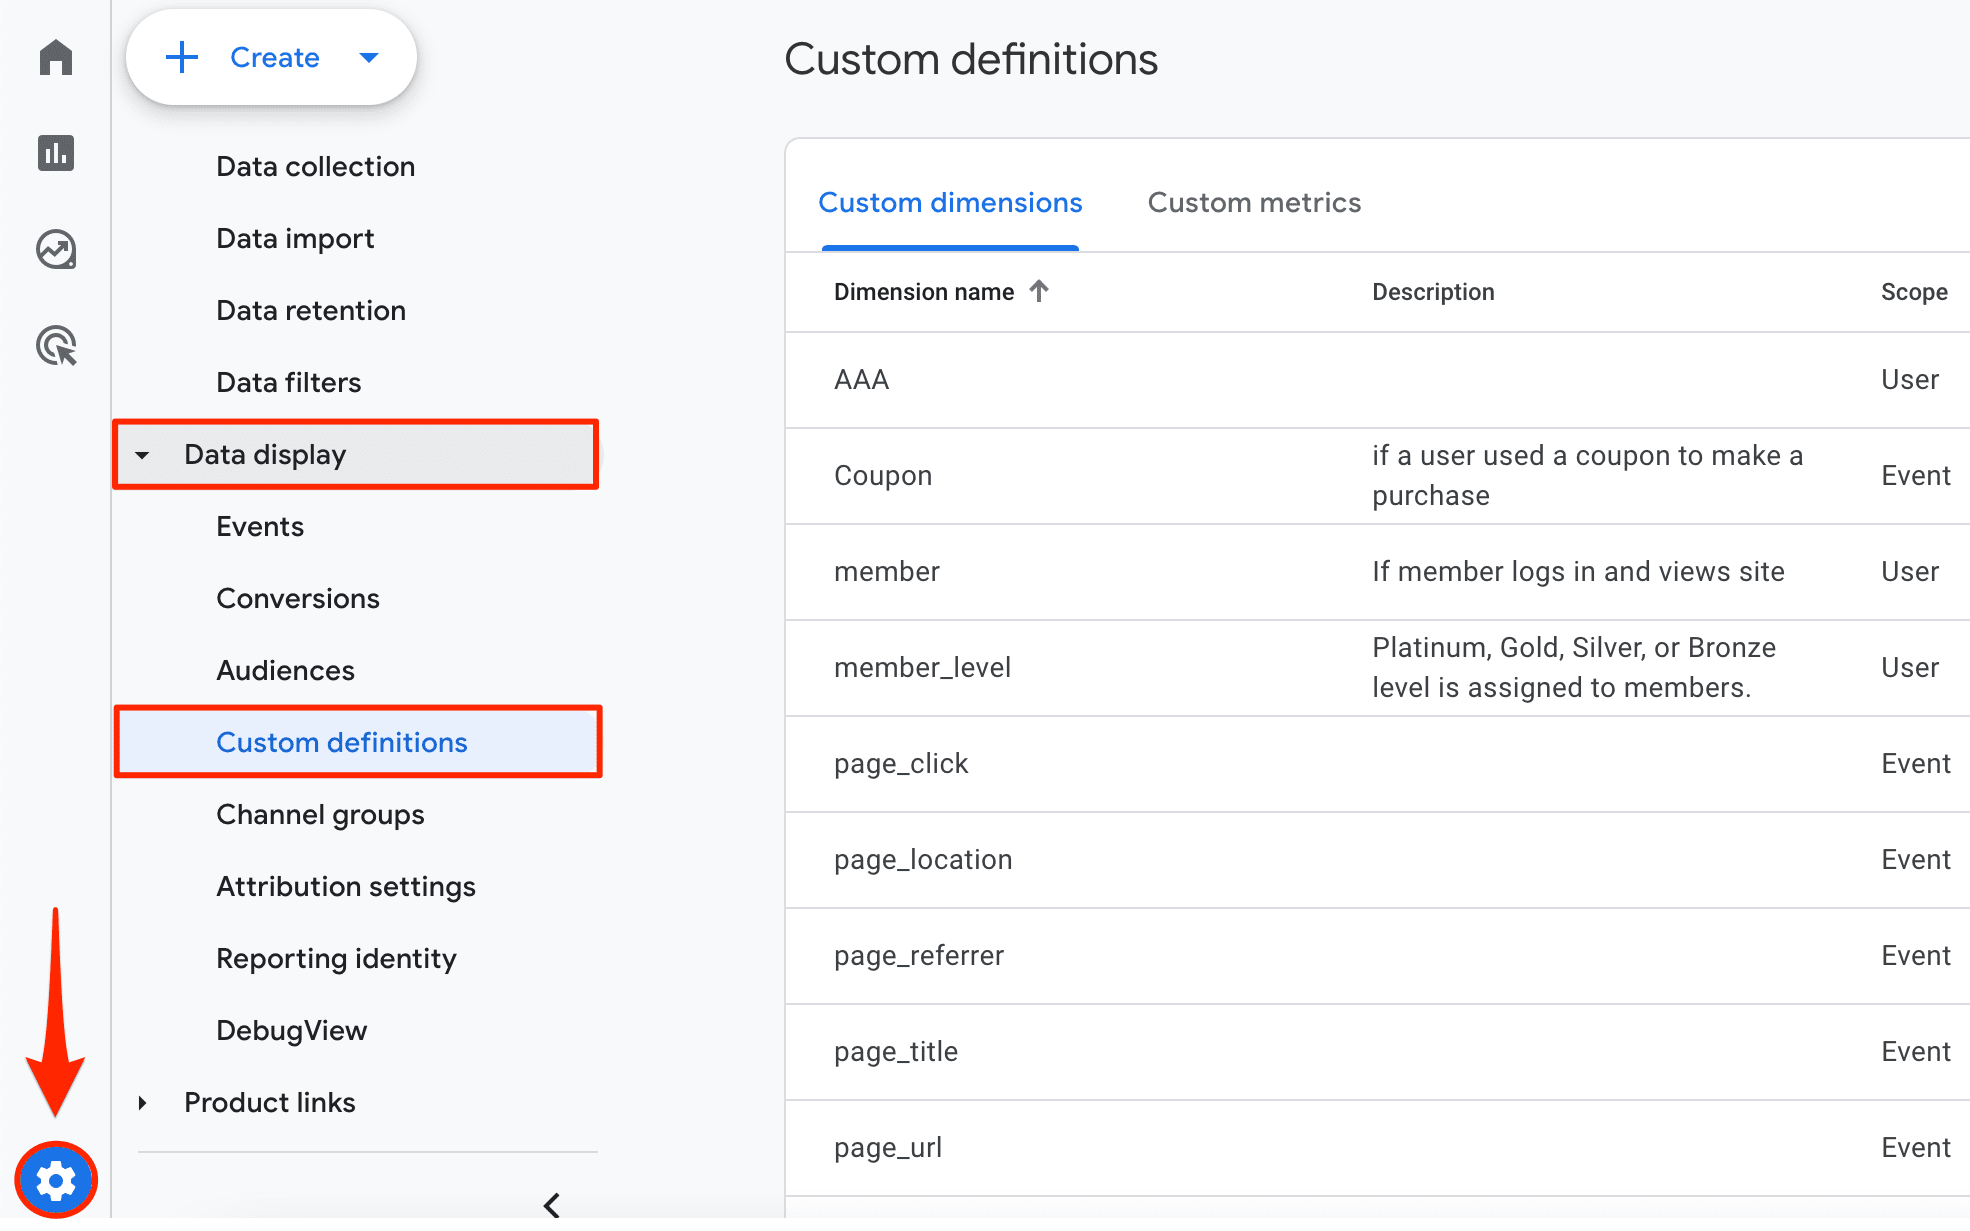
From here, choose the Create Custom Dimensions option.

Fill out all the required fields with essential data, including the dimension name, description, scope, and event parameter.
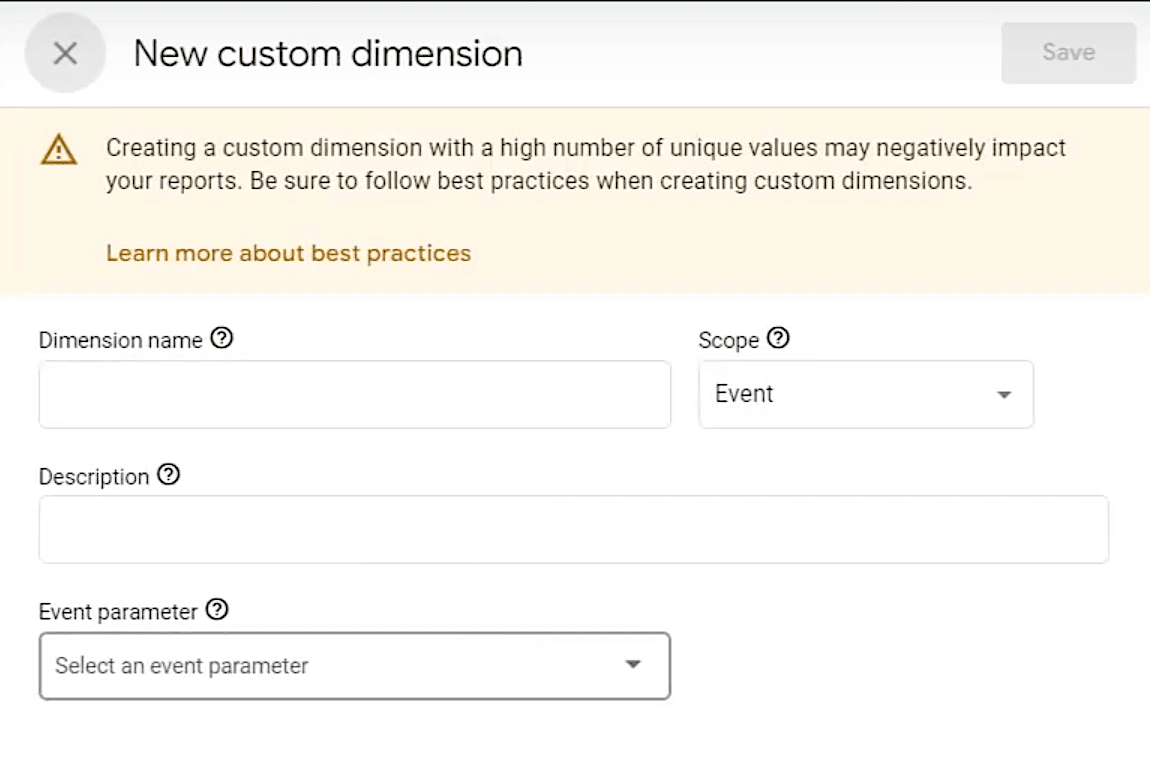
Now you’ll just have to wait. Sometimes it can take up to 24-48 hours for the data to appear in your new custom dimensions.
When using custom dimensions across multiple domains, ensure that cross-domain tracking is properly set up to avoid data discrepancies. For a detailed explanation of how to configure cross-domain tracking, refer to our guide on Understanding Cross-Domain Tracking in Google Analytics 4.
Editing and deleting GA4 custom dimensions
Editing and deleting your custom attributes in GA4 is a simple and intuitive process. Just follow these steps:
Step 1: Open your GA4 property and click on the Admin option.
Step 2: Select Custom Dimensions from the left-hand menu.

Step 3: Click on the vertical three dots next to your desired custom dimension and select either the Edit or Archive option.

Step 4: Make your changes and then confirm them by clicking on the blue Save button.
Once you delete your custom dimension, you won’t be able to restore it later. This is why you should always be mindful of how you archive your dimensions, as doing so automatically halts data collection. To start tracking this data again, you’ll need to set up a new custom dimension.
Limitations of GA4 custom dimensions
Despite the variety of valuable insights that custom dimensions can help you receive, there are some limitations worth considering before configuring them.
- Quota limits
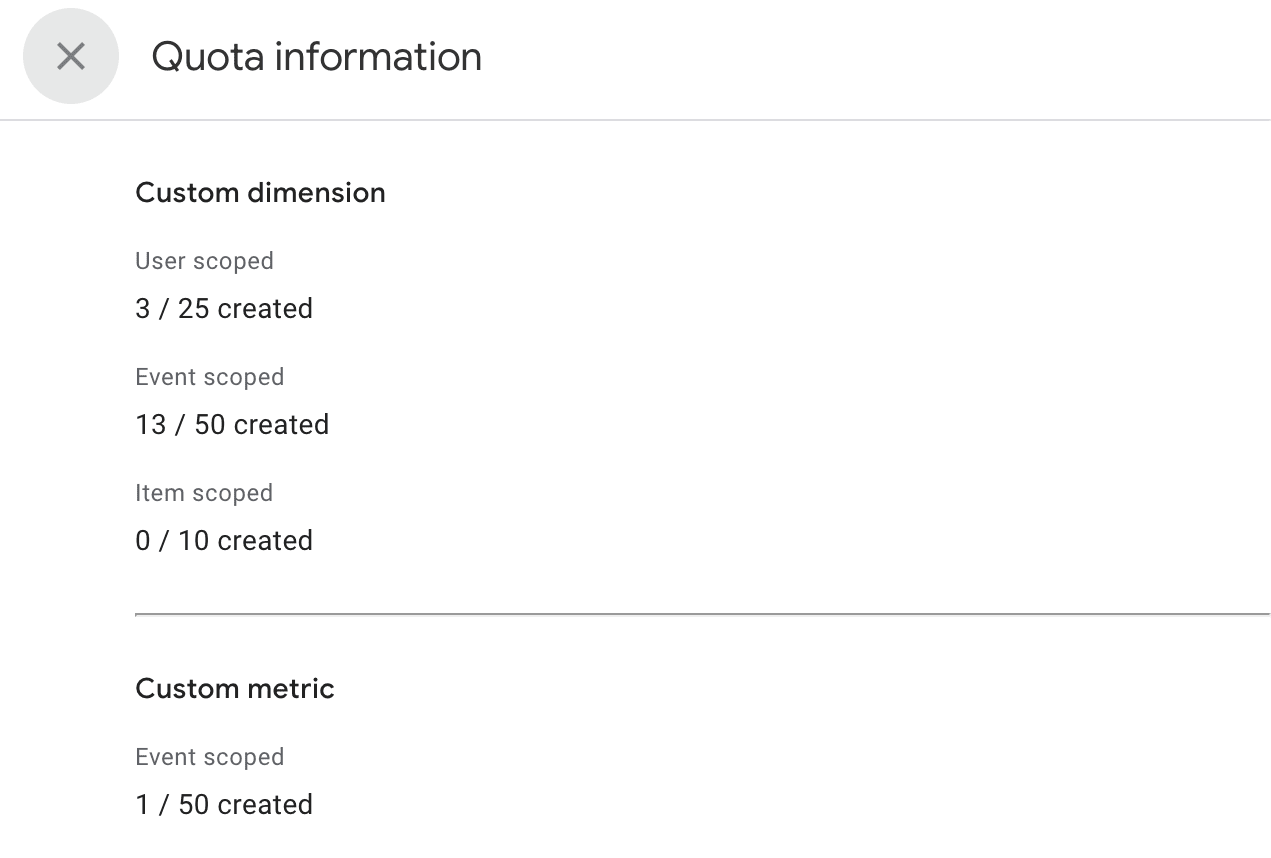
As of now, GA4 limits the number of custom dimensions you can set up per property: no more than 25 user-scoped, 50 event-scoped, and 10 item-scoped custom attributes. To ensure you fit into this limit, you must regularly review and update your custom dimensions. When possible, use data from the default dimensions offered by GA4.
To see the number of custom dimensions you’ve already created and the number of dimensions you’re still allowed to add, follow these steps:
- Navigate to your GA4 property and select the Admin option.
- Select Custom Dimensions.
- Click on the Quota Information button.
- Complex configuration and integration with other tools
Setting up custom dimensions in GA4 can be more complex and time-consuming than it was in Universal Analytics. You can benefit from data within your custom parameters, but only if you have them properly configured both in GA4 and other tracking tools (e.g., Google Tag Manager). For people without previous experience sending event data from Google Tag Manager to GA4, this might be a major issue.
Where to find custom dimensions in GA4 reports
GA4 is an event-based platform, so the majority of its reports will be affected in some way by the event data sent from Google Tag Manager to this tool.
Here’s a list of the main reports with custom dimensions that you will likely find useful:
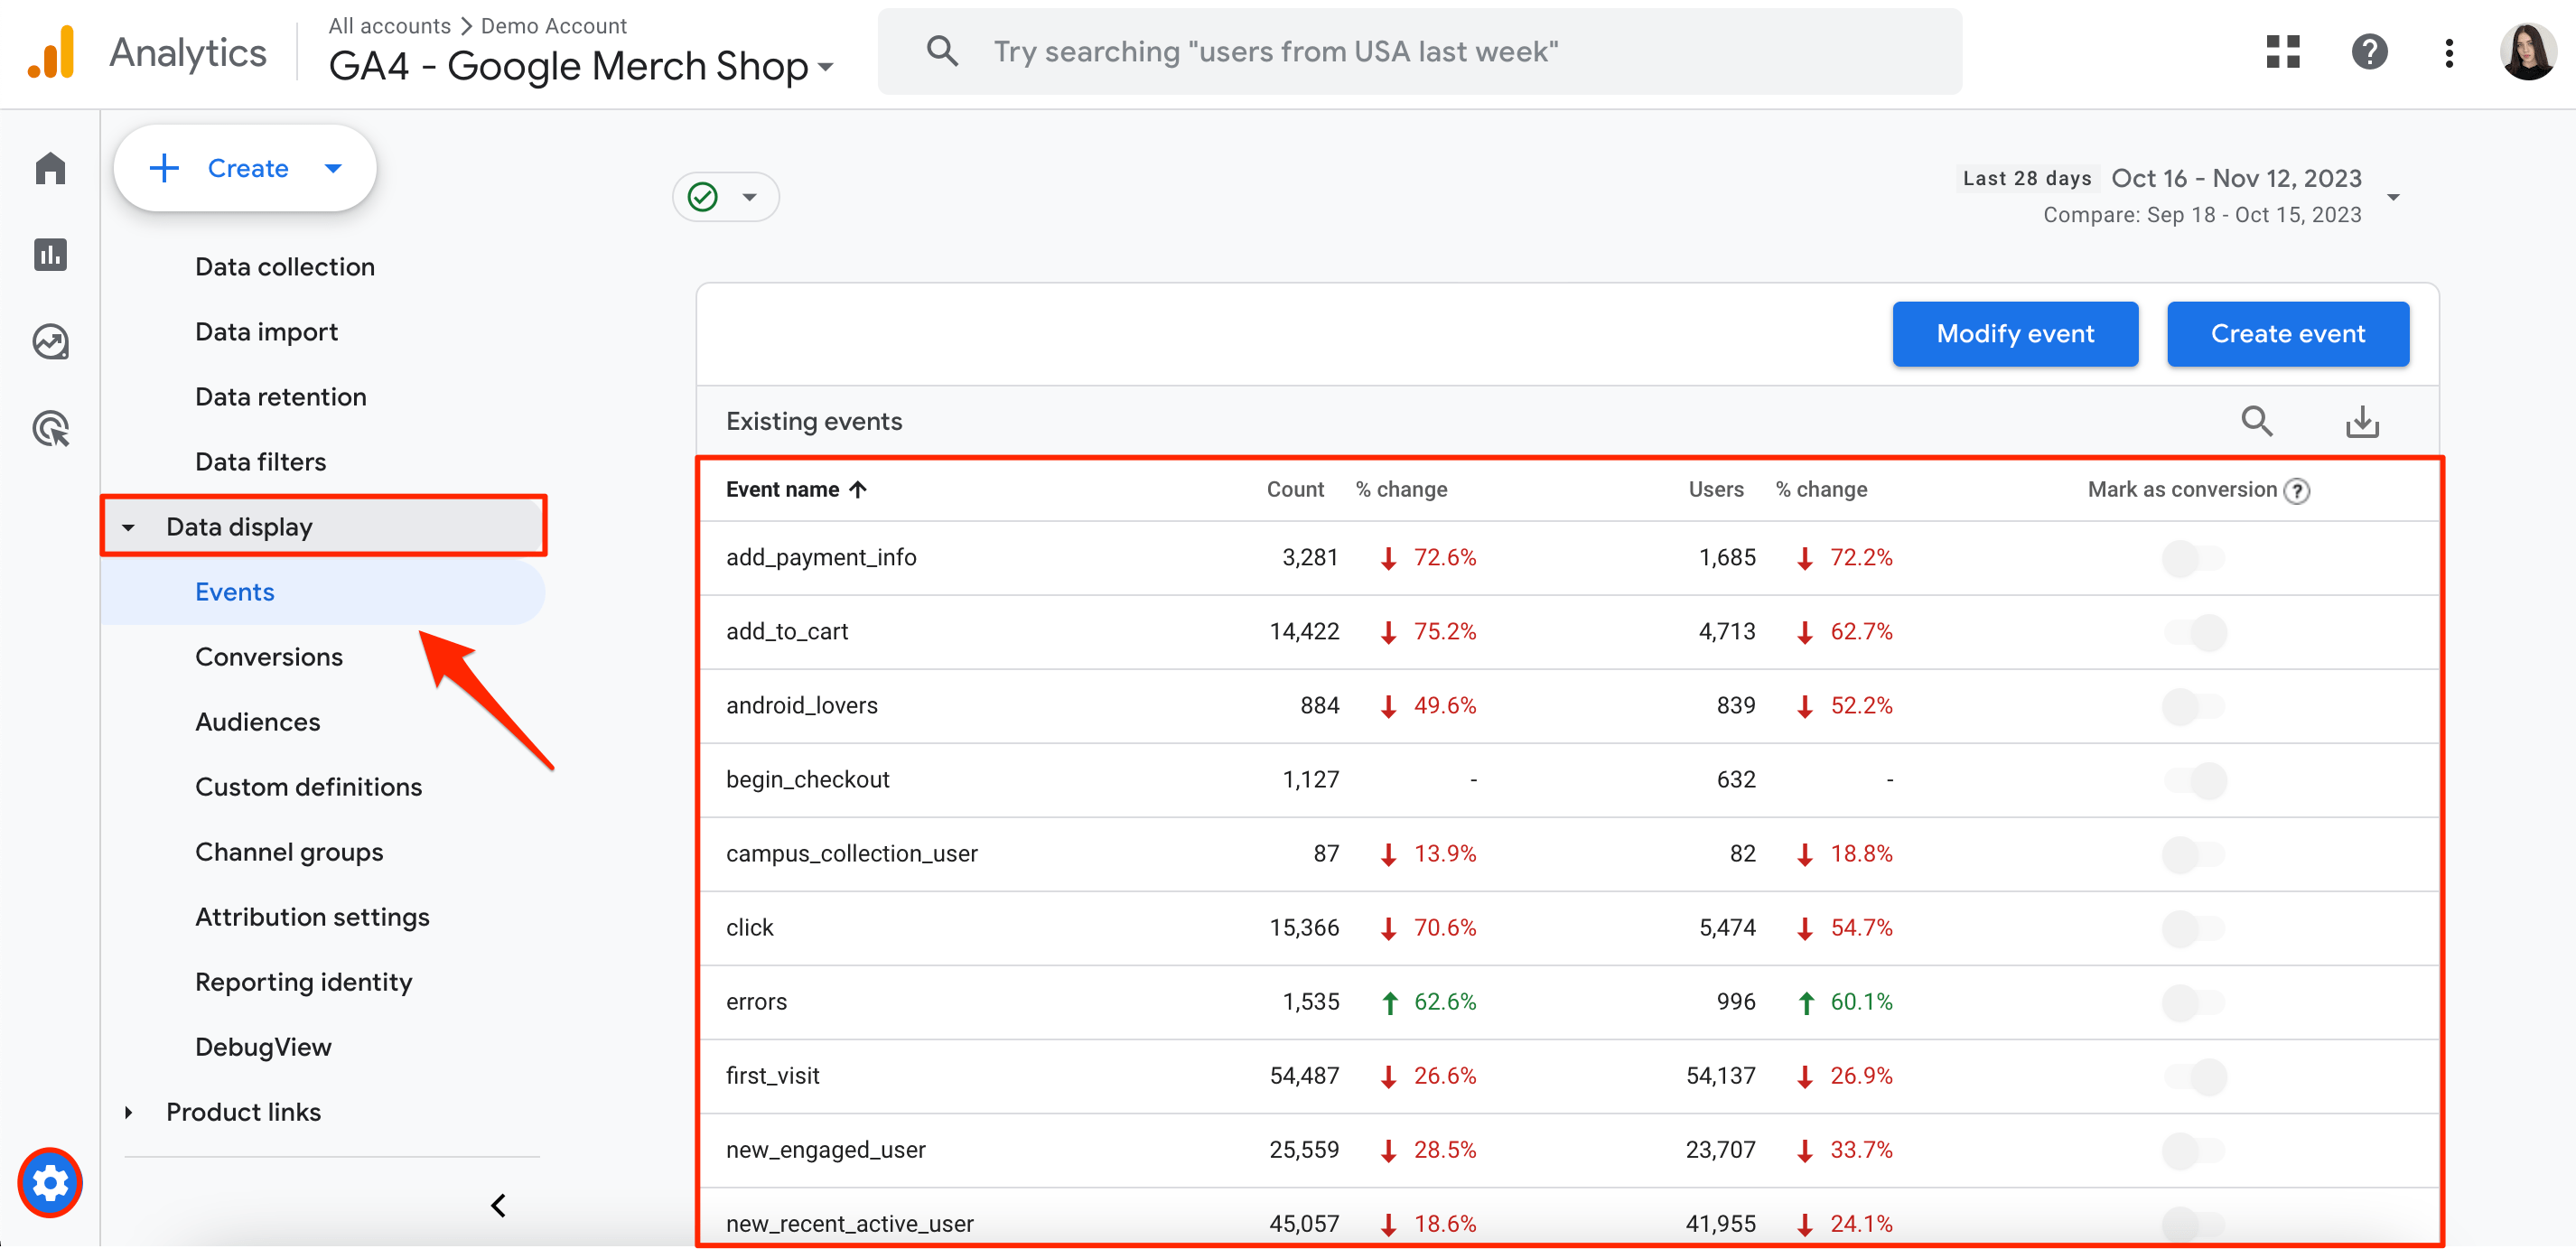
- Admin > Data Display > Events
This is a basic report. It represents the list of existing events, both automatically and manually created. It also shows counts and the number of users who participated in these events.
- Reports > Engagement > Events
This section provides an overview of all events sent to your property.
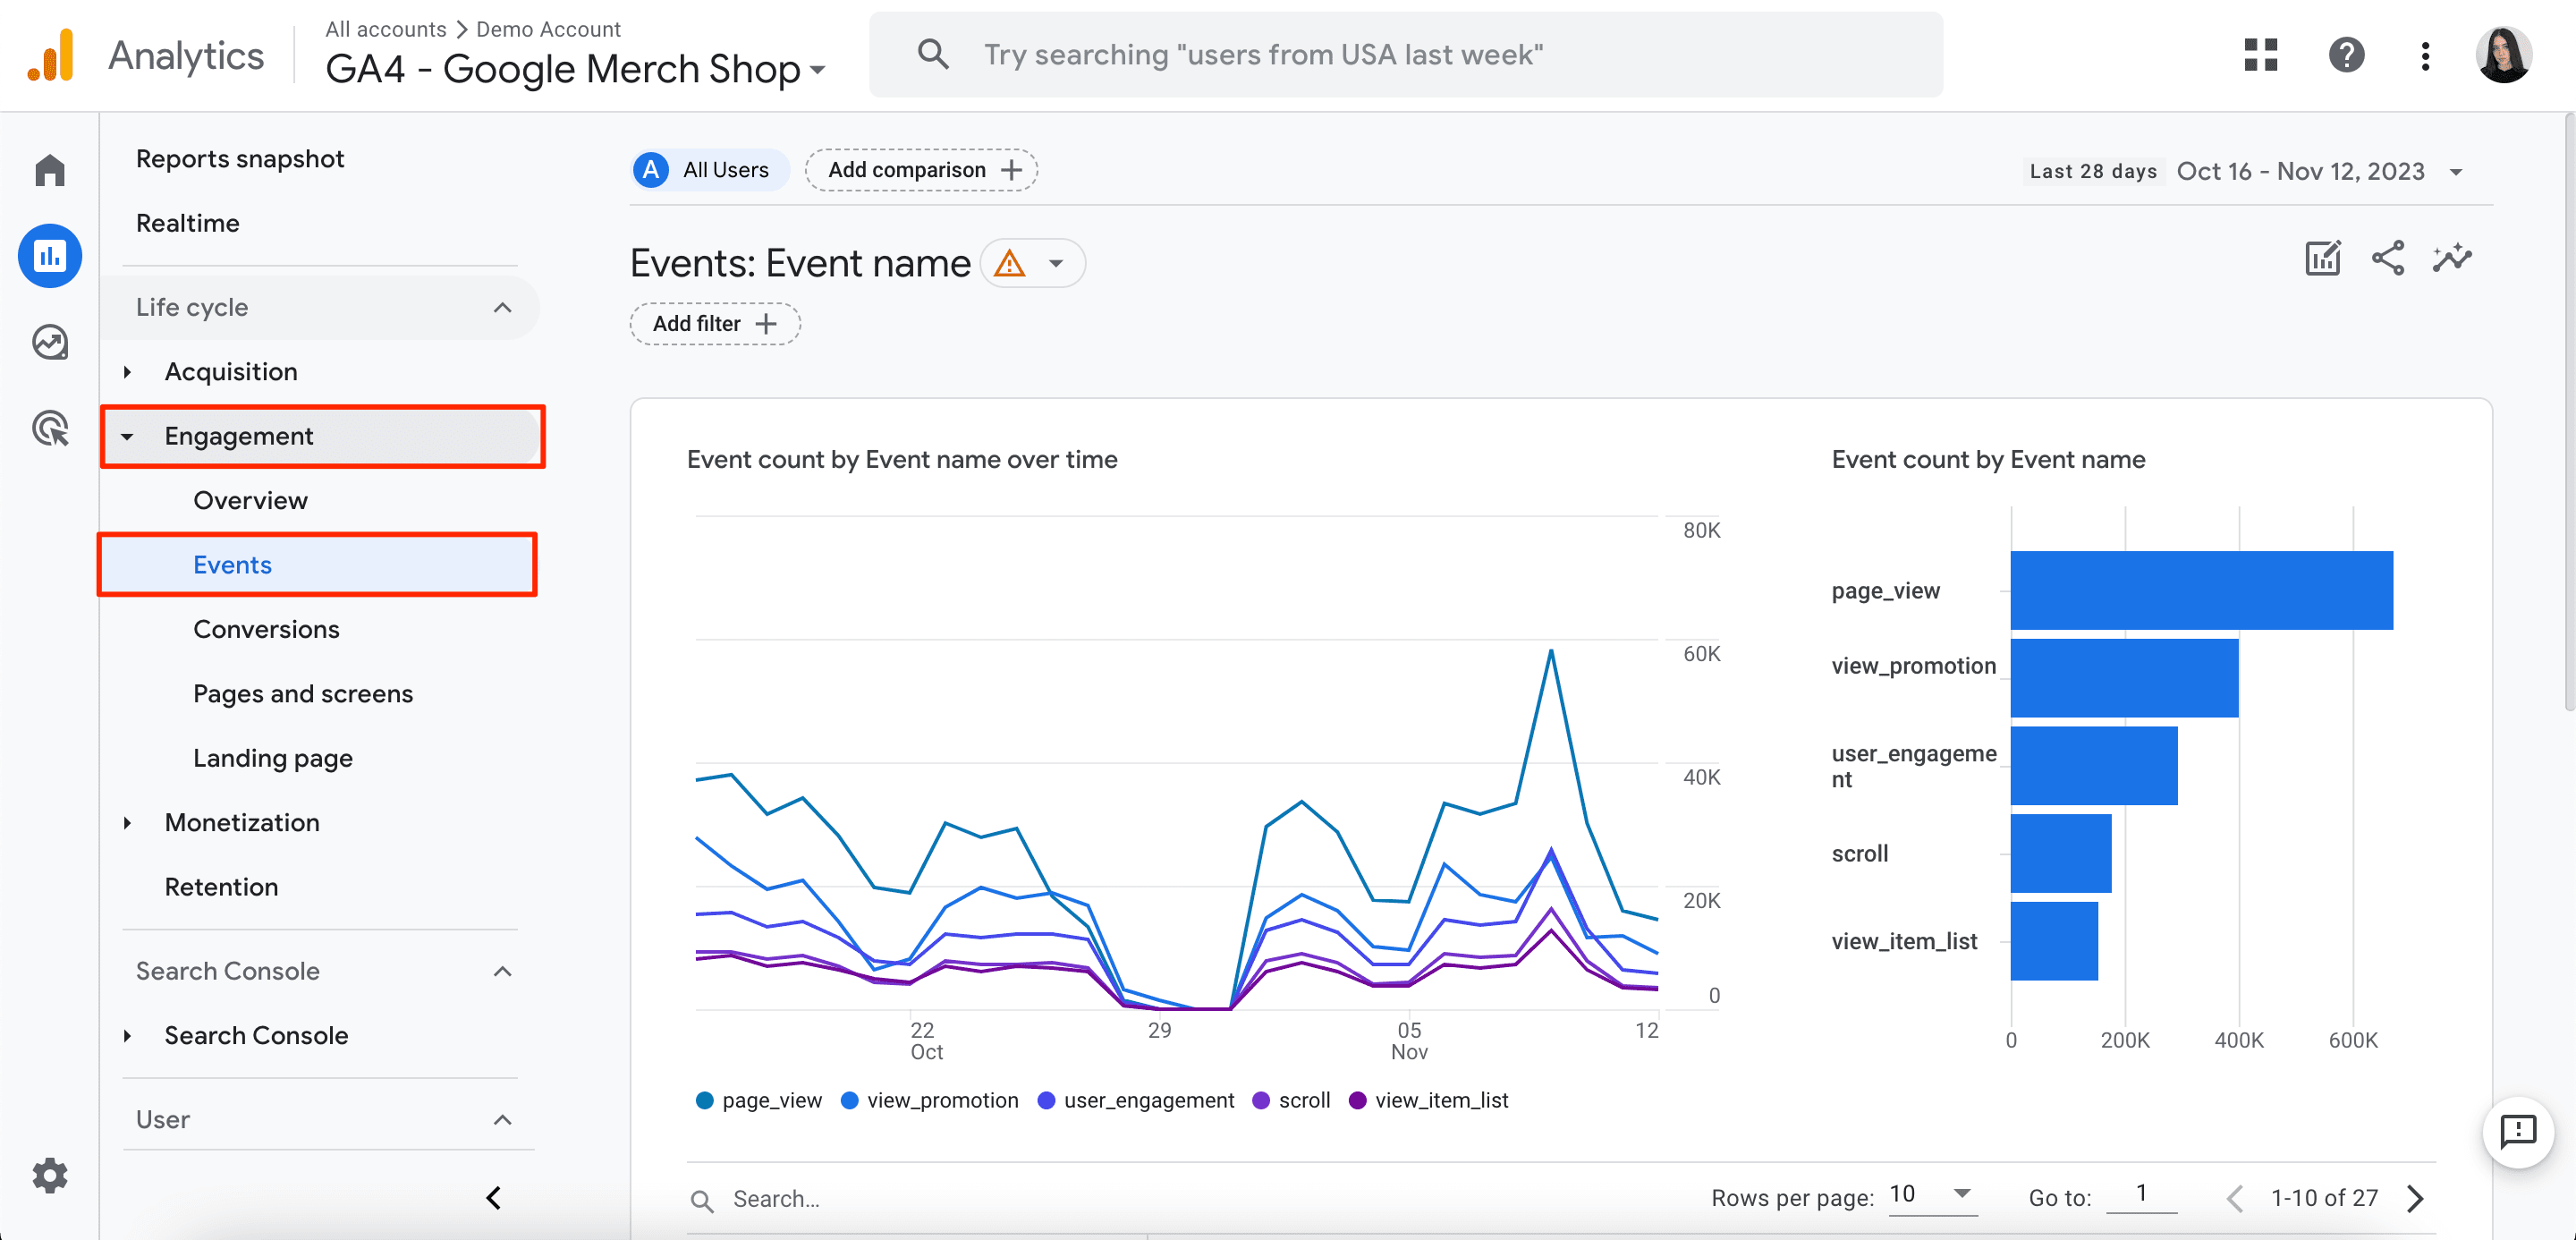
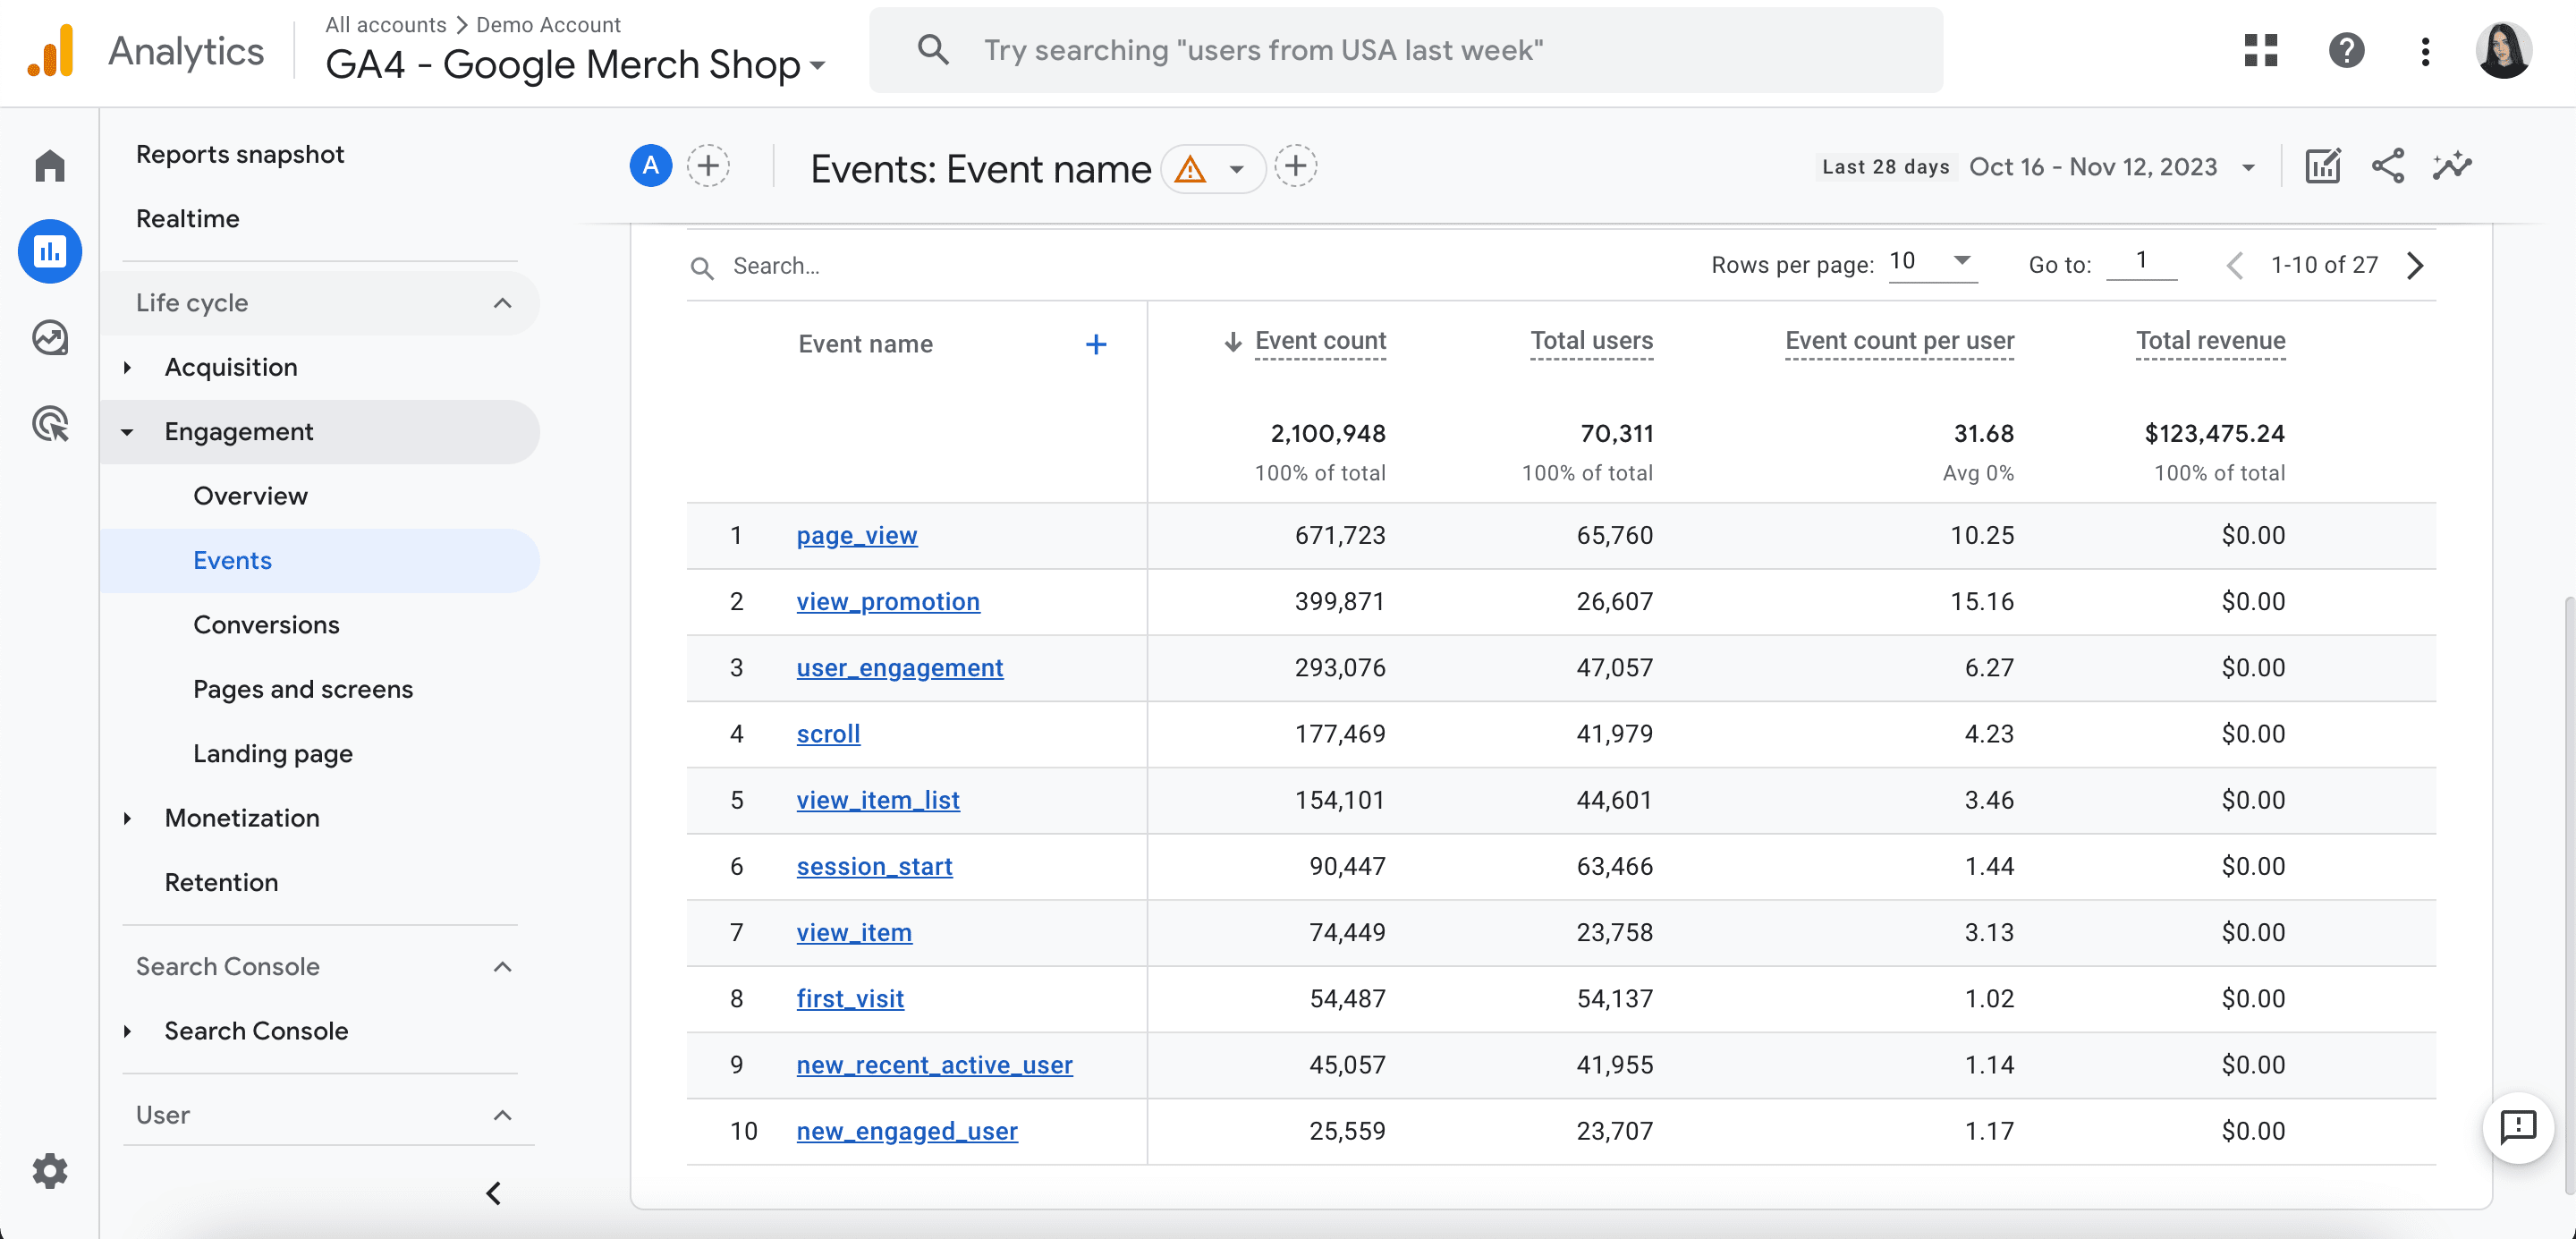
Scroll down to see a list of events along with default data like event count, total users, event count per user, and total revenue.
- Explore (Exploration reports)
This is where you can experience all the advantages offered by custom dimensions data. You can use Exploration reports to combine any data you want. It also reveals insights you would have otherwise missed when using the default dimensions provided by GA4.
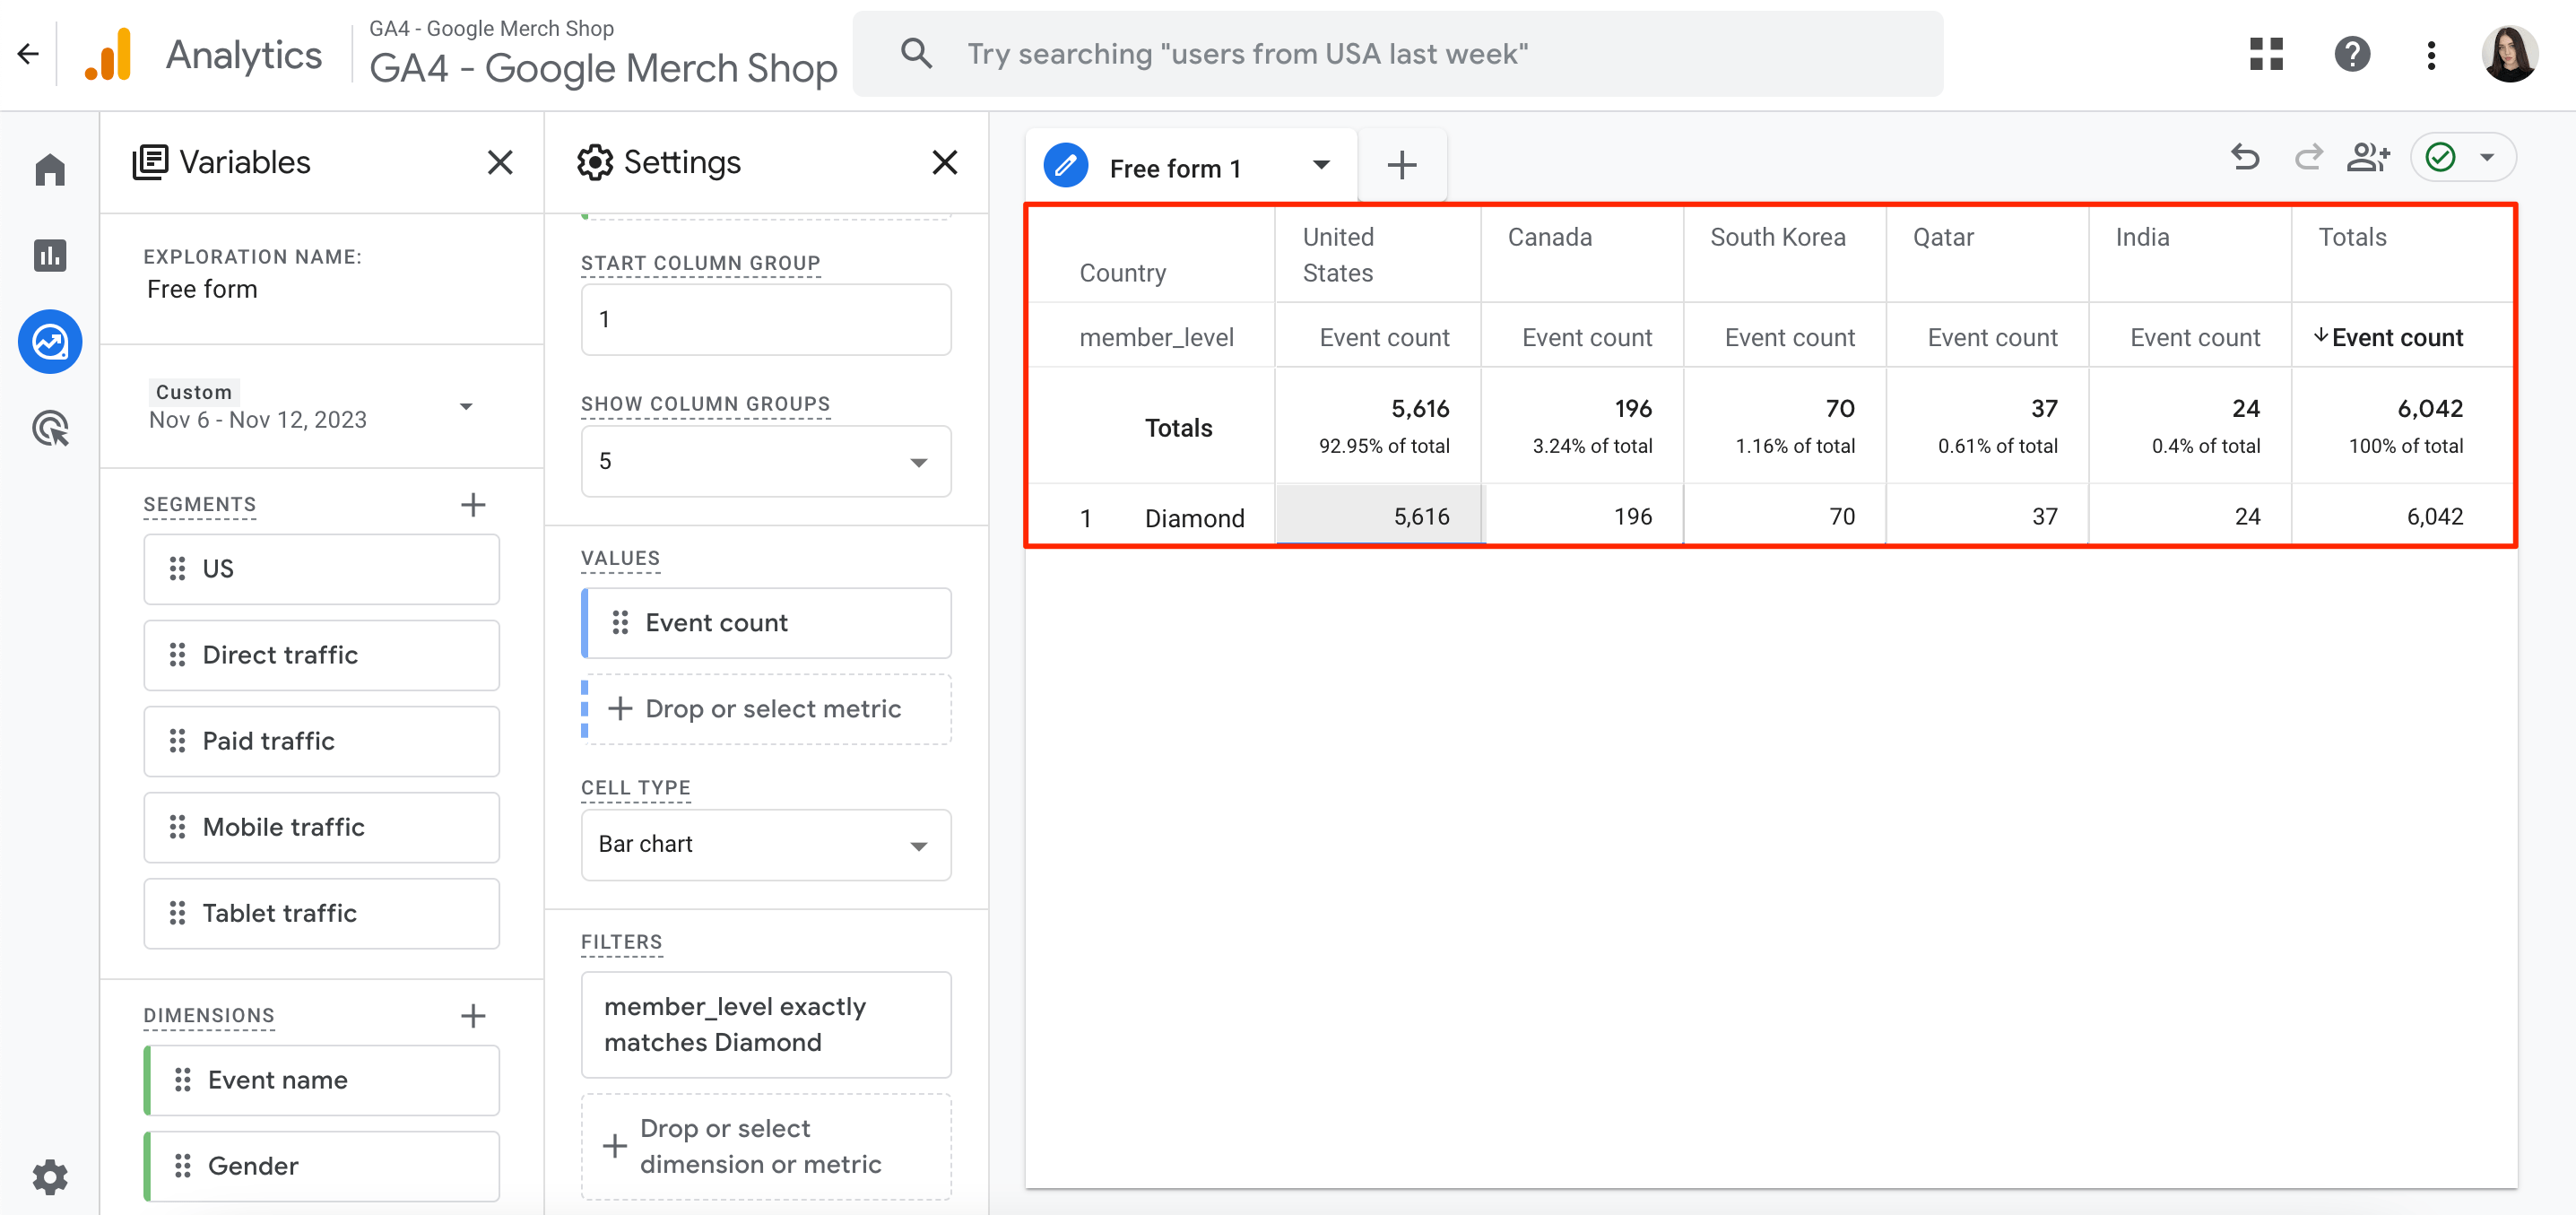
Let’s say you want to identify the geographical location of the users on your site who have a Diamond membership package.
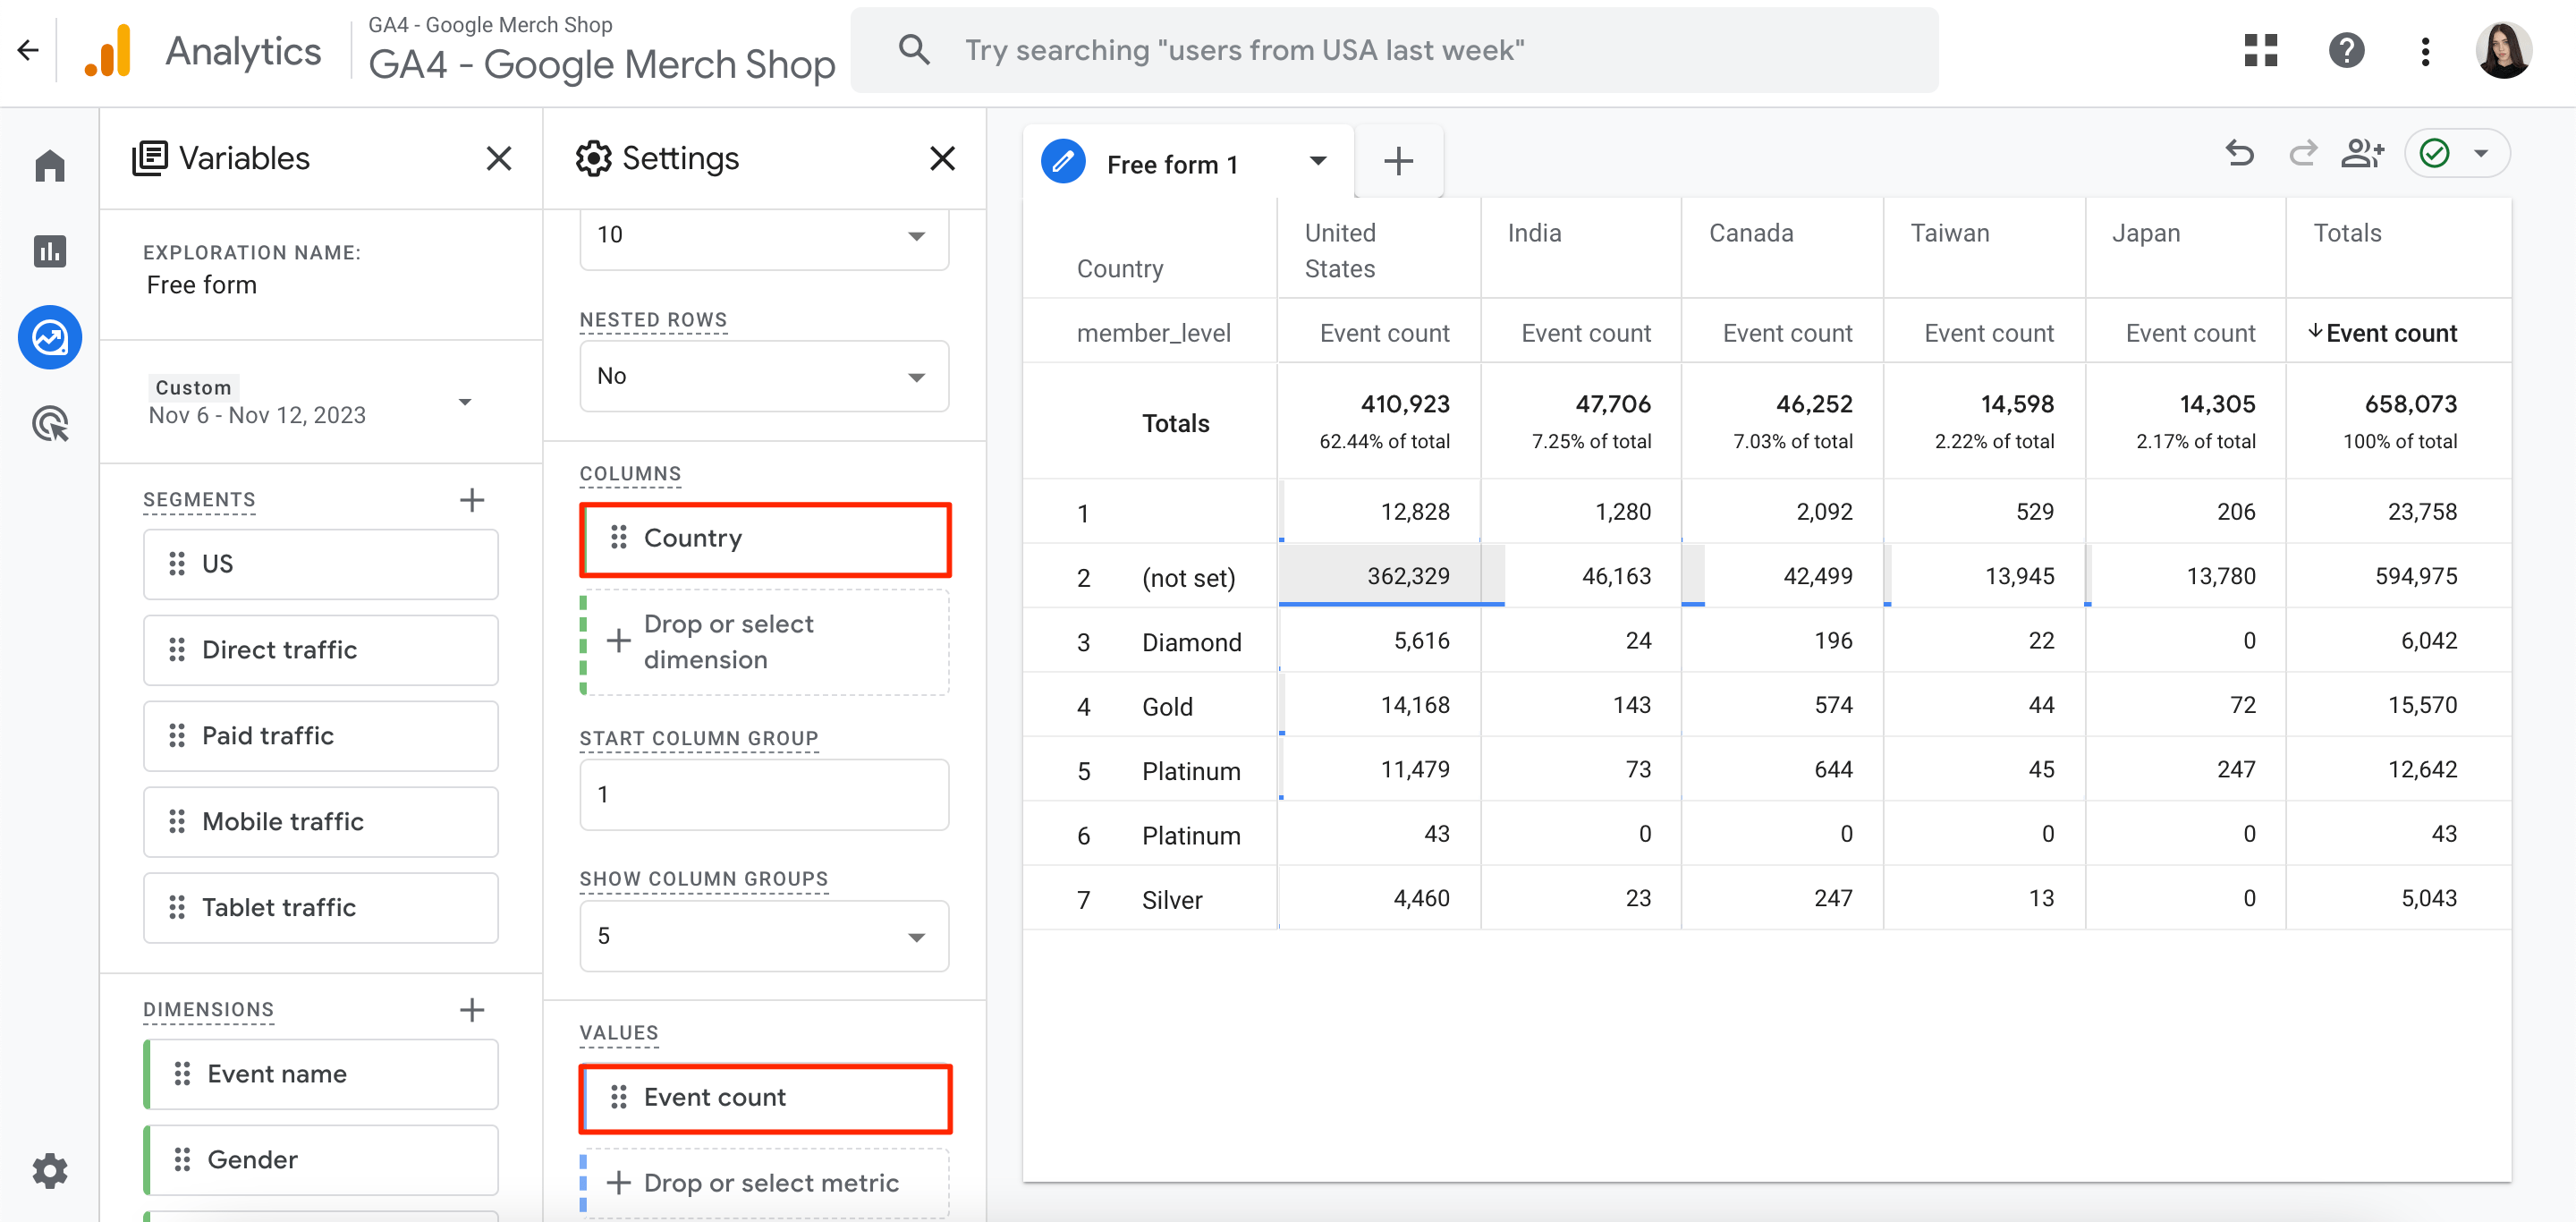
To generate a report around these insights, start by going to the Explore section and choosing the Free Form option.

Next, navigate to the Dimensions blocks and click the Plus icon. From here, you will find the member_level dimension within your custom options.
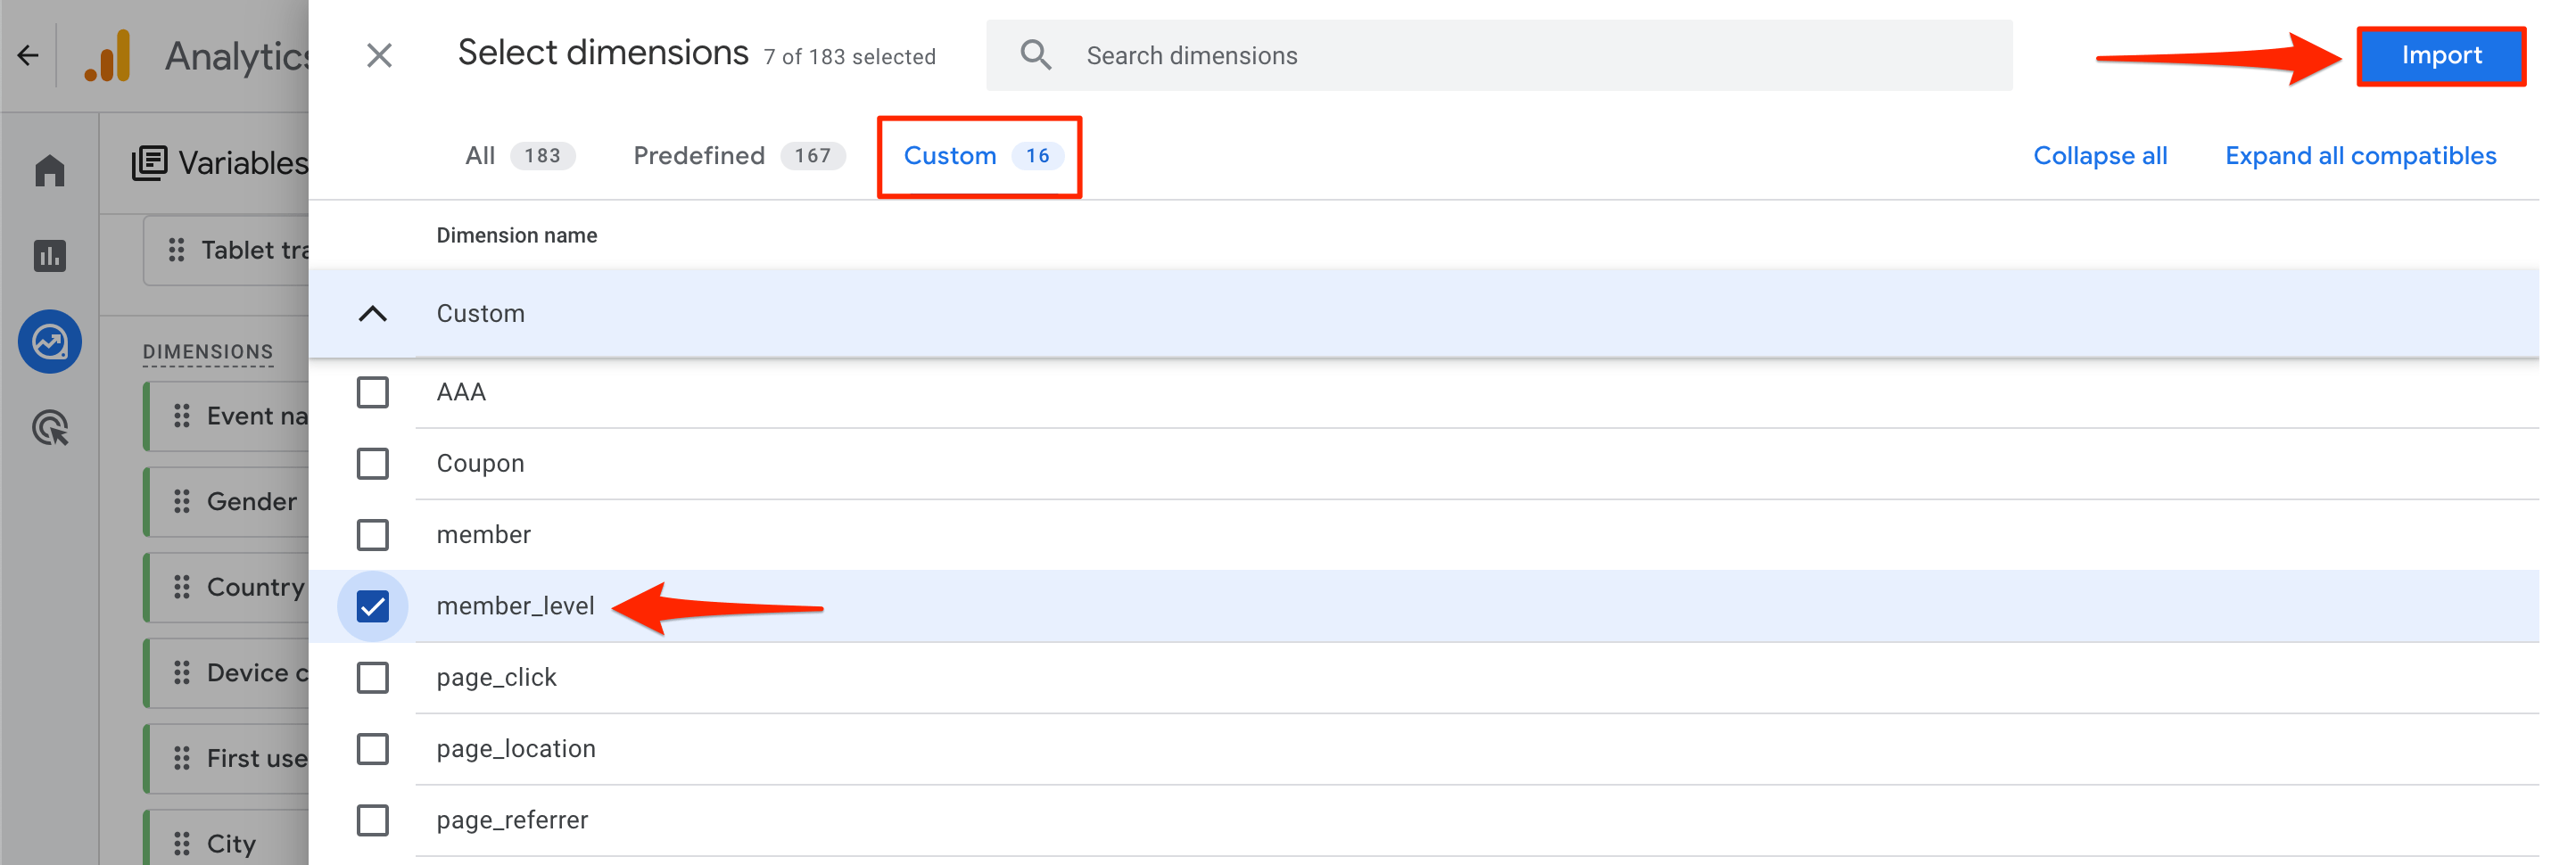
Now, go to the Rows section and delete all predefined parameters from the list. Instead of them, you’ll need to include your custom dimension, which is the member_level in our case.
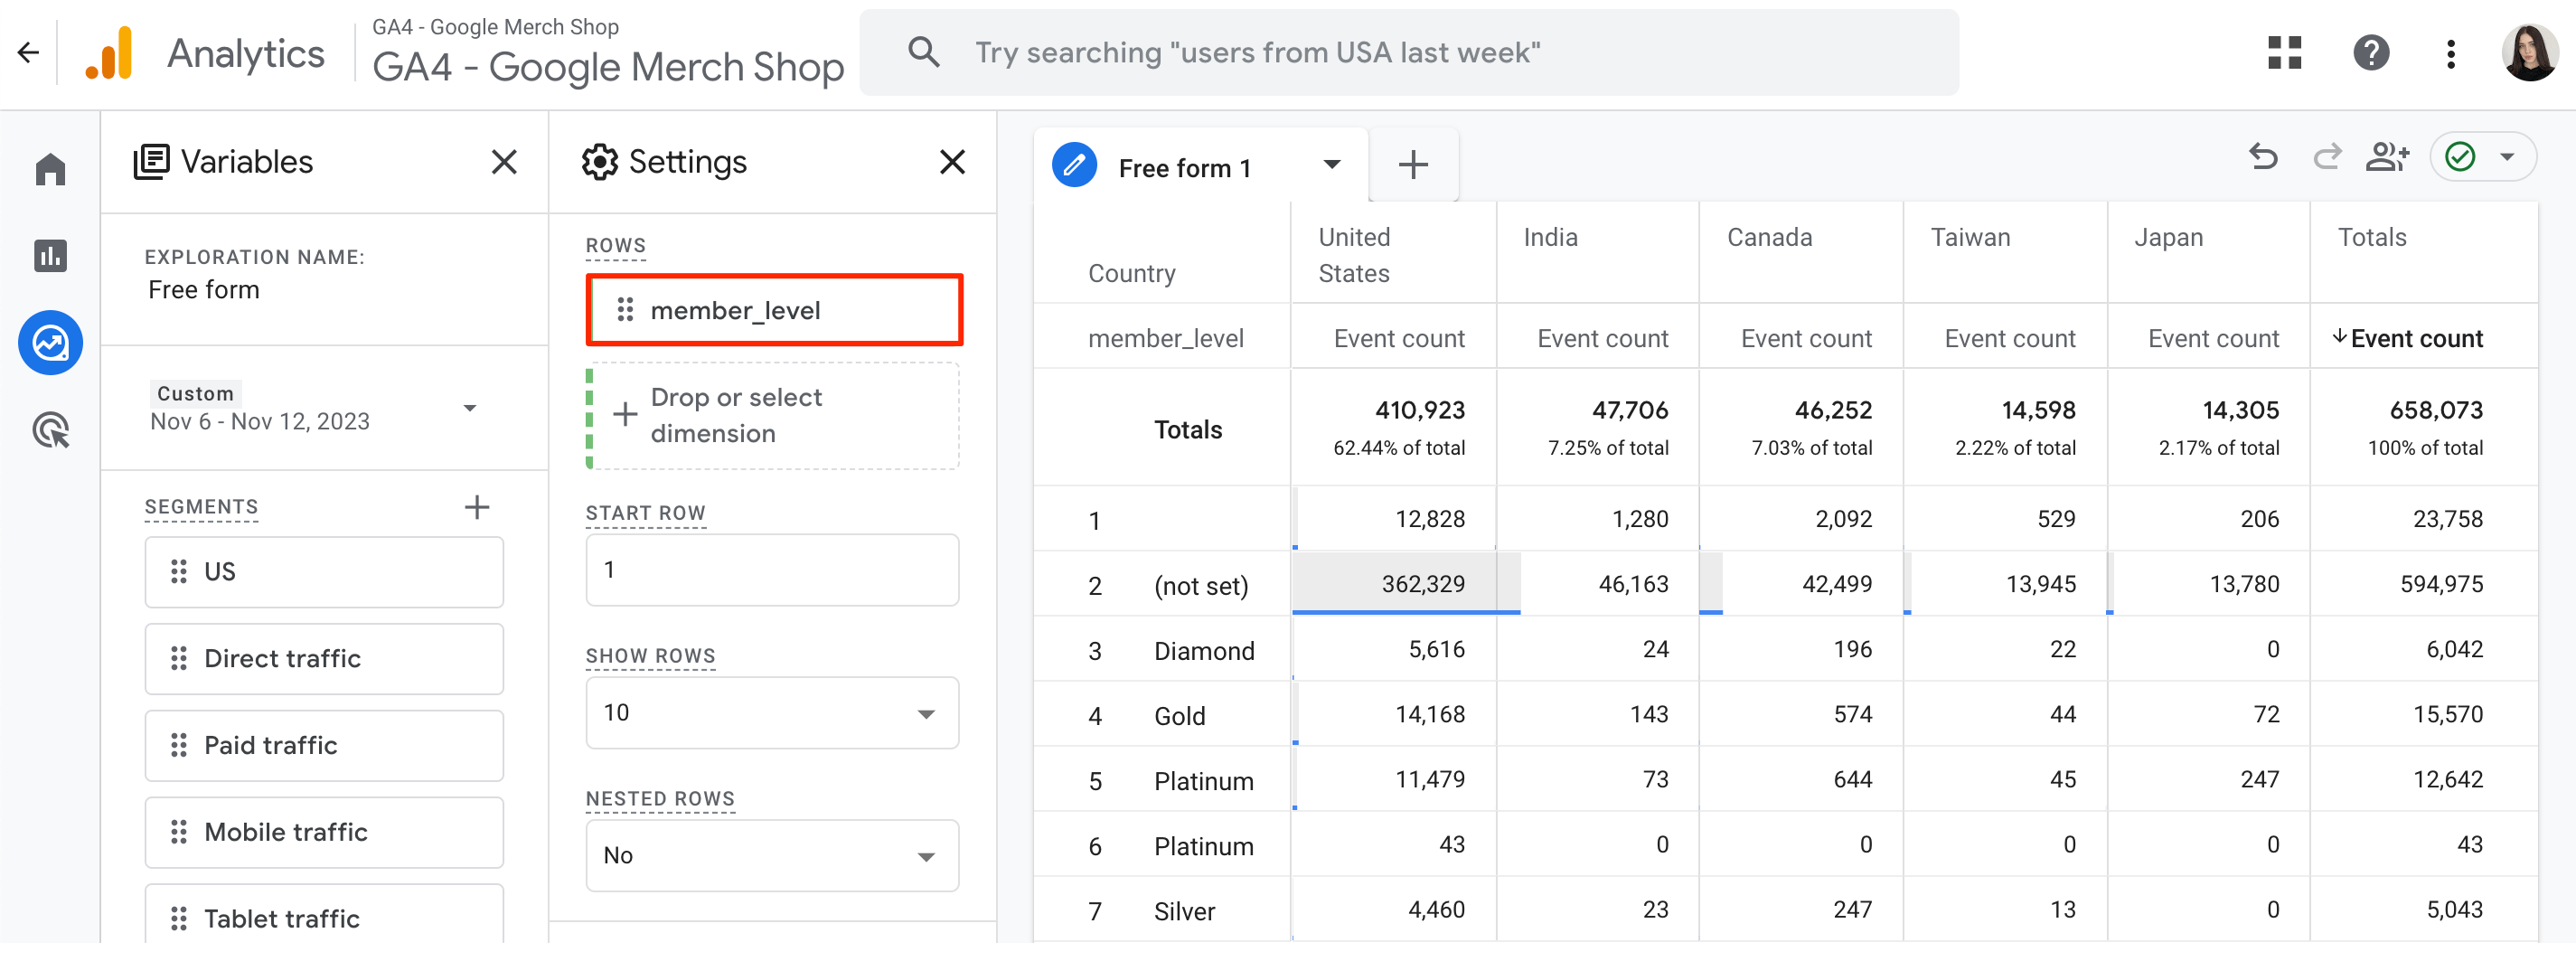
In the Columns section, include the Country category dimension. Make sure the Values setting contains the Event Count metric.
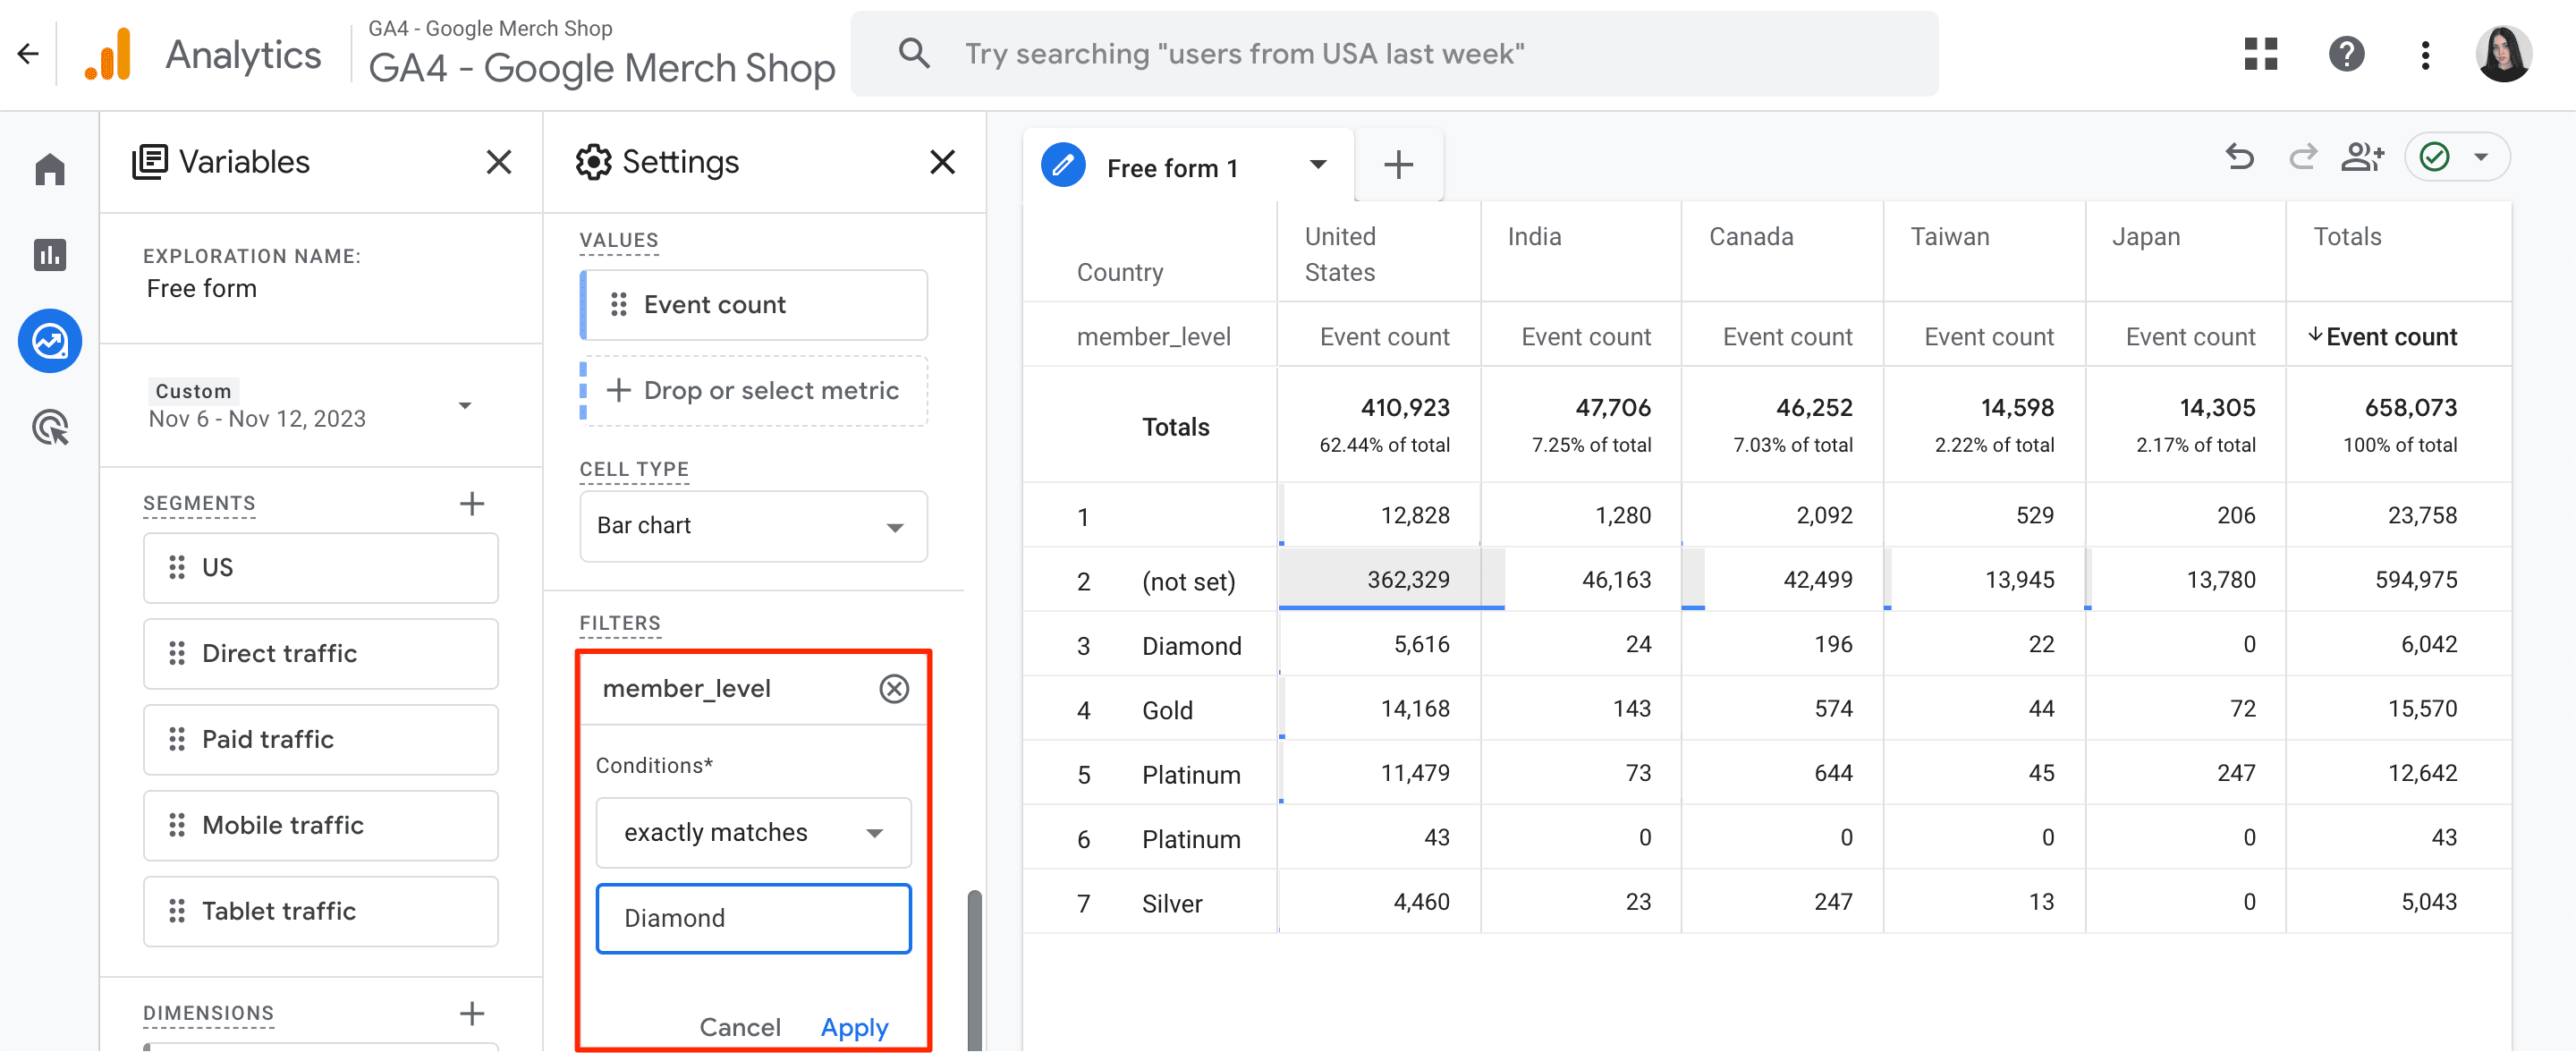
The final step is to limit the list of all users to those who have a Diamond membership. To do this, go to the Filter block and enter the following filter: member_level exactly matches Diamond.
And there you have it, a well-made report showcasing where your VIP audience (in this case, people with a Diamond membership) are from.
Tips for optimizing your custom dimensions
As you can see, there are plenty of ways to use the custom dimensions in GA4 to your advantage. Follow the guidelines in this section to optimize this process and guarantee you receive the most valuable insights while conserving your business resources.
1. Align your marketing goals with your custom dimensions.
Creating custom dimensions without clear predefined goals can be a real shot in the dark. It’s a surefire way to waste all your valuable resources.
So, instead of randomly creating numerous custom attributes, think instead about how configuring them will contribute to your goals.
For instance, if you run a blog, you can set up the “Engagement Level” custom dimension to categorize users based on their interaction with different types of content. This helps you better parse out which types of content on your site (e.g., educational courses, webinars, podcasts, how-to articles) trigger a reaction in your users. It also shows you who is focusing on it in the first place.
This data can even help you personalize content recommendations and design targeted campaigns for each engagement level.
2. Plan the configuration of custom dimensions with quota limits in mind.
Once you know which data you need to obtain to meet certain goals, start planning and documenting your custom dimension strategy while keeping quota limits in mind.
You need to be especially mindful here because GA4 strictly limits the number of custom dimensions you can create. Again, you can configure up to 25 user-scoped dimensions, up to 50 event-scoped dimensions, and up to 10 item-scoped dimensions.
Start by configuring only the most important custom dimensions, followed by those with less impact on your goals. This will prevent you from missing out on essential data insights and help you to use your custom dimensions limit more responsibly.
3. Choose descriptive namings for your custom dimensions.
While there are no strict recommendations for naming custom attributes, it’s best to name them all in the same way.
Not doing so can lead to misunderstandings with other team members who are using the same GA4 account. This can cause mistakes and potential time loss.
Let’s say one of your dimensions is named “dst_type.” Someone seeing this dimension for the first time might not understand what it is about. Is it a Destination type? Data storage type? Delivery service type?
Your colleague will likely need to spend time clarifying this naming with you. In some cases, when clarified inaccurately, it can lead to wrongful data interpretation.
4. Build custom reports.
The best thing about custom dimensions is that you can only combine and represent insights within the report that are valuable for your business needs.
For example, let’s pretend you just launched an online learning platform.
Thanks to GA4’s default dimensions, you know how many times each course has been opened by users. But now you want to find answers to more advanced questions like:
- Which subscription type do users select?
- What is the preferred learning style among users (visual, auditory, kinesthetic)?
- How many people have fully completed a particular course?
- Which score do users receive upon completing particular courses?
The custom reports in GA4 are flexible and easy to read. Through them, you can showcase answers to questions like the ones above, and in any format suitable for your needs.
5. Regularly review and refine your custom dimensions.
Both your business objectives and market trends change over time. This impacts the relevancy of certain dimensions. By either modifying or archiving irrelevant custom dimensions, you can save your quota limits for more important purposes.
For instance, if your e-commerce platform expands its product list from electronics to clothing and accessories, “Electronics” will no longer be a key dimension in this case. You’ll also need to update or introduce dimensions specific to the expanded product range.
Anyway, make sure your custom dimensions strategy is flexible and adaptive. Align it directly with your business goals and the industry as a whole.
Key takeaway
Relying on predefined and automatically tracked events in GA4 is a great way to start your data analysis process. But to gain business-specific insights that place you one step ahead of your competition, you’ll need to make custom dimensions a part of your data collection routine.
We hope this guide has inspired you to build promising new plans for web analytics with custom dimensions in mind.

