How to set up Google Search Console: The Ultimate Guide
-
Setting up Google Search Console is crucial for website owners and SEO professionals who want to monitor and improve their site’s search performance.
-
Key GSC tools and reports include the Page Indexing Report, Performance on Search Results, the URL Inspection tool, Core Web Vitals report, Enhancements report, and Links report.
-
GSC offers two main property types: URL-prefix and Domain.
-
To install Google Search Console, you need a Google account. You must also use one of the following methods to verify website ownership: DNS record, HTML file upload, HTML meta tag, Google Analytics, or Google Tag Manager.
-
Common verification errors include incorrect tag placement, server timeouts, DNS lookup issues, etc.
-
After verifying ownership, submitting your sitemap to GSC is highly recommended. This helps Google crawl and index your site more efficiently.
-
GSC allows you to manage user permissions and grant different access levels to team members or clients. This feature makes collaboration easier and keeps you in control of sensitive data.
-
Connecting GSC to SEO tools like SE Ranking can streamline your workflow by providing integrated data analysis and more frequent updates than with GSC alone.
-
WordPress, Shopify, and Wix users can follow platform-specific instructions to integrate GSC.
-
Regularly monitoring GSC data helps you discover valuable insights for ongoing SEO improvements. It typically takes 2-3 days for the first bit of data to appear.
Begin your Google Search Console setup by verifying your ownership after creating your website. While you don’t have to verify your website in GSC to show up in search results, doing so grants you access to all the important data provided by the tool.
If you are a webmaster, learning how to use Google Search Console is essential. It helps you identify site errors, ensure proper indexing of web pages, assess mobile-friendliness, gain insights into the search queries people used to find their site, and much more.
This post covers how to set up Google Search Console correctly.
Get a free ebook that analyzes AIOs behavior before and after rollout
Click the link we sent you in the email to confirm your email
What is Google Search Console?
Google Search Console is a free, user-friendly toolset that helps you track, maintain, and troubleshoot your website’s presence in Google search results. It provides valuable insights into whether Google can find your site, how it crawls and indexes your pages, and how your website performs in search.
The most valuable GSC tools and reports include:
- Page indexing report: To check, spot and quickly fix any tech issues preventing Google from crawling and indexing websites properly.
- Performance on Search Results: To see how often your site shows up and gets clicked in search results, and which search terms bring traffic to your site.
- URL Inspection tool: To check how Google crawls, indexes, and serves any page on your site, directly from Google’s index or in live test format.
- Core Web Vitals report: To monitor key metrics on your site’s loading speed, interactivity, and visual stability.
- Enhancements report: To get insights into improving your website’s structured data, identify errors and warnings, and optimize for rich results.
- Links report:To learn who’s linking to your website.
Who should use it?
- Business owners: To know what features are available in Google Search and become aware of search optimization basics.
- SEO specialists: To access data to inform and refine search optimization strategies.
- Site administrators: To track and in some cases fix technical problems and security issues.
- Web developers: To identify and fix markup problems.
How to set up Google Search Console
To begin setting up Google Search Console, you’ll need a Google account. If you don’t have one, you must create one first. If you already use a Google account to monitor other websites, note that one account can manage multiple properties in Search Console (to be more specific – up to 1,000 properties).
Learning how to add Google Search Console to your website and verify your ownership is straightforward:
- Sign in to your Google Search Console account
- Choose one of the suggested property types
- Use one of the five available options to prove that you own your website:
- Domain name provider
- HTML tag
- HTML file
- Google Analytics tracking code
- Google Tag Manager container snippet
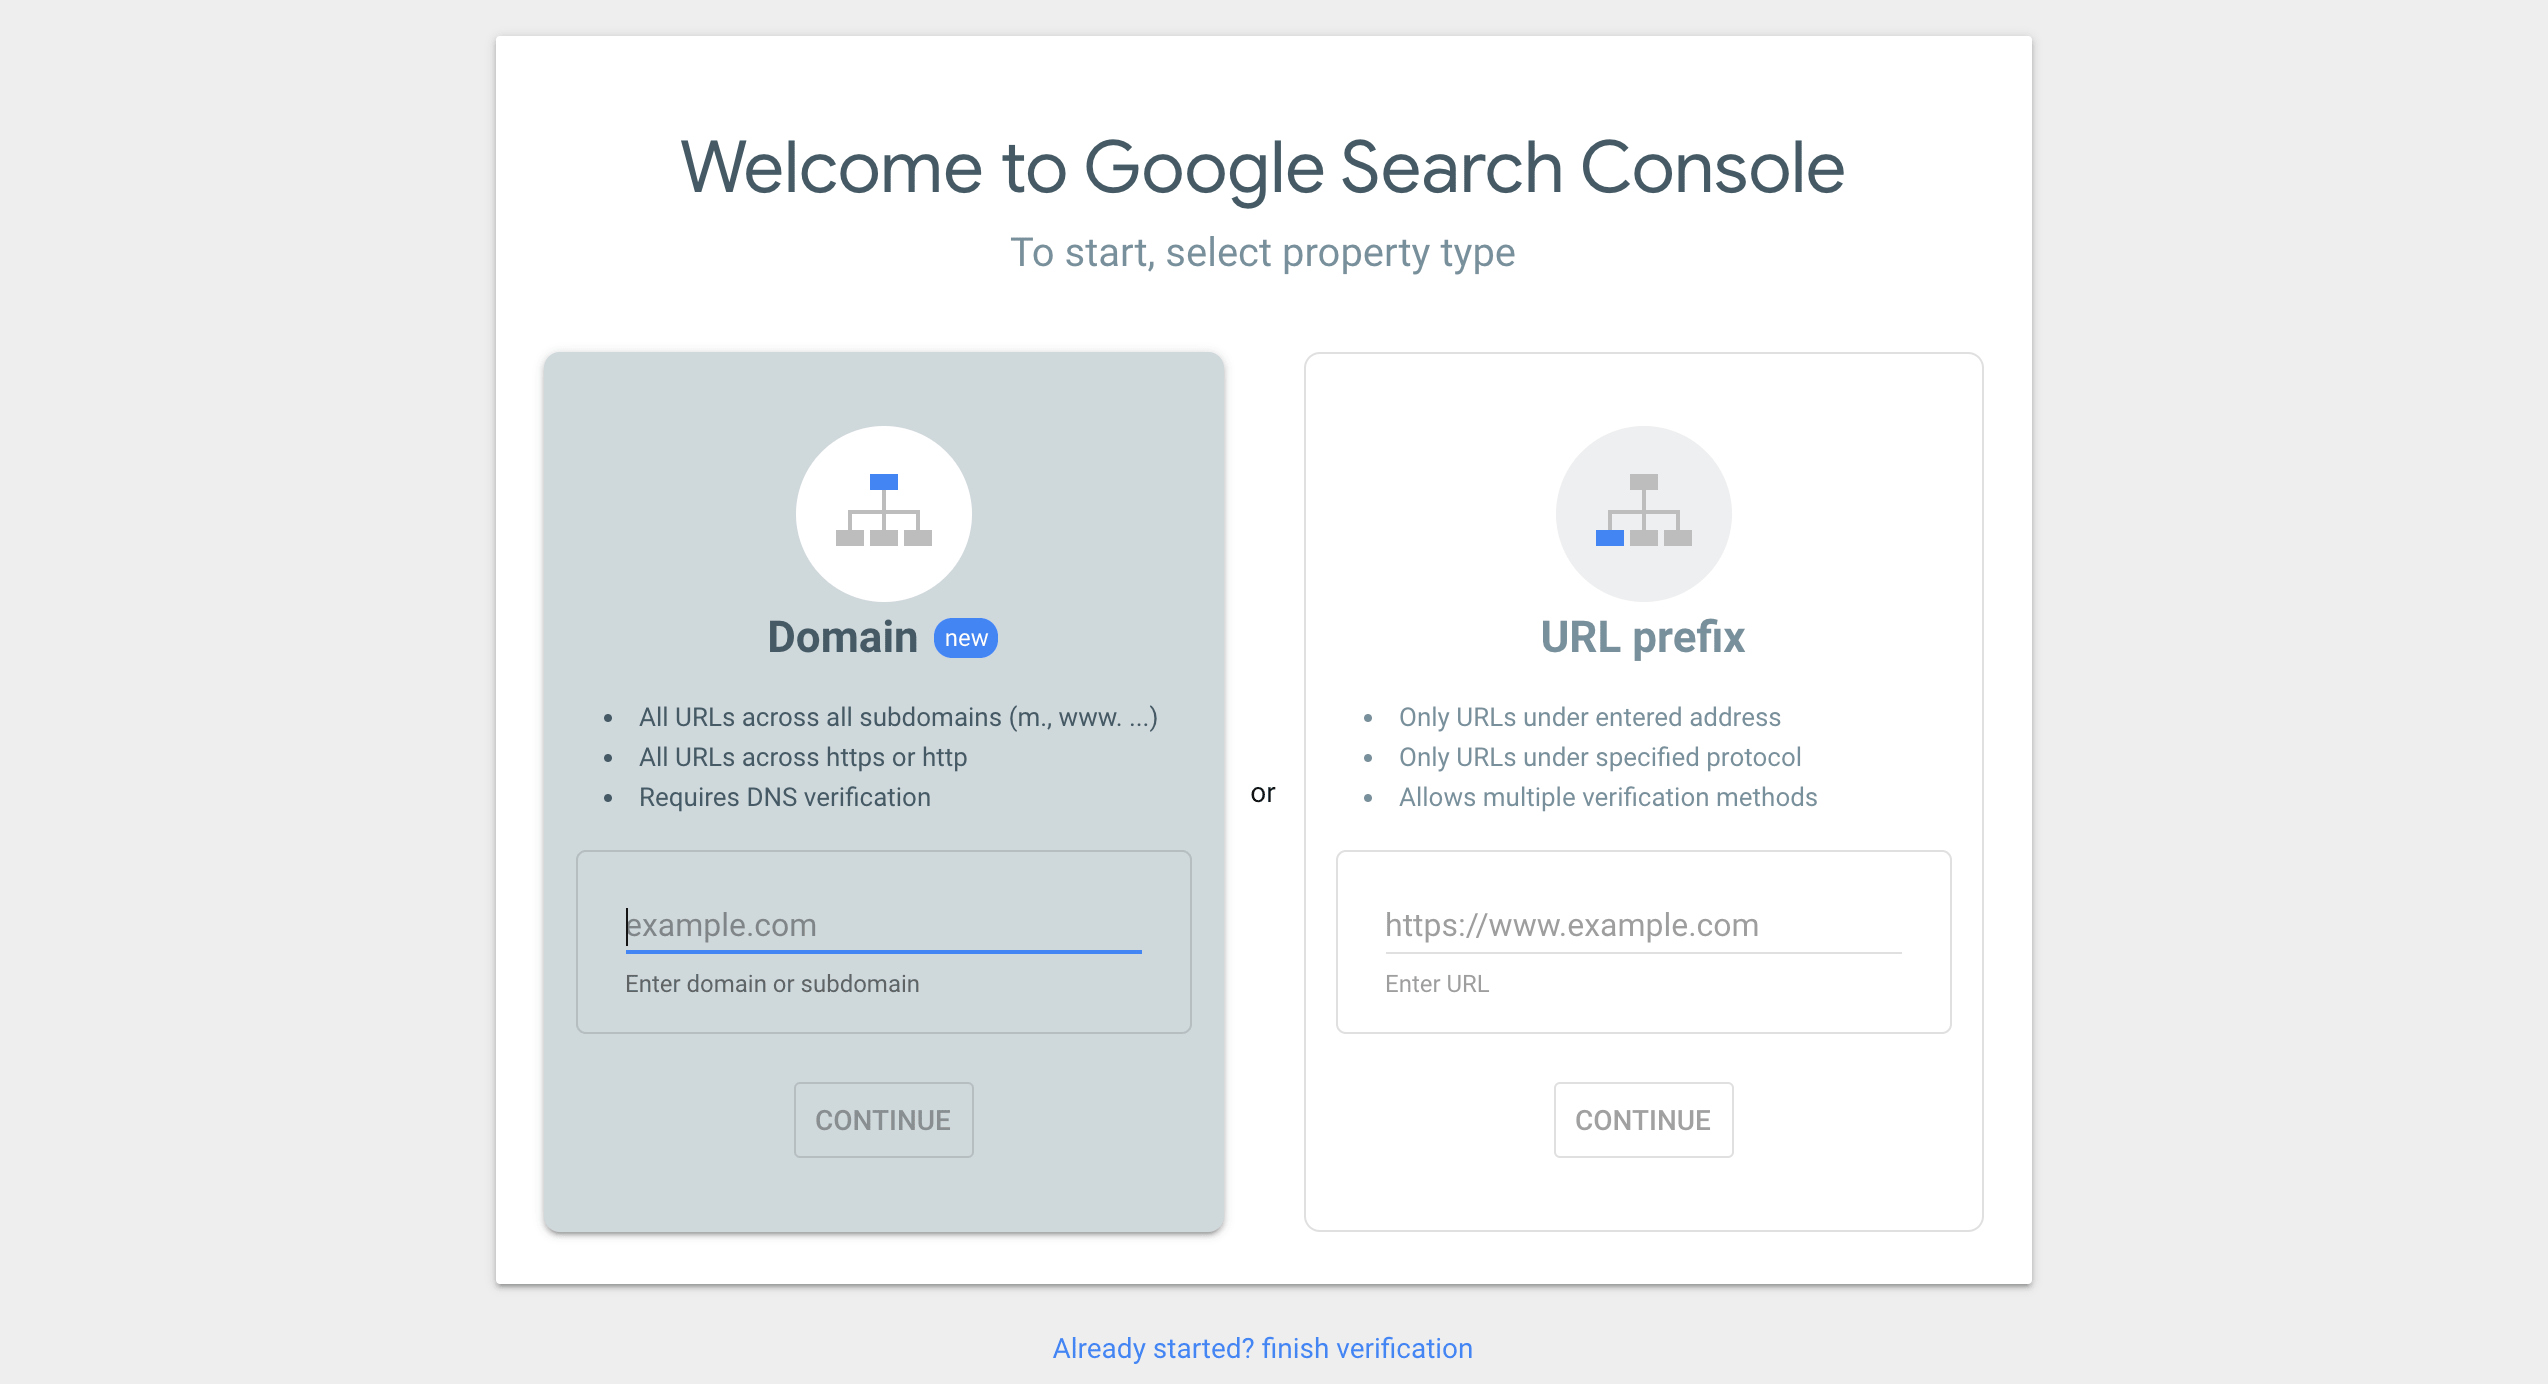
Adding a Domain property in Search Console
After adding a new property, you will have to choose a property type. GSC accepts two main website property types: URL-prefix property and Domain property. Unlike the URL-prefix property, which supports several verification types, the latter stands for DNS record verification only. A domain property includes all subdomains such as m, www, and multiple protocols: http, https, FTP.
The DNS method is considered one of the best ways to verify your website because it eliminates the need for re-verification if you decide to switch between using www and non-www in the future. See this article on www vs non-www choice to learn how www impacts SEO and your site’s technical setup.
A Domain property URL does not contain an http/https protocol and ignores www (if you add www.website.com, the property will be created as website.com). It also covers all subdomains and subpaths. For example, if a Domain property is website.com, then besides the domain name, the data includes the following subdomains:
- support.m.example.com
- m.example.com
How to verify Google Search Console through the DNS record
To perform a Google Search Console setup through the DNS record, you must:
- Select the domain property type in Search Console.
- Choose your DNS provider from the DNS Providers list. For example, if your provider is Gandi.net, choose it and click Start Verification. Log in to Gandi.net, and click Authorize. From here, verification should occur immediately.
If your Search Console doesn’t show your domain name provider, or if it shows one that’s not yours, you’ll have to add it manually. Here’s how:
1. Choose the record type. GSC offers two options: TXT and CNAME.
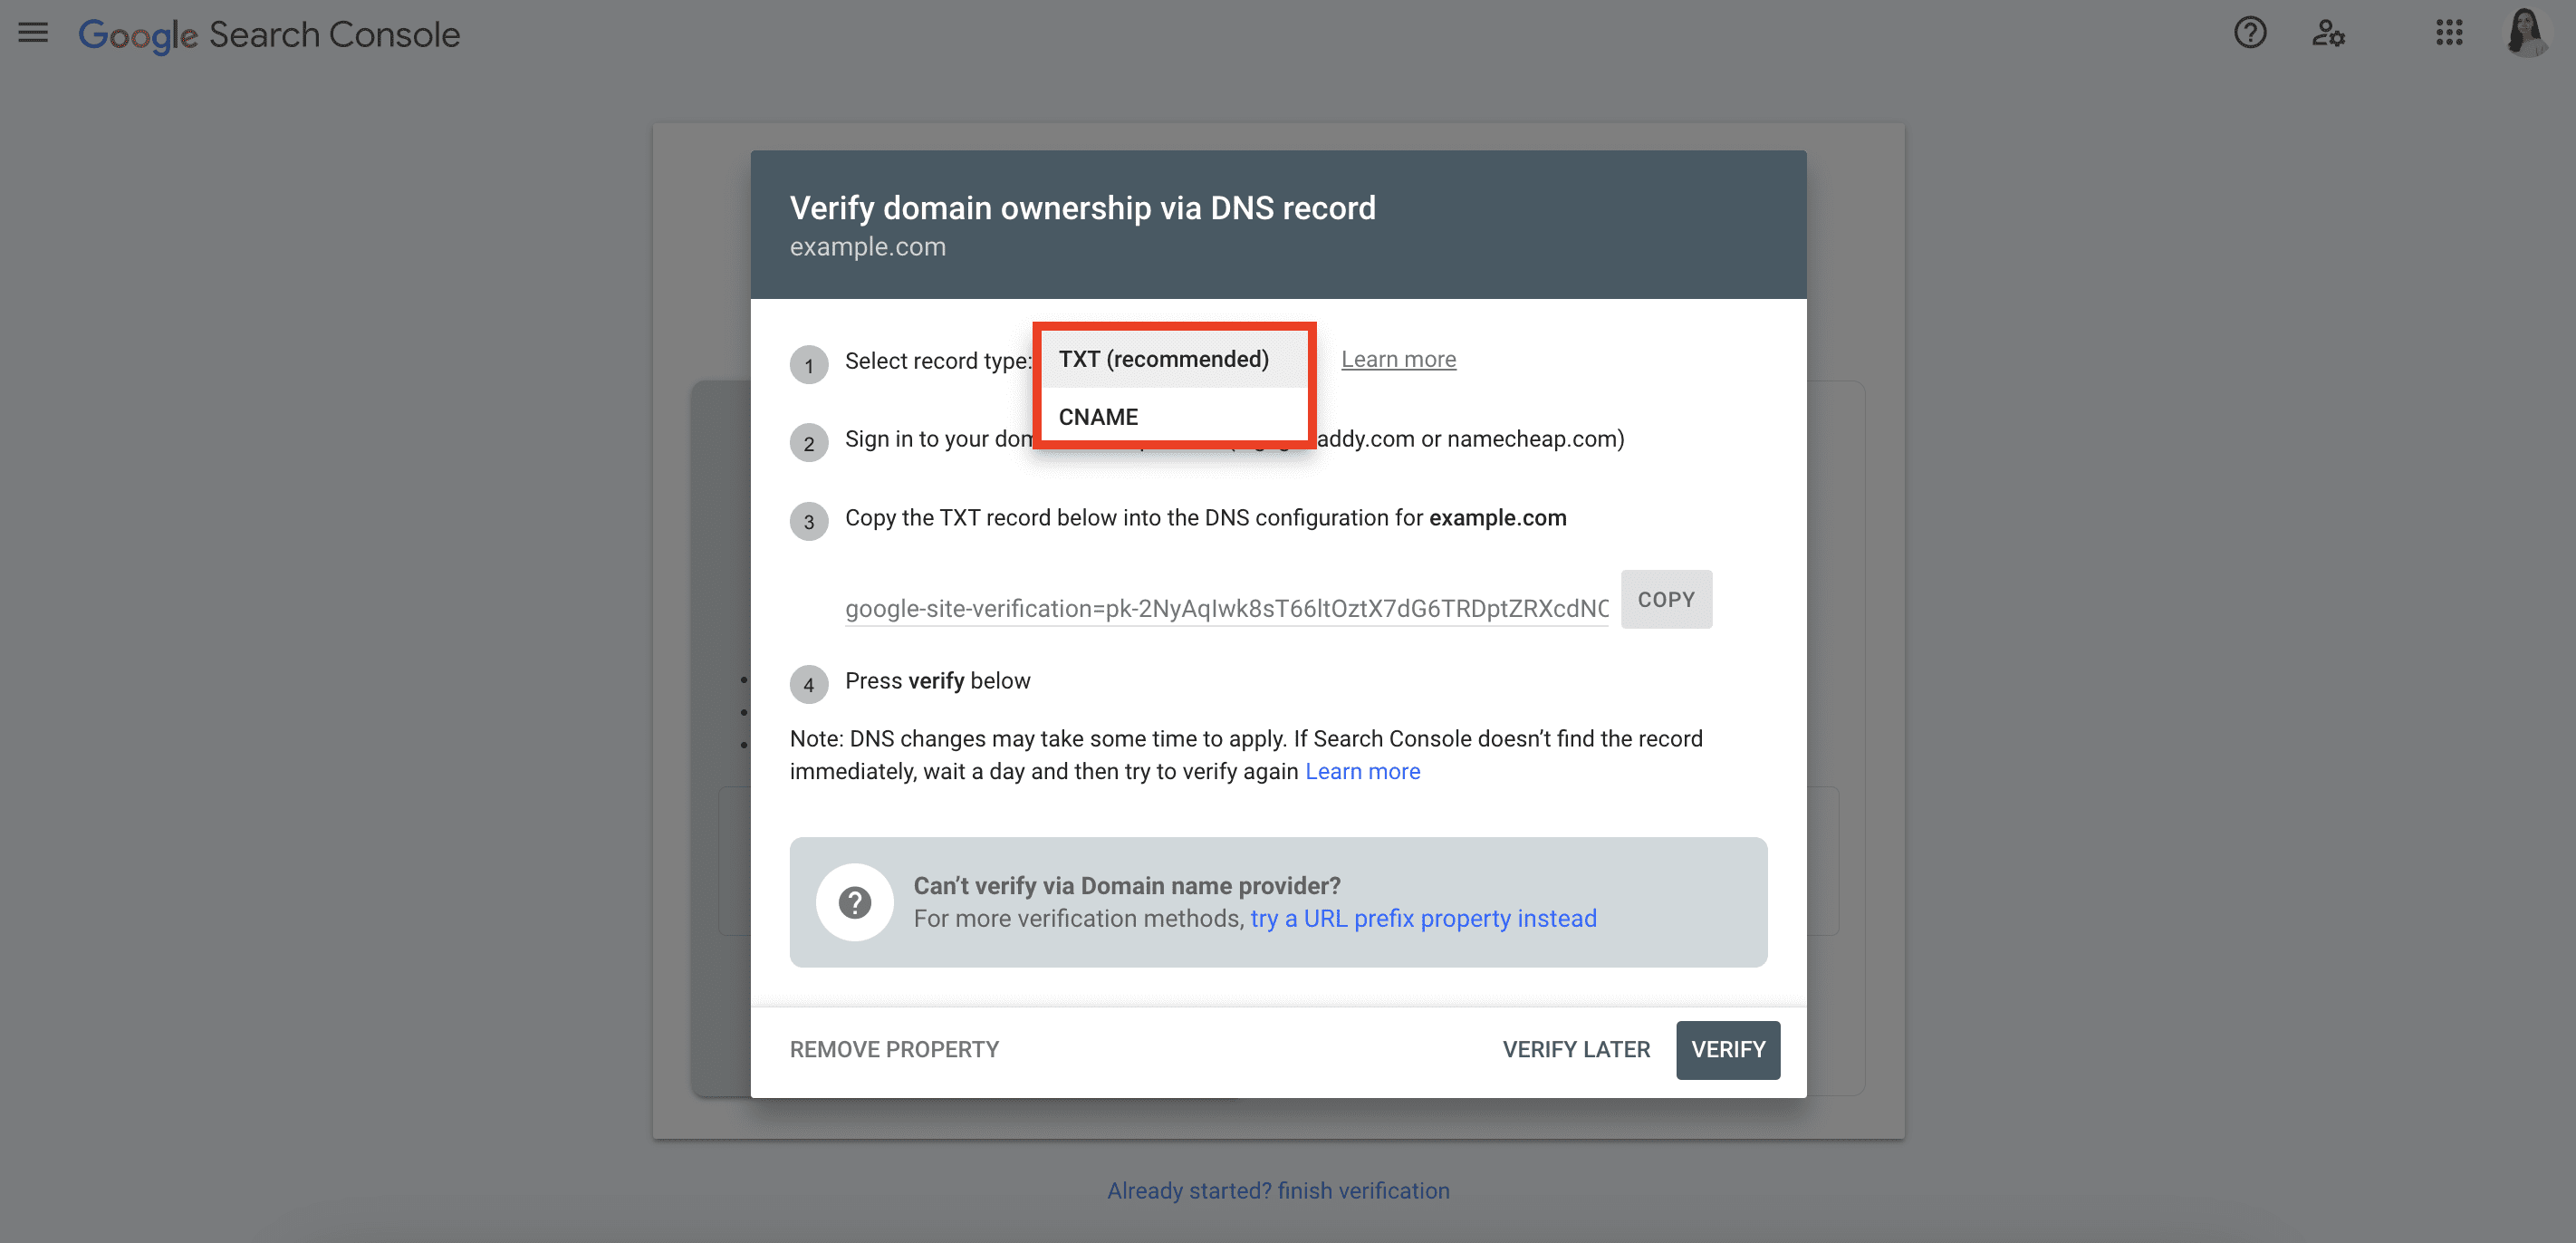
To determine which type to select, enter your domain name into the Google Admin Toolbox under the CNAME tab and observe the output. If the verification process indicates that no record is found, proceed with the TXT record type. If you see the output as a CNAME, pay close attention to the Target value. If the Target value corresponds to the parent domain of the domain you specified, then choose the CNAME record type. If it doesn’t match the parent domain, follow the TXT record instructions.
2. Depending on the chosen record type, copy the generated TXT record or CNAME Label/Host and CNAME Destination/Target and paste them into your domain provider.
3. Click on the Verify button on the GSC verification details page.
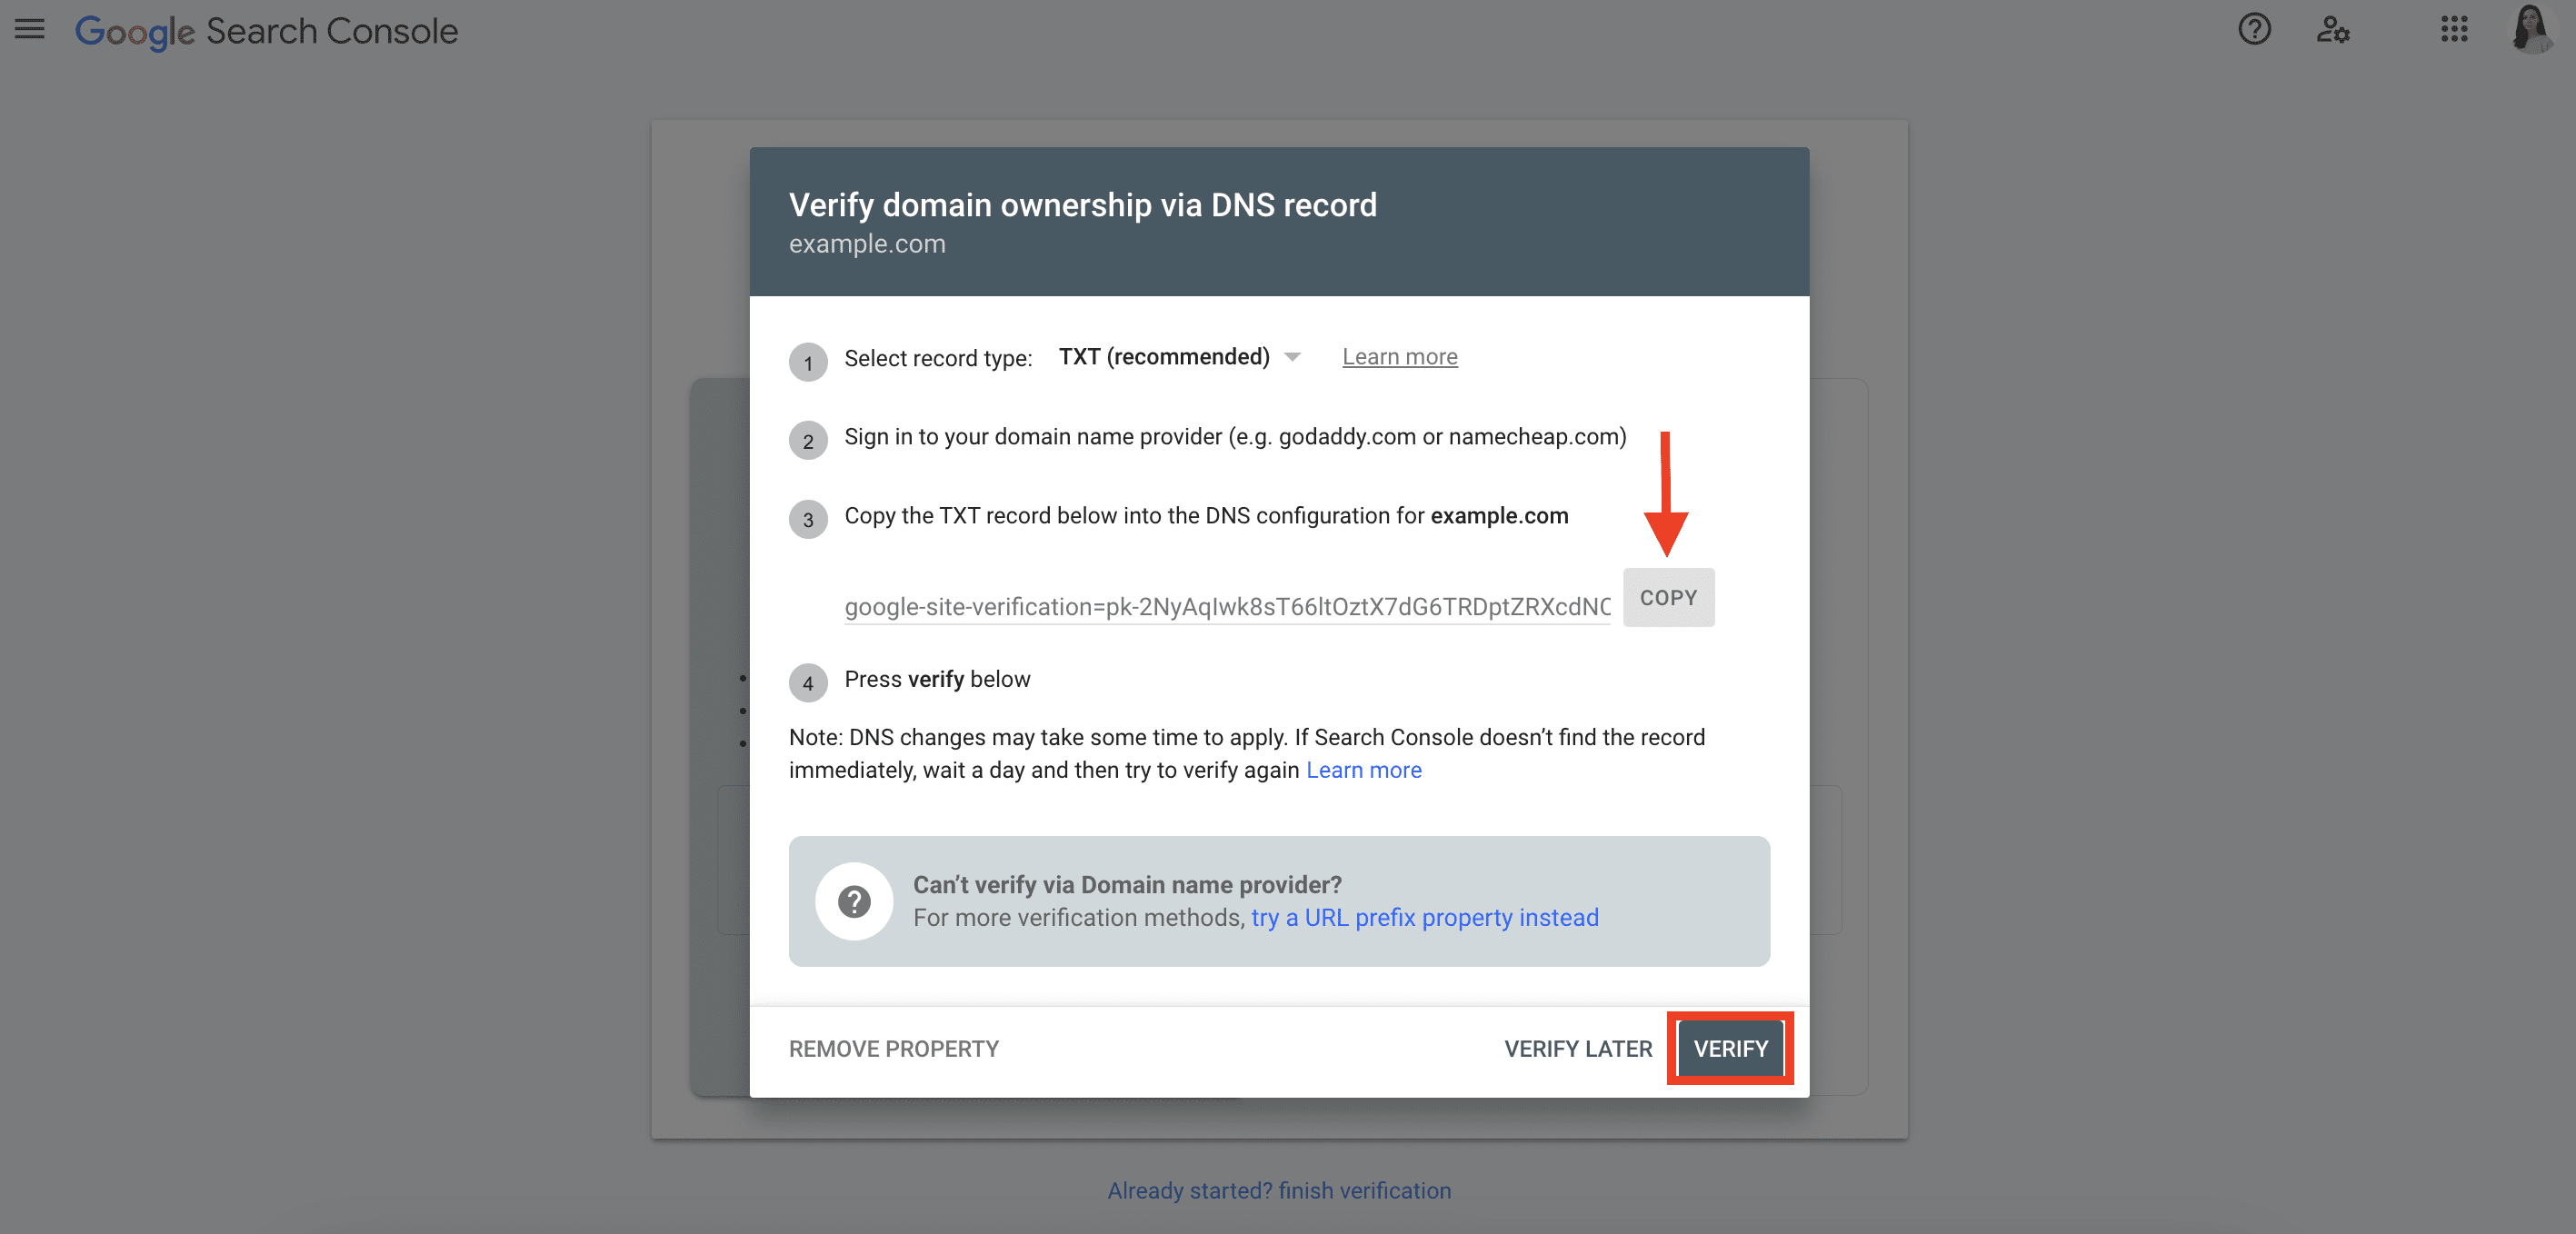
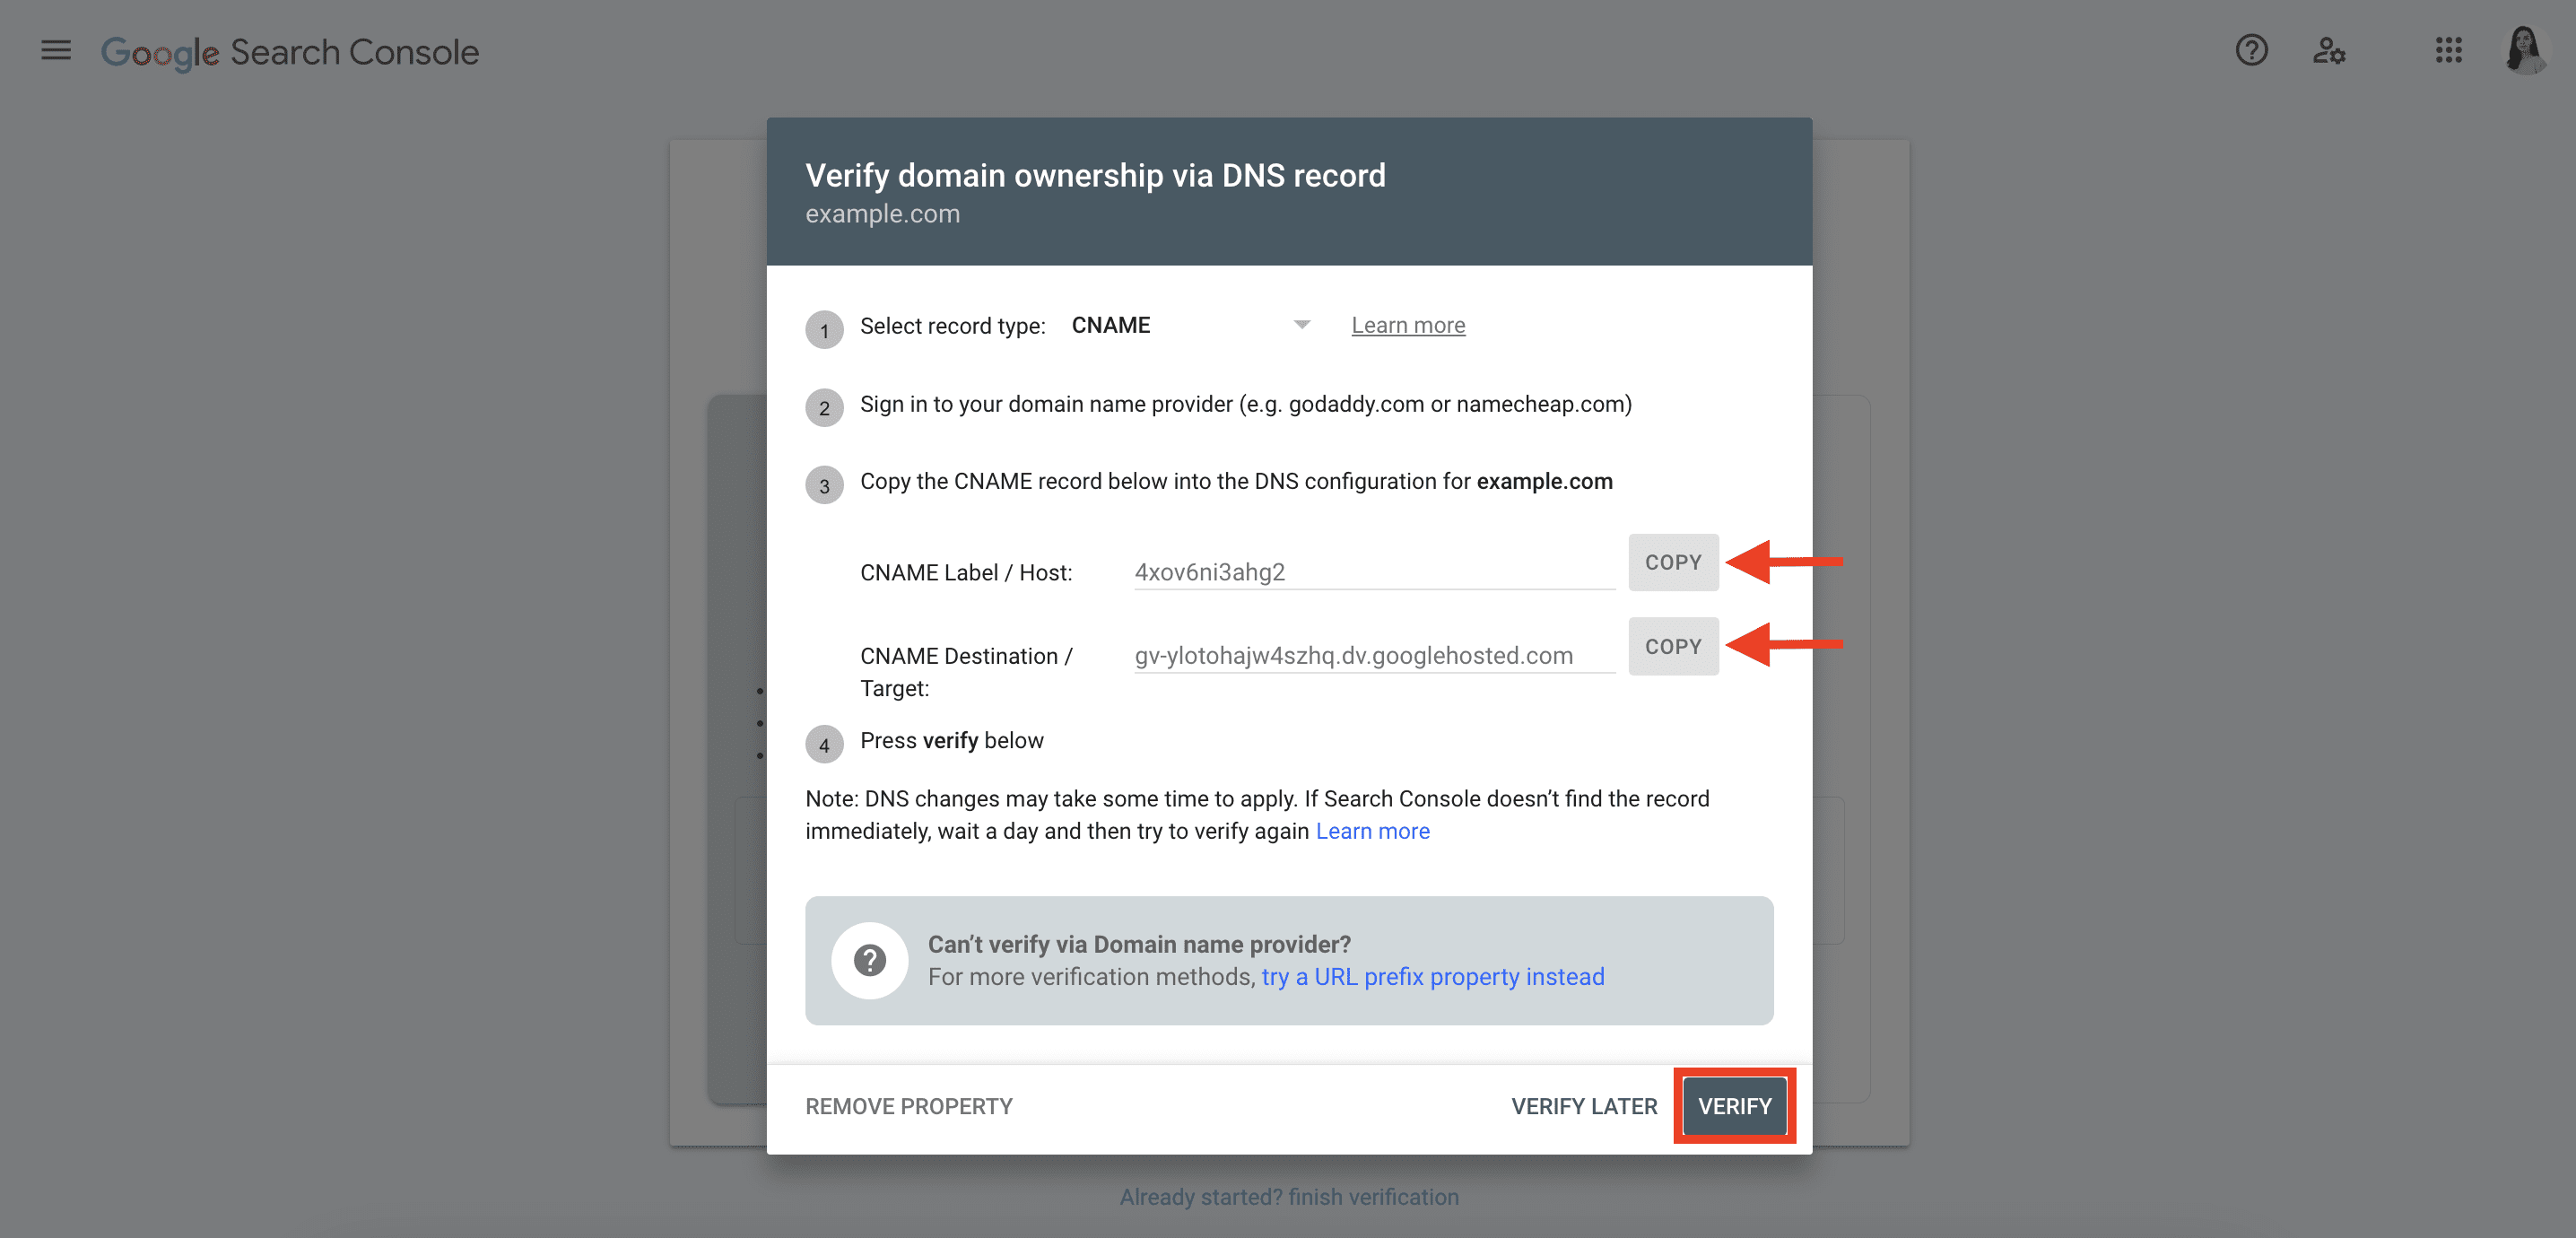
Note that your provider will need up to two or three days to start serving the record.
If you don’t know what your domain host is, review the Google instructions on how to find your domain host. After identifying the DNS provider, choose it in the drop-down list, or select the Any DNS provider.
Adding a property to Search Console using the URL-prefix
The URL-prefix property supports four Google Search Console verification methods: HTML file upload, Meta tag, Google Analytics, and Google tag manager. This property type lets users analyze individual subsections of a website in Google Search Console. For example, if your site contains subfolders covering Germany and France, consider creating separate accounts for them:
- https://www.website.com/
- https://www.website.com/germany/
- https://www.website.com/france/
You also have to add a separate property for http and https protocols:
- http://www.website.com/
- https://www.website.com/
Also, include a separate property for each subdomain:
- http://m.website.com/
- http://website.com
- http://www.website.com
We’ll go over how to configure your Google Search Console setup for URL-Prefix properties later on in this article.
How to get your website verified in Google Search Console
Now that we have covered the steps for domain and URL-Prefix properties, let’s look at how other verification methods work. Each method caters to different types of websites, technical setups and site access levels. This way, Google ensures that almost any legitimate site owner and their coworkers can verify that it is their property in Search Console, regardless of their specific circumstances. We have provided detailed step-by-step instructions for each scenario below.
By adding an HTML tag
Here’s how to set up Google Search Console by adding a meta tag:
1. Select the URL Prefix property type and add your website URL.
2. If HTML tag doesn’t appear as a recommended method, go to Other Verification Methods and select the HTML tag option.
3. Copy the provided meta tag. It will be unique and tied to a specific user.
4. Paste it into your website’s home page head tag (the page must be accessible to non-logged-in users) before the </head> tag, as shown in this example:
<head>
<title>examplesite.com homepage</title>
<meta name="google-site-verification" content="paste your meta tag here" />
</head>
Ensure that the meta tag is present on your live page. Visit your website’s home page and inspect the page source text to locate the meta tag. Check that the tag is copied and pasted exactly as provided.
5. The meta tag should be included within the first 2MB of the HTML file. External resources like scripts are not included in the size calculation.
6. Click Verify in Search Console.
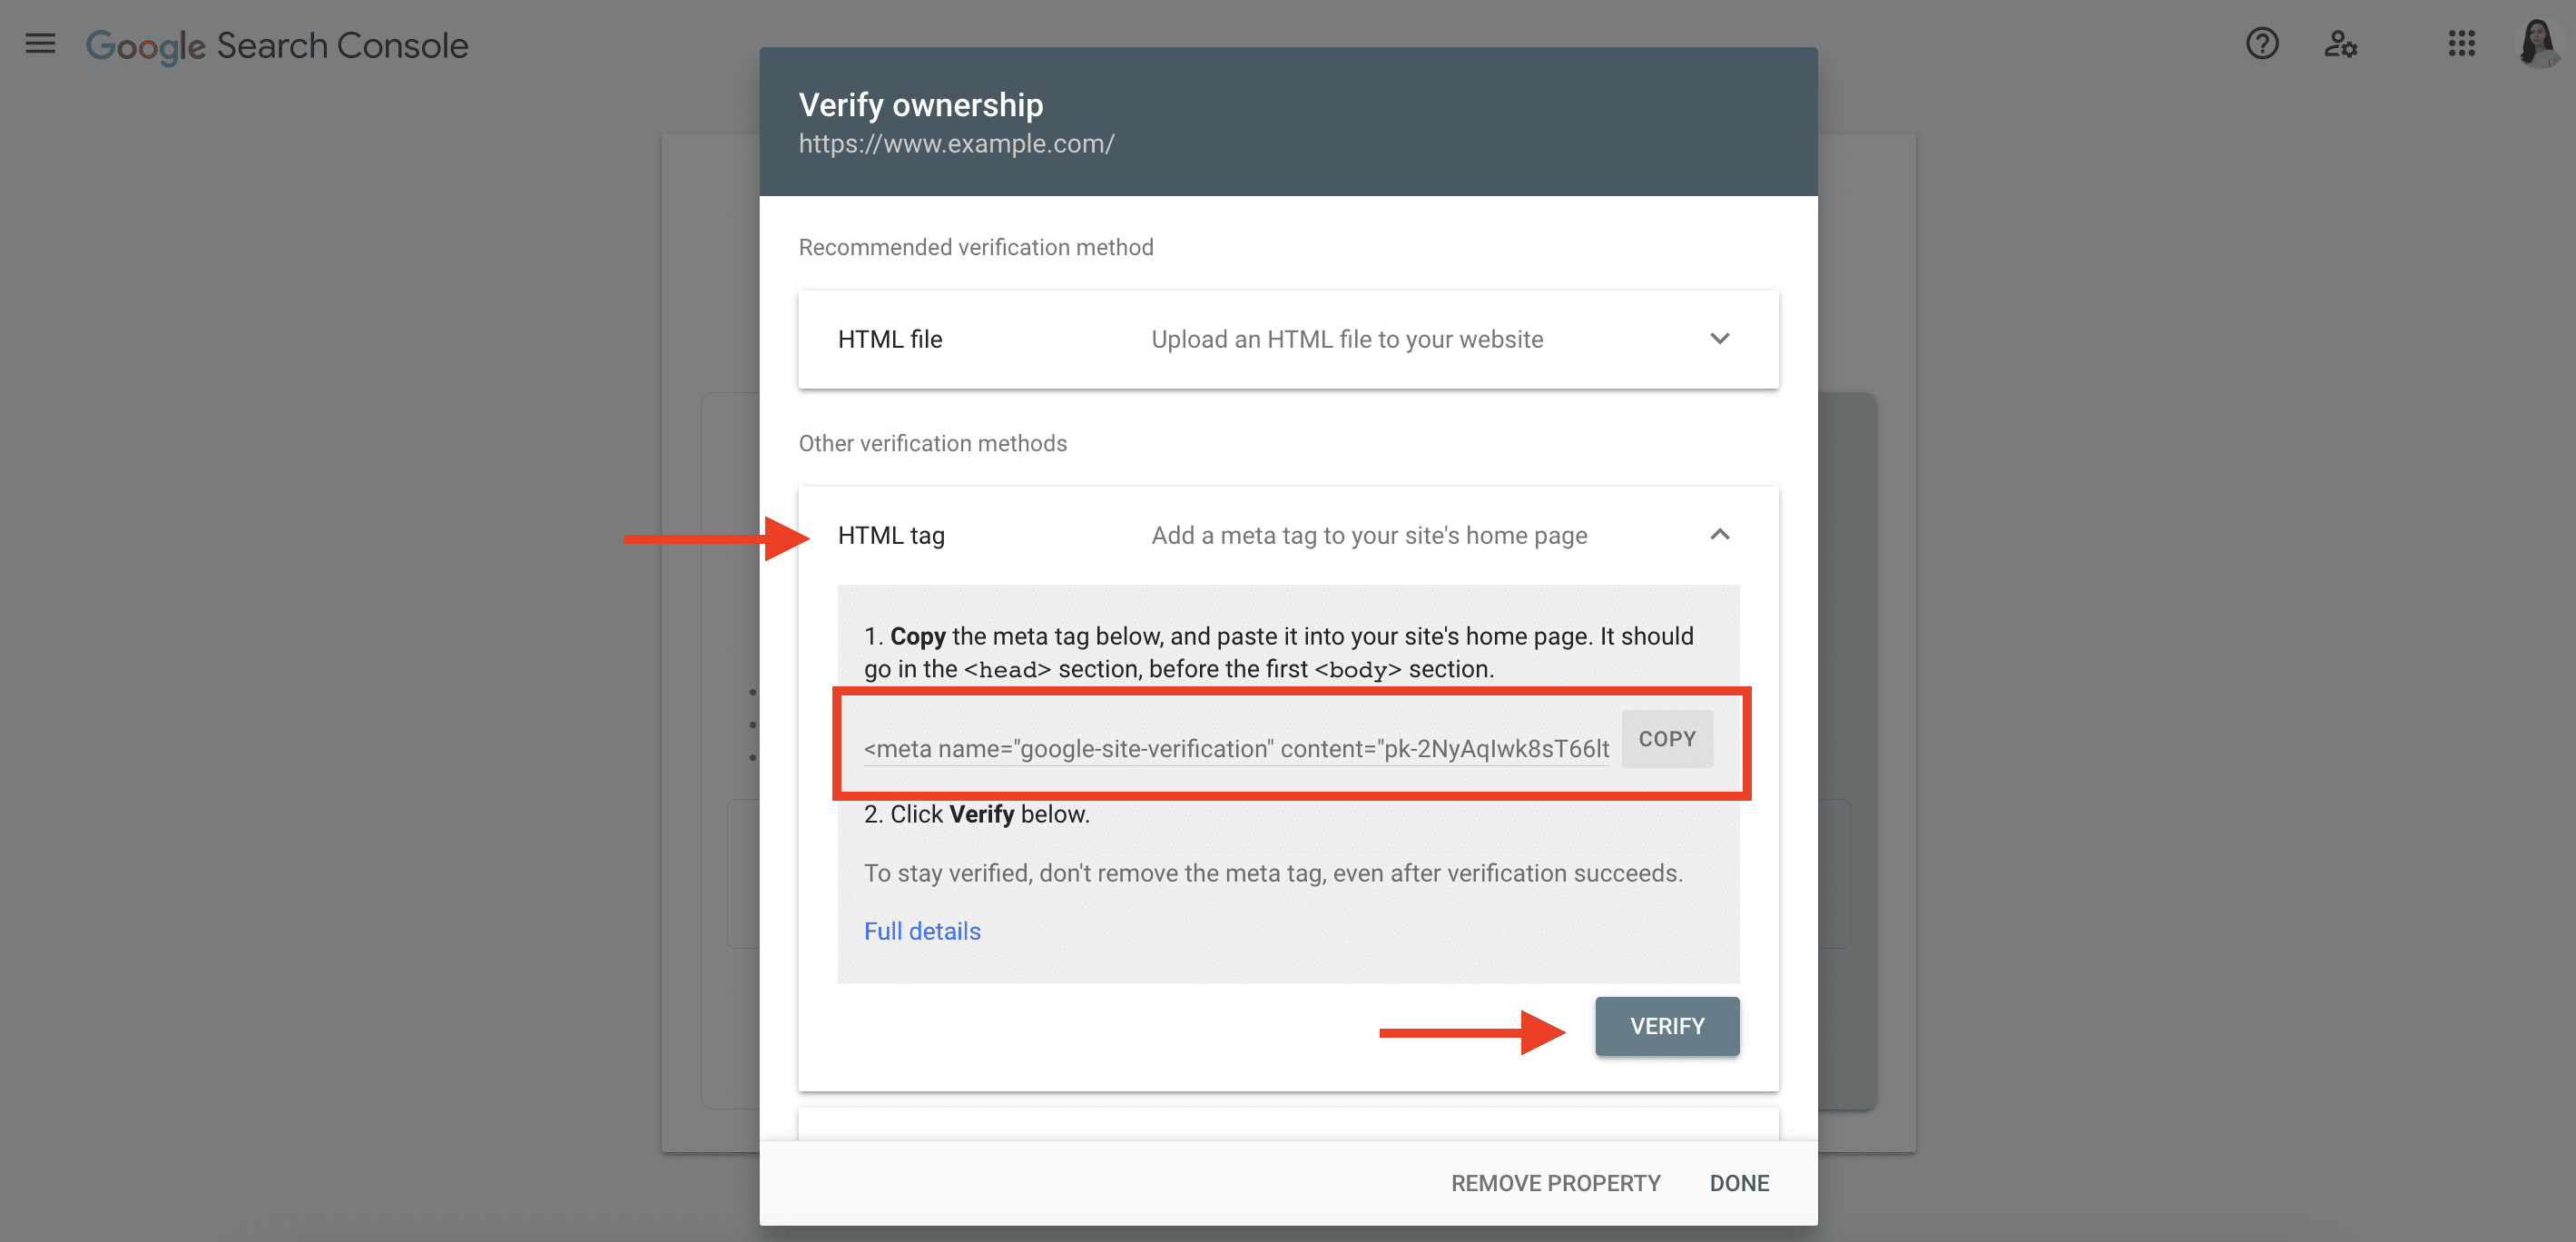
GSC will analyze whether the meta tag exists on that page. If it is missing or any other error occurs, you’ll get a notification with detailed information about the error. The system will also periodically check if the tag is still present on the page. If it is removed, you’ll be required to repeat the verification process.
Please note that only users with permission to edit the site’s source code can add the meta tag. You should choose a different method if you don’t have permission, or ask an authorized person to do it for you. If you’re using a website hosting platform, refer to their help guides for specific instructions.
By uploading an HTML file
To prove your website ownership by uploading an HTML file, add your website URL in the URL Prefix property field exactly as it appears in the browser’s address bar.
Next, follow these steps:
- Expand the HTML section.
- Download the provided file.
- Upload it (exactly as it is) to the root directory, which is the topmost folder containing all files that make up your website.
- Click Verify in your Google Search Console account.
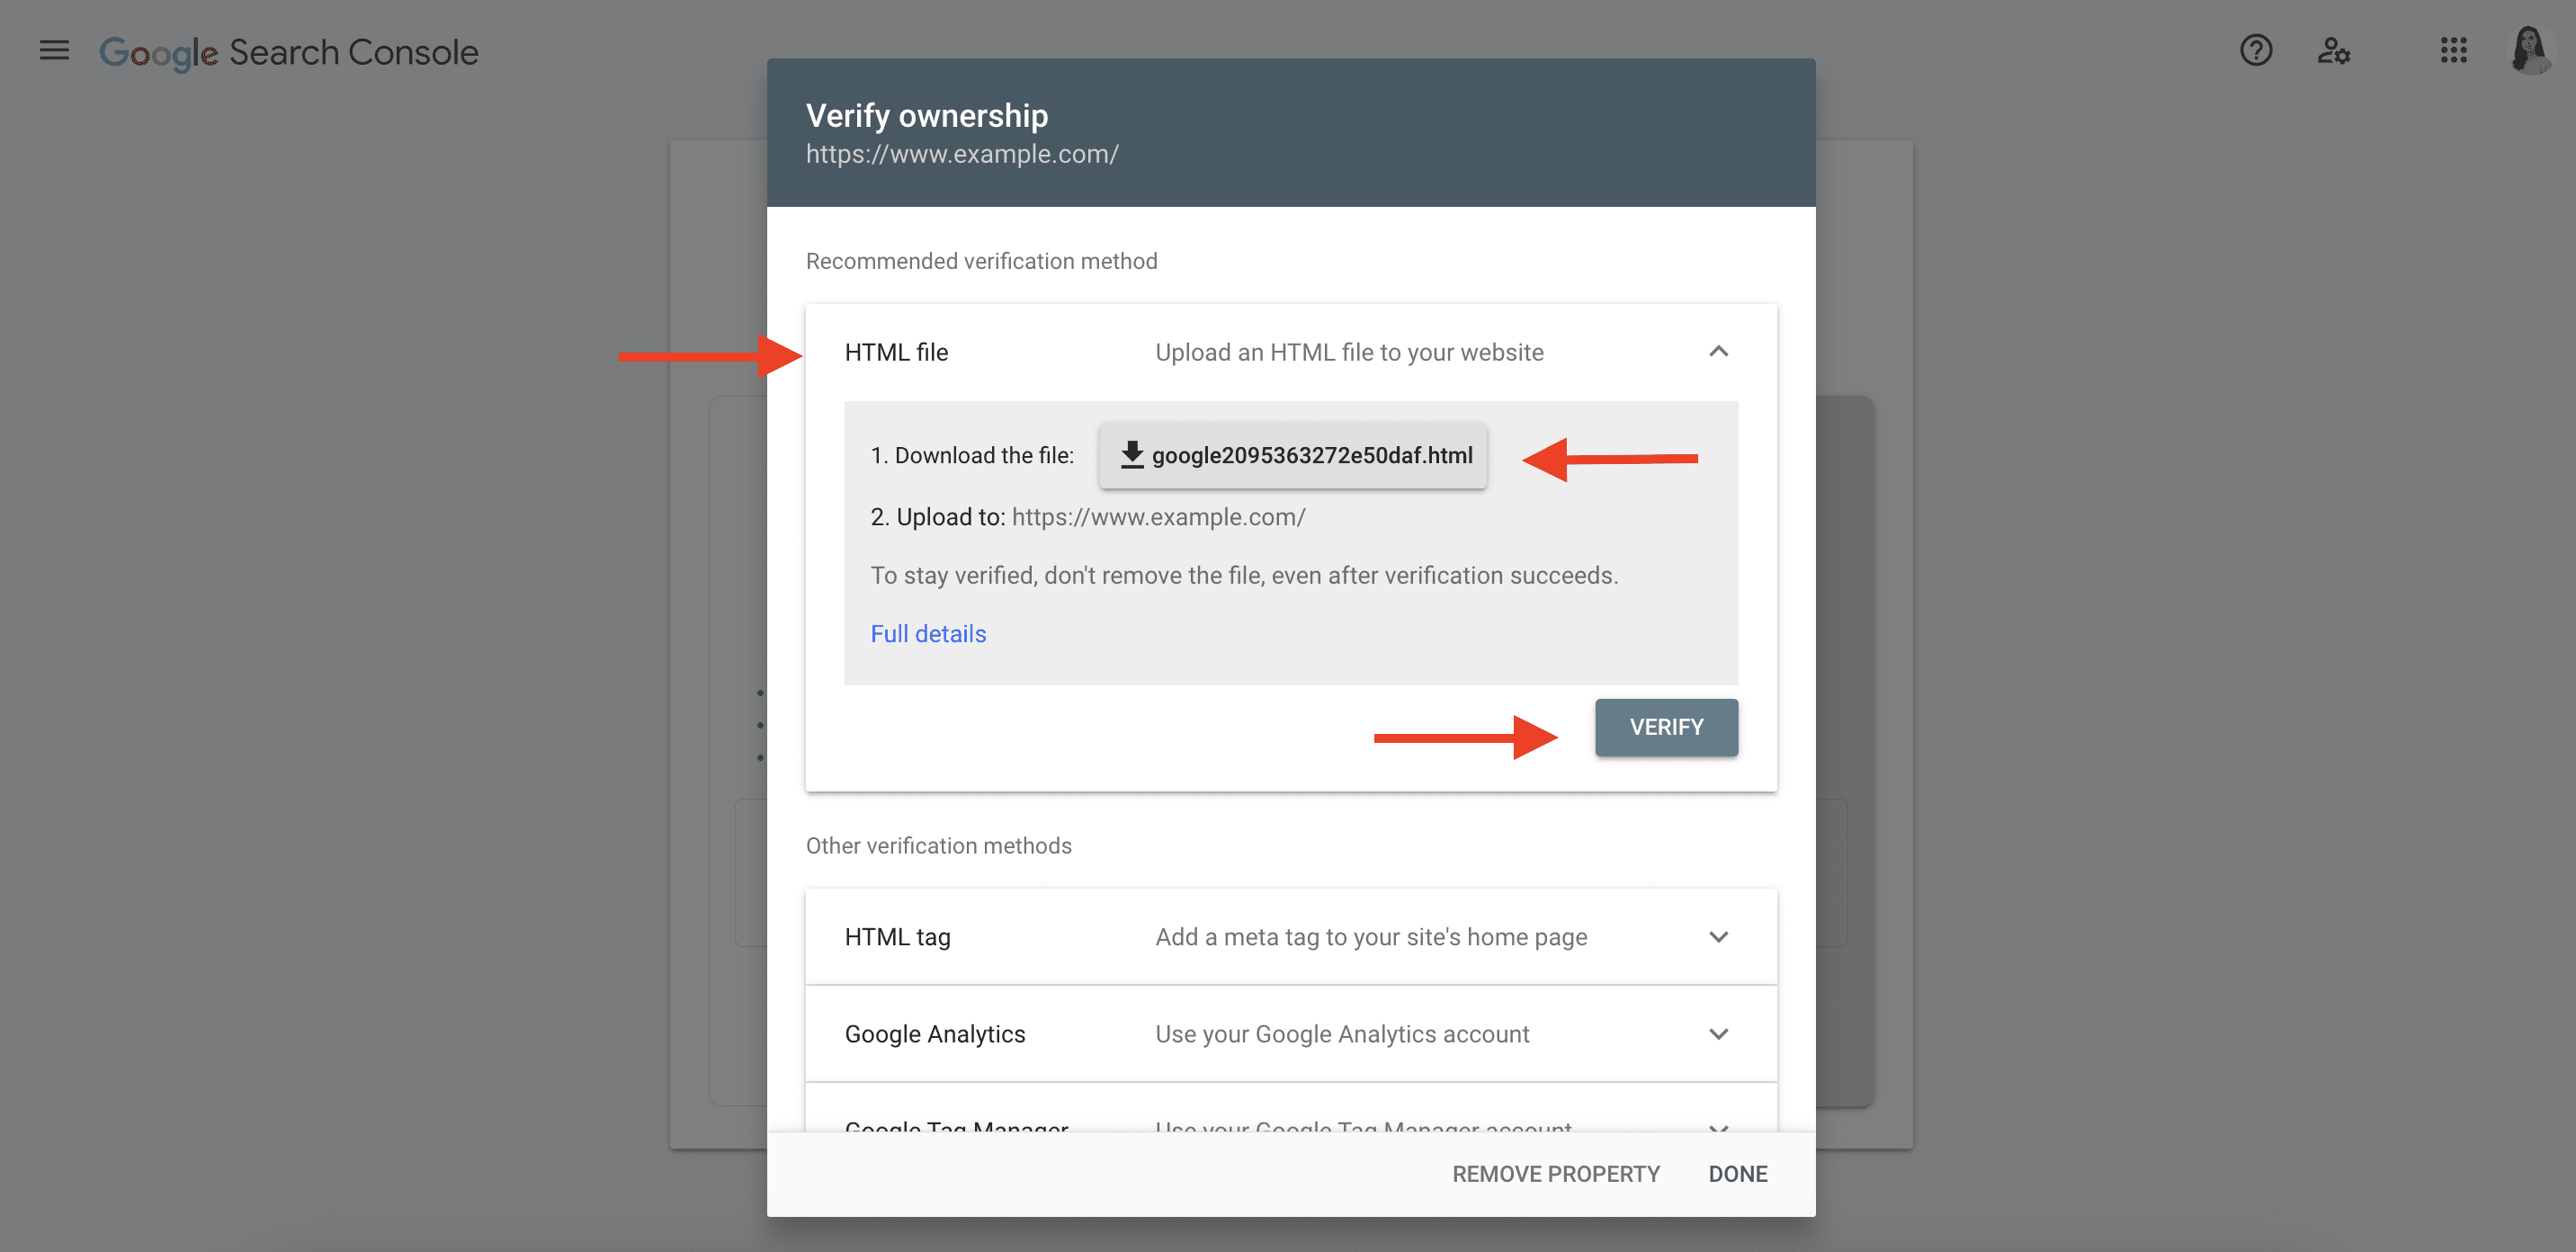
Here are some important considerations when using the HTML file method:
- The location where you upload the HTML file must be accessible to users who are not logged in. To confirm this, open the file in an incognito window to verify its accessibility.
- Ensure that you have the necessary access and permission to add files to the chosen location. If not, consider another option.
- Your website hosting platform might have custom requirements, so check its help pages before proceeding.
- If you remove the HTML file, you’ll lose verification.
- You can add more lines to the file after the main body, but avoid changing the file name or altering the main content.
- The HTML file is personalized for a specific user.
By using your Google Analytics account
This method can be used when you have access to both Google Search Console and Google Analytics accounts, and you are using the same Google account to manage both of them.
Here’s how to accomplish this:
- Make sure that you have at least editing permission in your Google Analytics account.
- Remember that the code in earlier versions of Google Analytics was connected to a Google Analytics Web Property. Because of the recent migration to GA4, the code is now connected to a Google Analytics stream.
- Check that your home page doesn’t require users to log in and that it has the analytics.js or gtag.js snippet. Please note that GSC only supports the latest version of the Google Analytics snippet. If you have an older snippet that contains either _gat. or _getTracker|urchin.js, you must update it to the latest version.
- Confirm that the Google Analytics tracking code is located in the head section of your homepage. If the code is placed in the body section or elsewhere, this method will not work. Avoid making changes from within the tracking code itself.
- Make sure the code is there by opening the page in the web browser. Then access the page source and search for the specified snippet.
- The tag must be included in the first 2 MB of the HTML file (scripts aren’t counted).
After all preparatory steps have been completed, the next steps are simple. Here’s how to add a Google Analytics tracking code to Search Console:
- Log in to Search Console with the account you use for Google Analytics.
- Click Add Property, enter your website URL, and choose the Google Analytics section.
- Select Google Analytics as your verification method.
- Click on Verify.
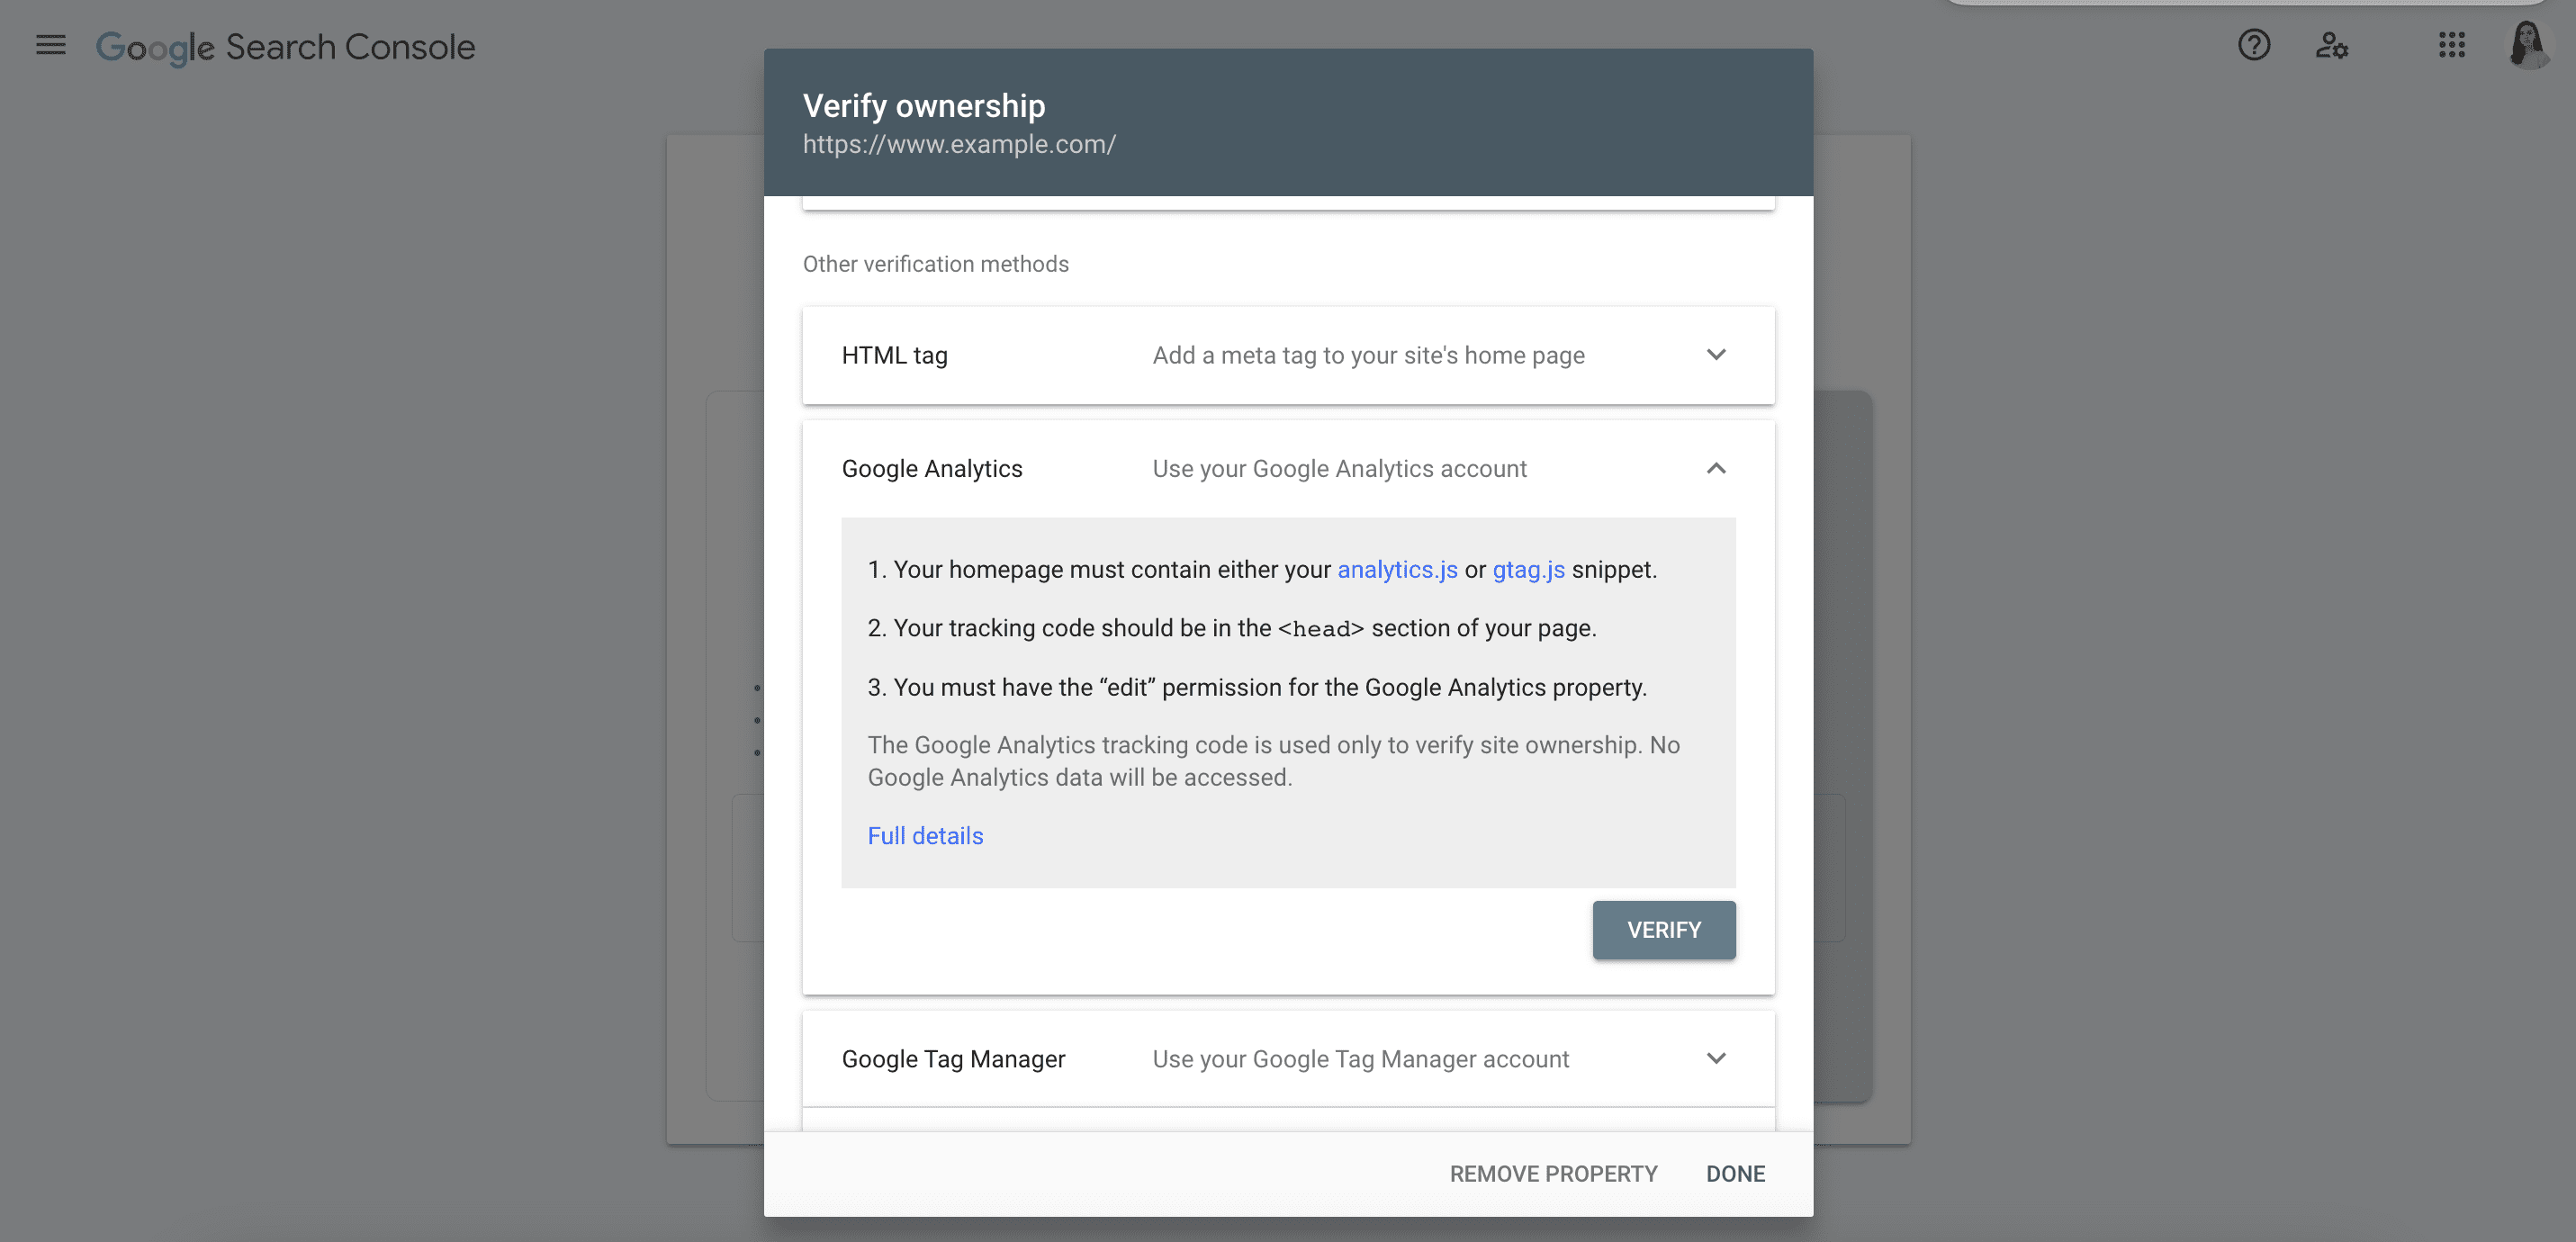
If you do everything right, it will be verified immediately.
By using your Google Tag Manager account
You can also use the Google Tag Manager container snippet to submit your site to Google Search Console. If you haven’t created one yet, simply follow these instructions.
Before proceeding with GSC authentication, you will need to conduct some preparatory activities:
- Make sure that you have Publish or Admin permission to your container.
- Log in to the Search Console using the same account that you use for Google Tag Manager.
- Check that non-logged-in users can access your home page.
- The Tag Manager code must be on the home page immediately after the opening <body> tag. It’s crucial to avoid inserting any content between the <body> tag and the Tag Manager code.
- Don’t change the code, as any changes may invalidate it.
- View the required page source to confirm the presence of the code.
Now you can get back to GSC and continue the process:
- Click Add Property, then enter your website URL.
- Choose the Google Tag Manager section.
- Click on the Verify button.
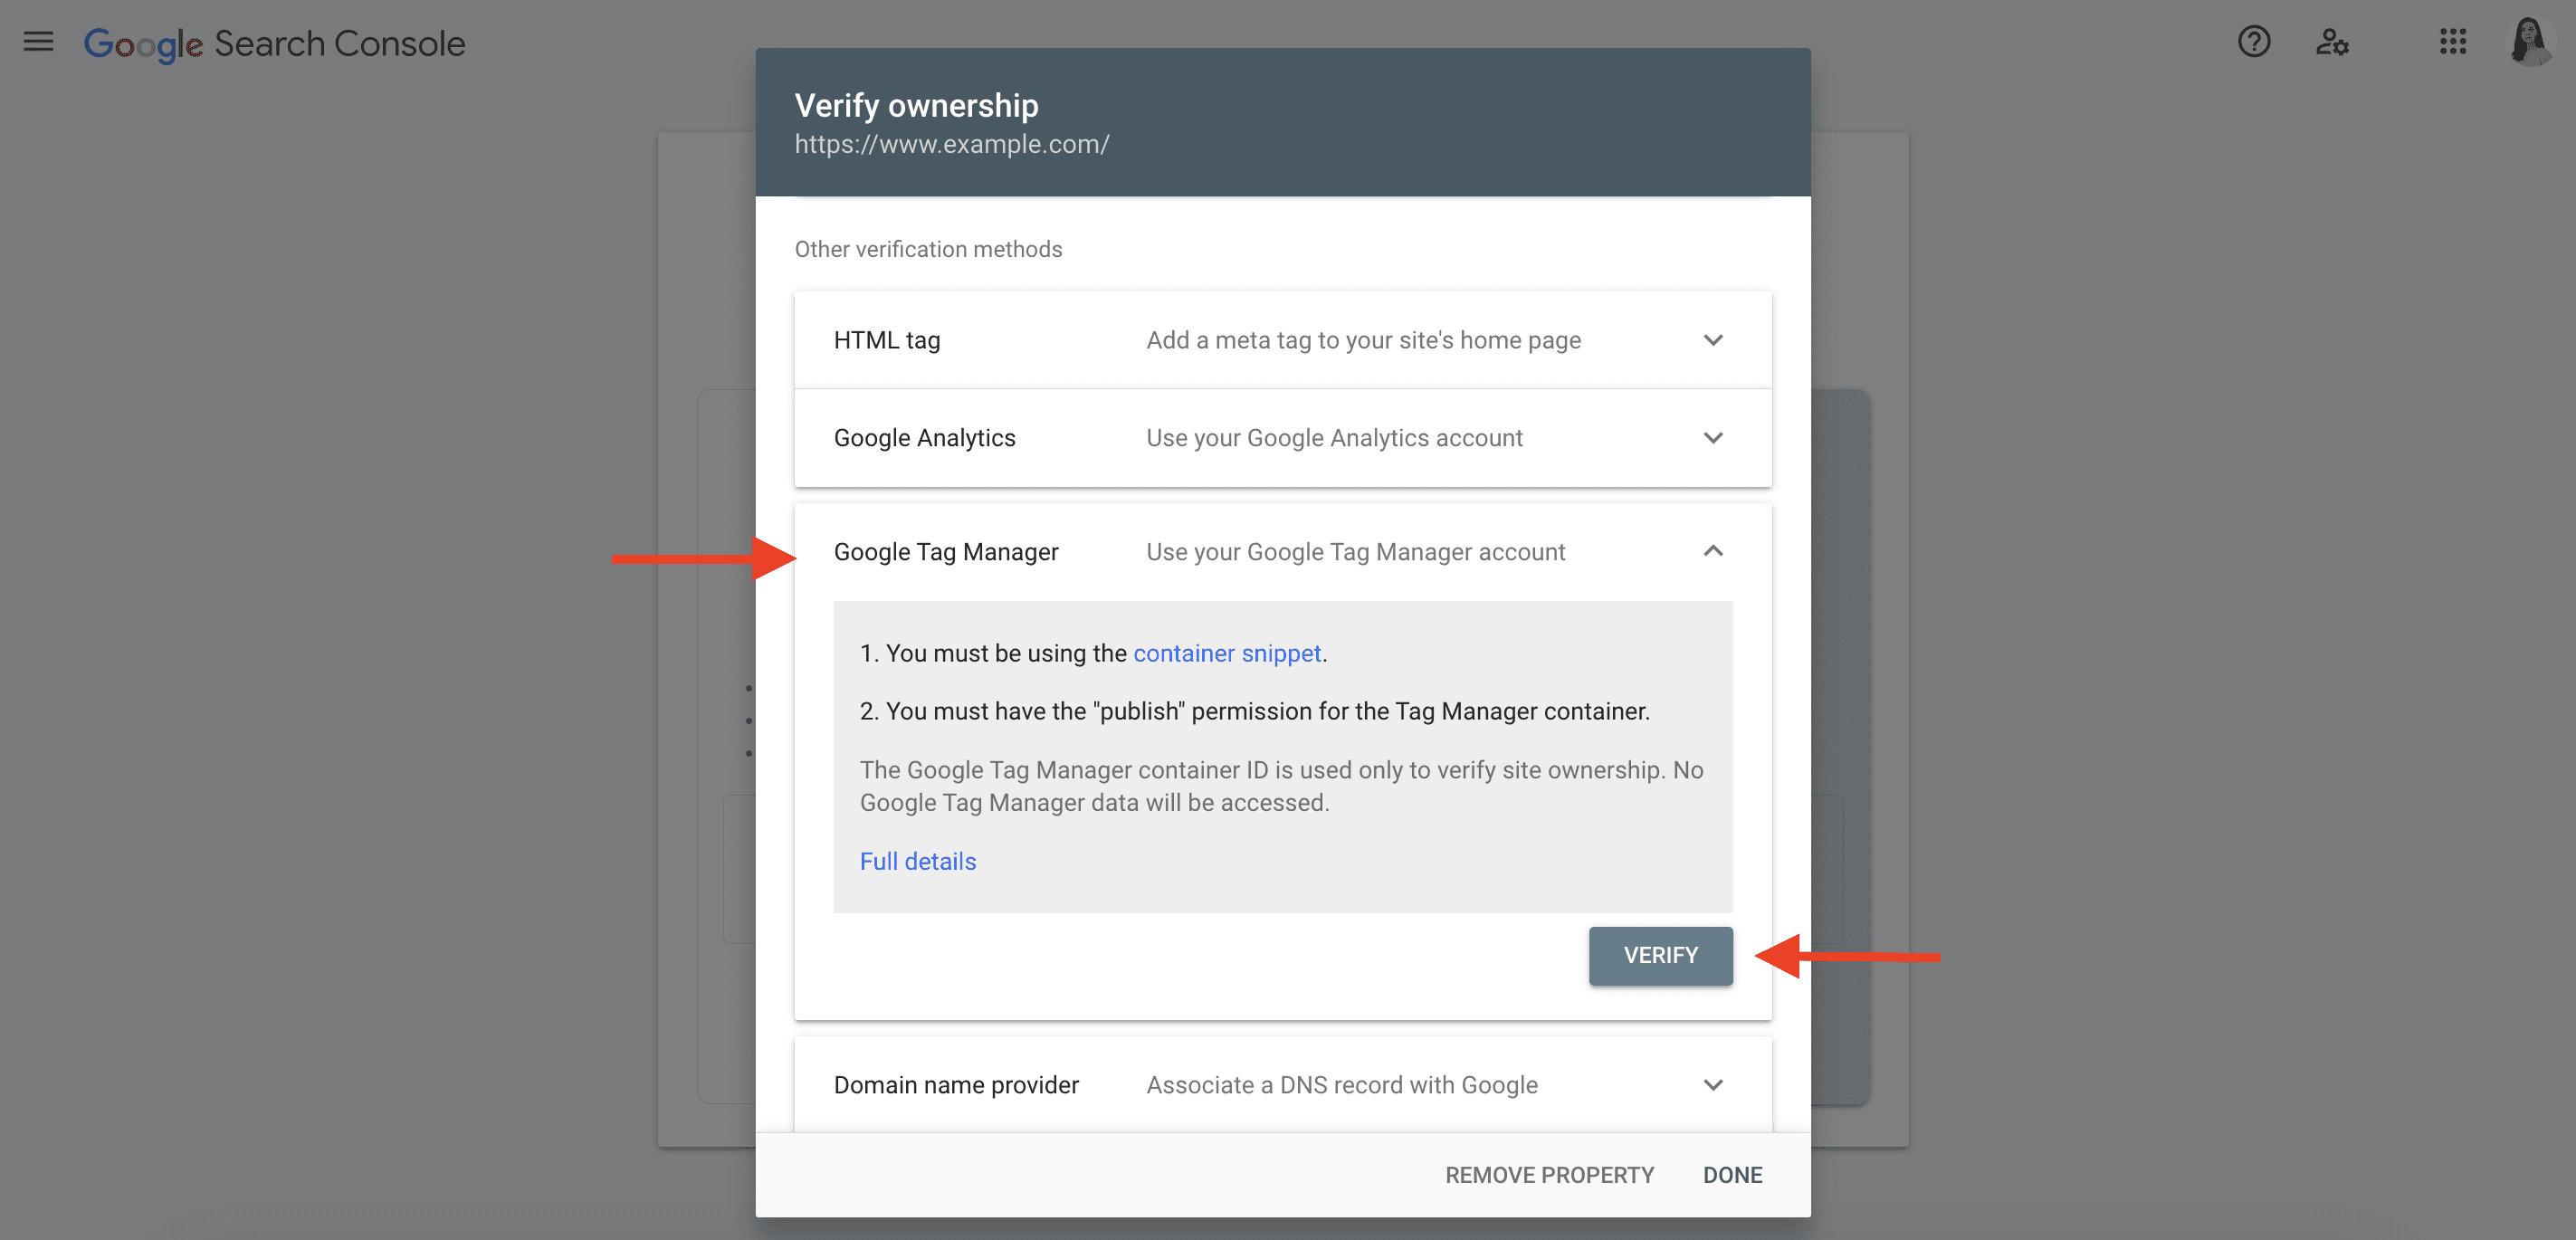
Adding a Google-hosted property to Search Console (Sites, Blogger, Workspace)
If you created your website with Google Sites, created a blog with Blogger, or used Google Domains, you can create either a Domain or URL-prefix property. You must be logged in with the same account you use to manage your Google-hosted website. This ensures that your website can be automatically verified.
If the authentication process doesn’t happen automatically, you’ll need to follow specific instructions based on the property type you selected. Here are some rules to keep in mind:
- Select the Google Analytics Tracking Code method for Google Sites created after 2017.
- Use the HTML tag method for Google Sites or older blogs created before 2017.
Adding several domains to one Google Search Console account
Users can add up to 1000 properties to their GSC account, but whether they should or shouldn’t is a topic of debate among webmasters. While most agree that owners can add multiple domains to their accounts without affecting SEO, search engines may not favor the use of non-standard SEO techniques. It would be wiser to keep your main projects separate and segment your websites instead of adding them to a single account.
But if you run official projects, such as working for multiple customers as an SEO specialist or running an agency, it can be more convenient to add multiple properties within a single account.
It’s also worth noting that Google doesn’t penalize you for adding multiple properties to a single account.
Common verification errors
Here are some common verification errors you may encounter and how to address them:
- Mistakes in tags, snippets, files
This error occurs when you make unauthorized changes to tags, code fragments, or files, rendering them invalid for verification. Ensure that you use the exact tag, code snippet, or file you received.
- Your file, tag, or code wasn’t found in the required location or was found in the wrong location
This can happen when the files, tags, snippets, or codes are not placed correctly according to the chosen verification method. For example, GSC won’t verify your website if your HTML file isn’t in the root folder of your property or if the HTML tag isn’t in the <head> section of the page. Follow location requirements precisely.
- Server timeout
If there is a server timeout, GSC may be unable to verify your file, tag, code, or snippet. This can happen when the server is temporarily down or responding slowly. Ensure that your server operates well and try again.
- DNS lookup error
A DNS issue can prevent GSC from accessing your file. This could indicate problems with your server or DNS routing. Double-check that your domain is resolving correctly before attempting again.
- Excessive redirection
GSC won’t follow redirects to another domain but can handle redirects within the same domain. Still, the process may fail if the download request is redirected multiple times or caught in a loop. Check the URL for any redirection problems that may hinder the process.
- Invalid server response
If your site requires password authentication or GSC is unable to access it for any other reason, it can result in an invalid server response during verification. Ensure that the location where you place your file or tag is accessible to non-logged-in users.
- Domain not found
GSC tried to resolve the provided site URL but failed because it was unknown to the DNS service. Double-check that you have entered the correct URL for your property.
How long does it take for Google Search Console to show data?
Google Search Console typically takes 2-3 days to collect and display initial data for your website. However, this timeframe can vary depending on various factors.
To stay informed about data updates, check when the data was last updated in the top right corner of each report.
If you’re not seeing any data after several days, consider the following:
- Ensure your website is accessible to Google’s crawlers. You can use a robots.txt tester to check this. URLs blocked from crawling will be highlighted in red, while pages that are allowed for crawling will be highlighted in green. The tool also shows the robots.txt file for each domain.
- Verify that the URL of the property you’ve added to Search Console is correct and properly verified.
- Check whether there are any other notifications from Search Console in the service or in your mailbox.
If you’re still experiencing problems, search for solutions in the Search Console Help Center’s troubleshooting resources. For this specific issue, take a look at this support thread. Alternatively, you can contact Google Search Console directly for further assistance.
What’s next?
After setting up your Google Search Console account and verifying your website, it’s highly recommended to submit a sitemap to Google Search Console. Sitemaps help Google crawl and index your site to rank them higher.
Search robots will explore your site naturally by following the links. However, you can help them do it more efficiently by providing a file with all the website’s URLs that crawlers should take into account.
Once you have a sitemap, click the Sitemaps section in the navigation sidebar, click Add a new sitemap, enter your sitemap URL, and click the Submit button.
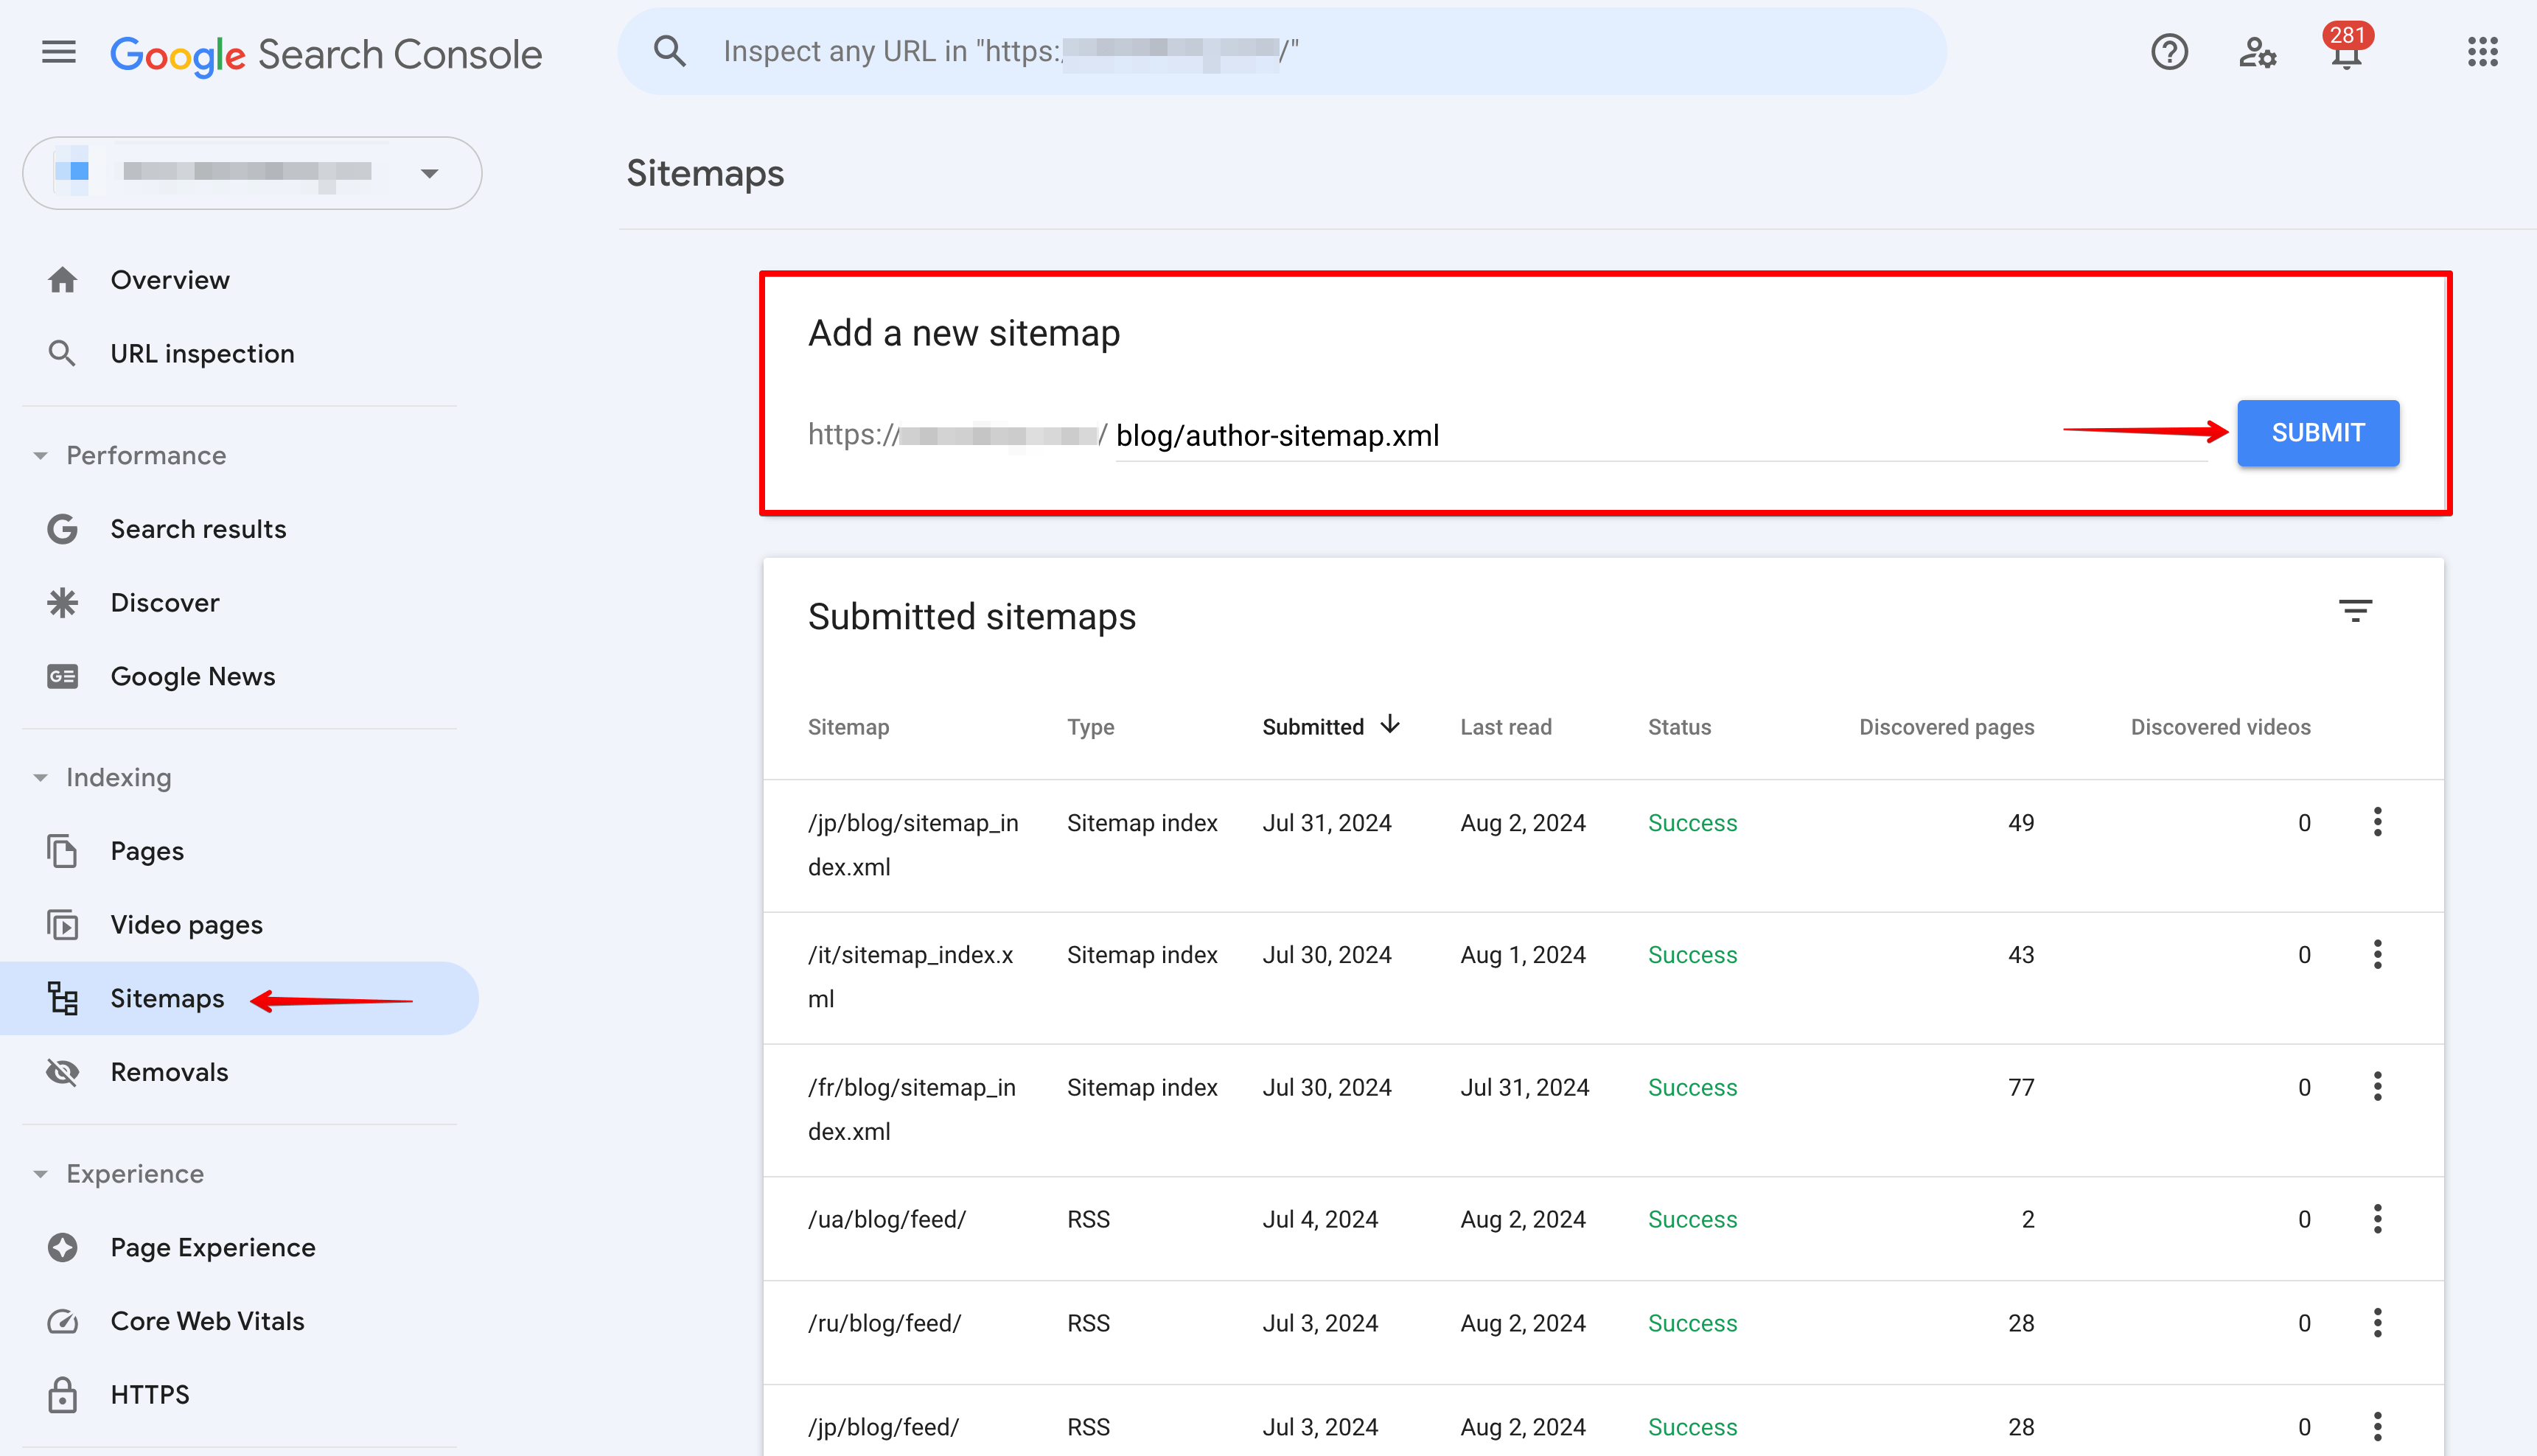
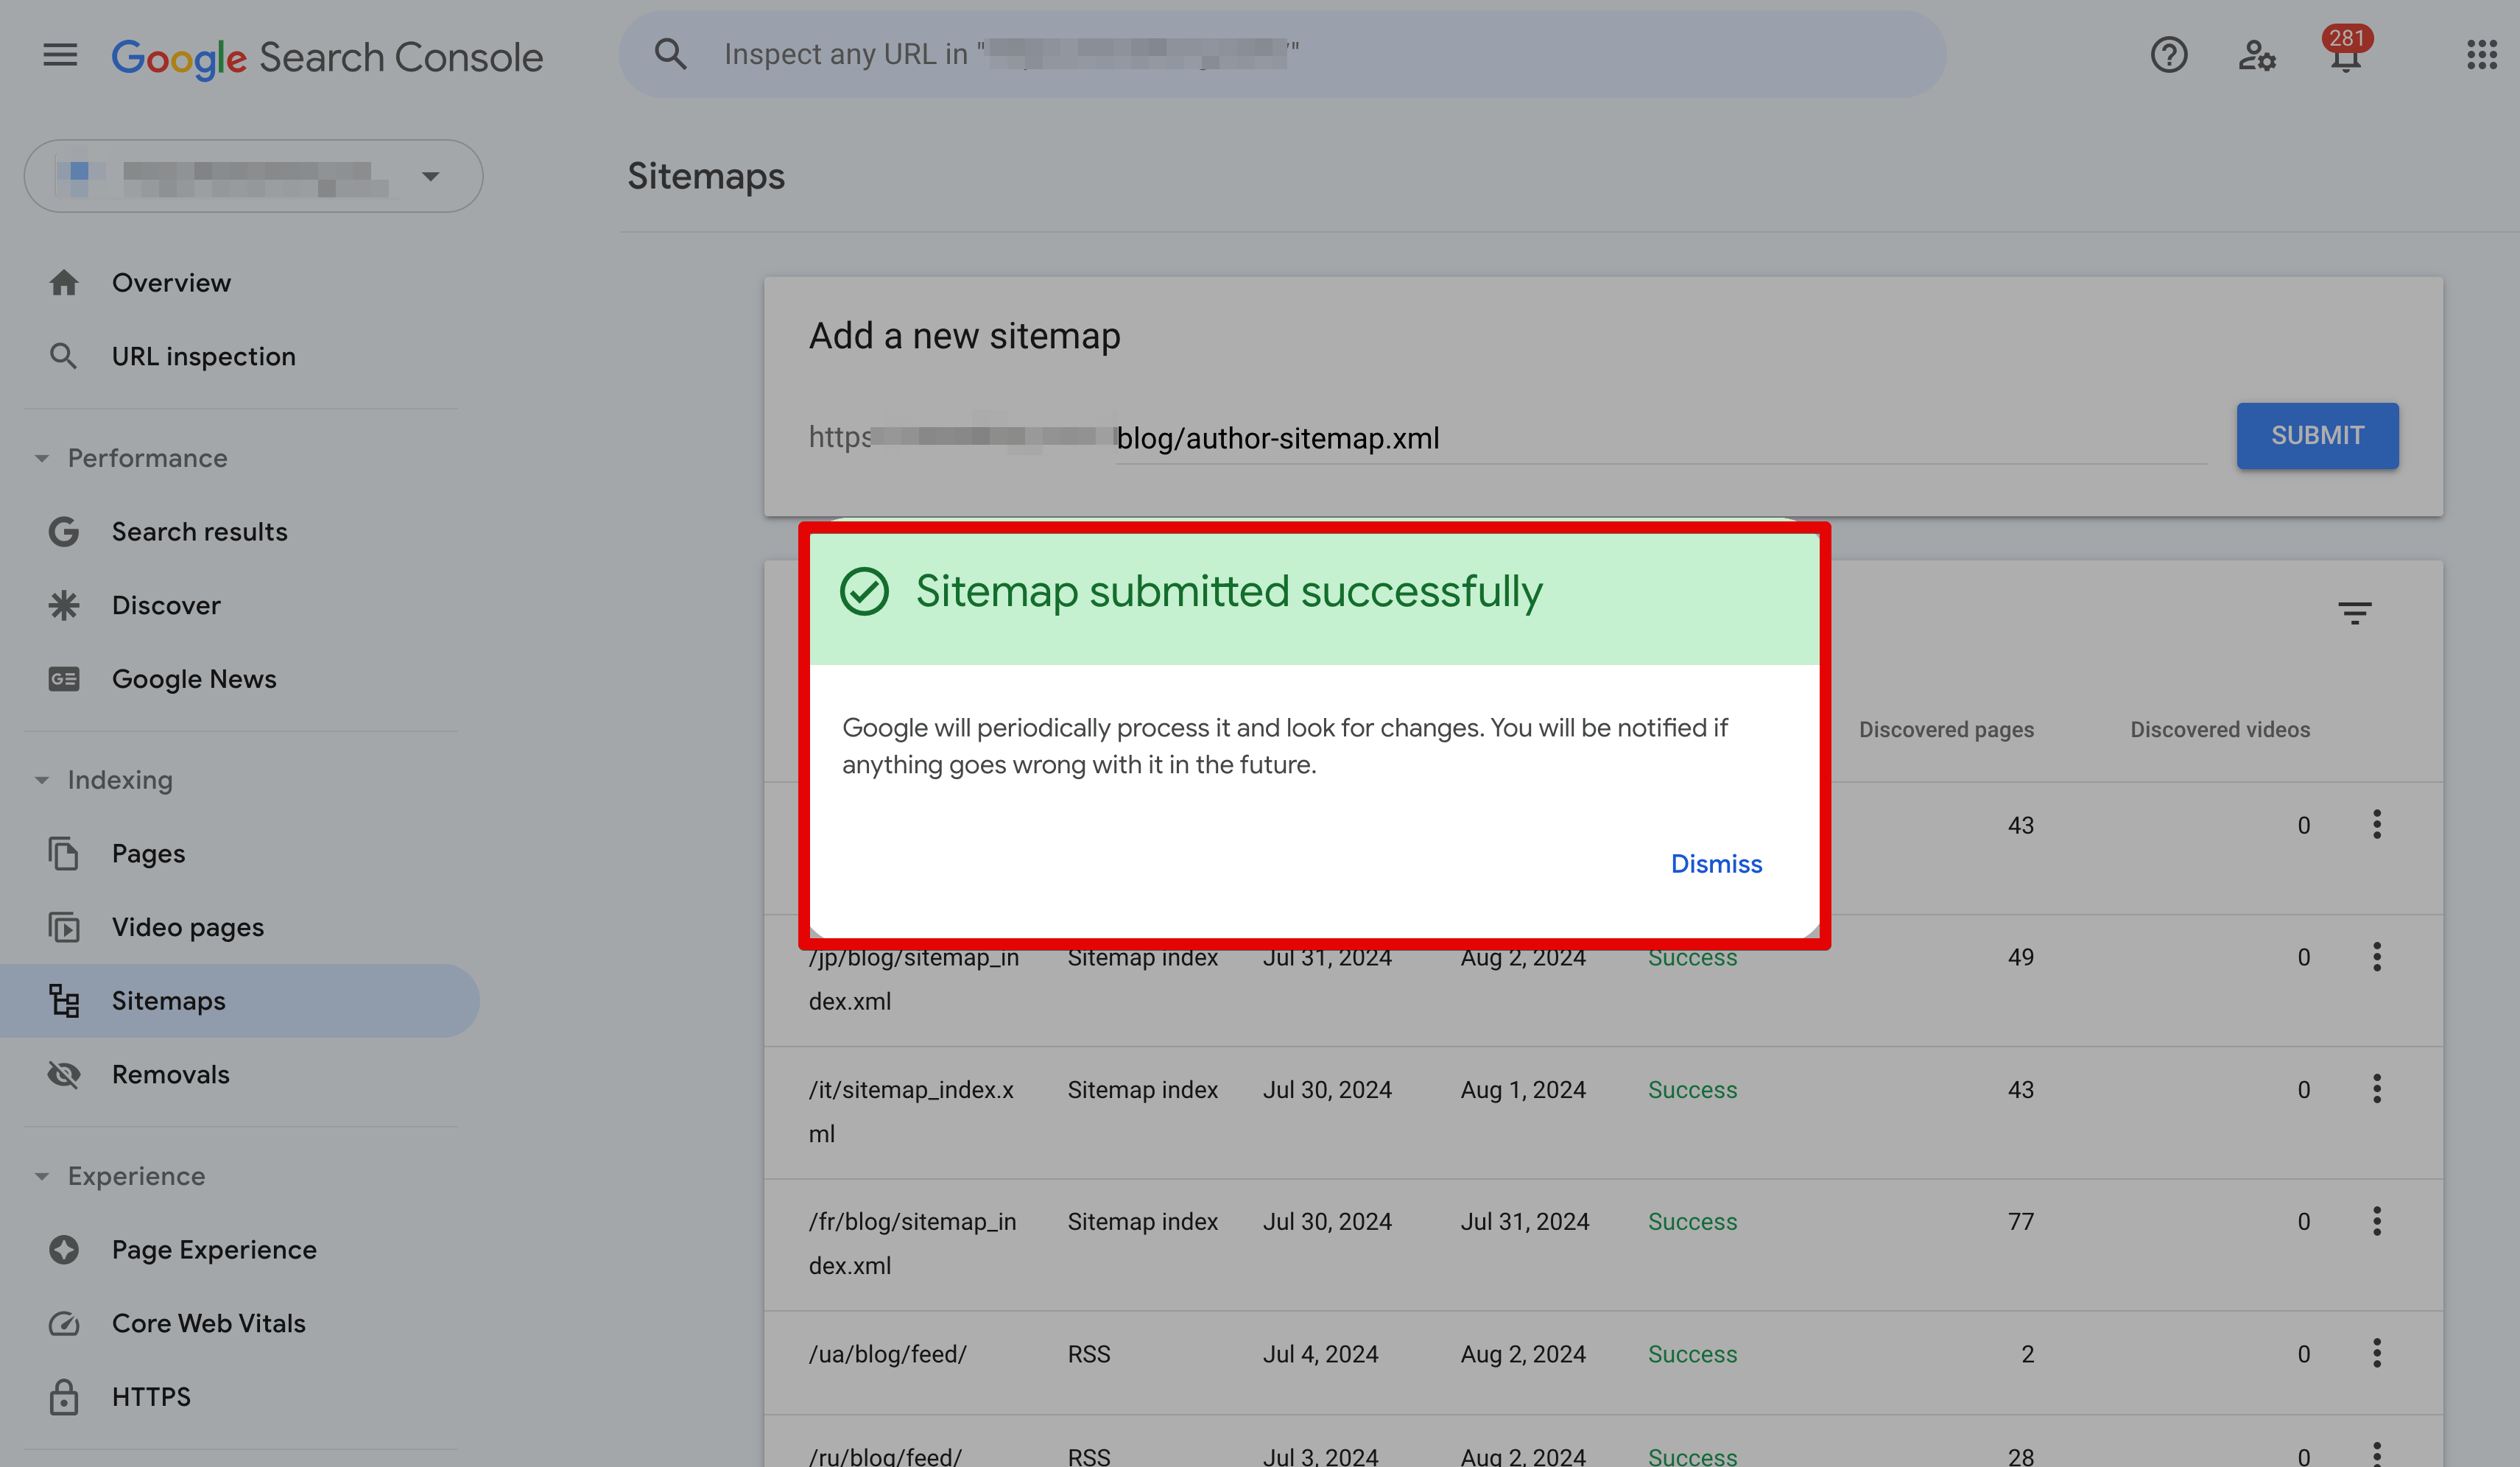
If your sitemap is submitted successfully, you’ll see a message like this:
If you haven’t created a sitemap yet, learn how in our detailed sitemap guide.
This is the stage where you can start inviting coworkers or other collaborators to access your Google Search Console property. We’ll cover this in more detail in the next section.
Google Search Console users, owners, and permissions
The next step in setting up a Google Search Console account is managing access to your projects. After signing in to GSC and confirming that you are a property owner, you will be able to grant permissions to other users.
Let’s take a closer look at user roles and permissions.
Owners
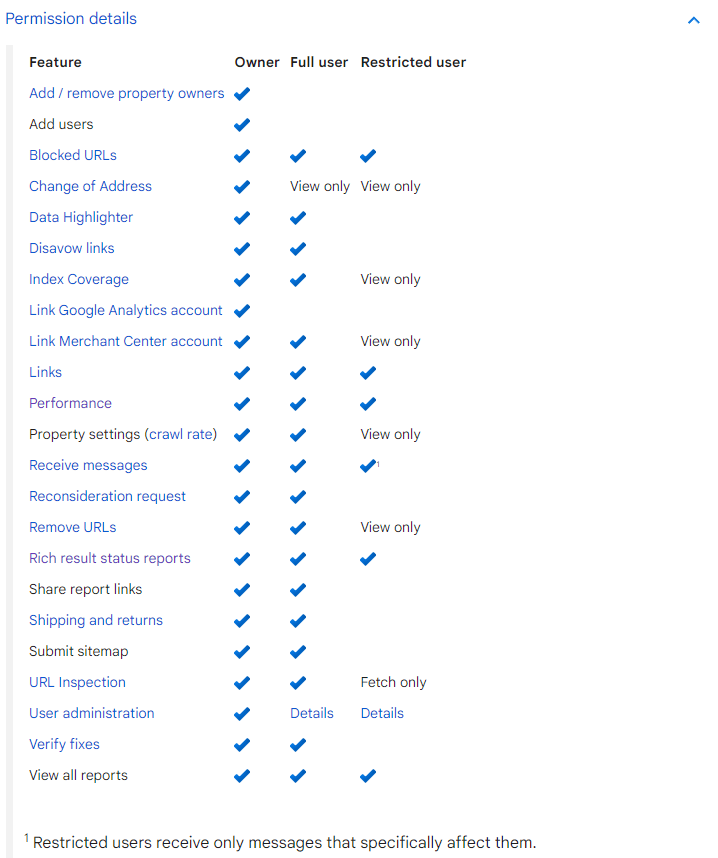
Owners have full control over properties in GSC. Users with owner rights can add and remove users, configure settings, and access all Search Console data and tools.
There are two types of owners in Google Search Console:
- Verified owner: Someone who has proven ownership of the property through a verification token (such as an HTML file uploaded to the website). If a property loses the last verified owner, no delegated users can access it in Google Search Console until someone verifies their ownership.
- Delegated owner: Someone who is granted ownership status by a verified owner, added directly through the Search Console without using a verification token.
Users
Users have access to Google Search Console, but with fewer permissions than owners.
- Full users: Can view any data and perform most actions, but cannot manage users.
- Restricted users: Can view most data, but have fewer permissions compared to full users.
- Associate: Can access specific data or perform some actions on behalf of your website from outside the Console. Actions and permissions depend on the type of item being associated, such as a Google Ads or Web Store account.
Here is a screenshot from the Google Search Help Center that shows all permission details for each access level.
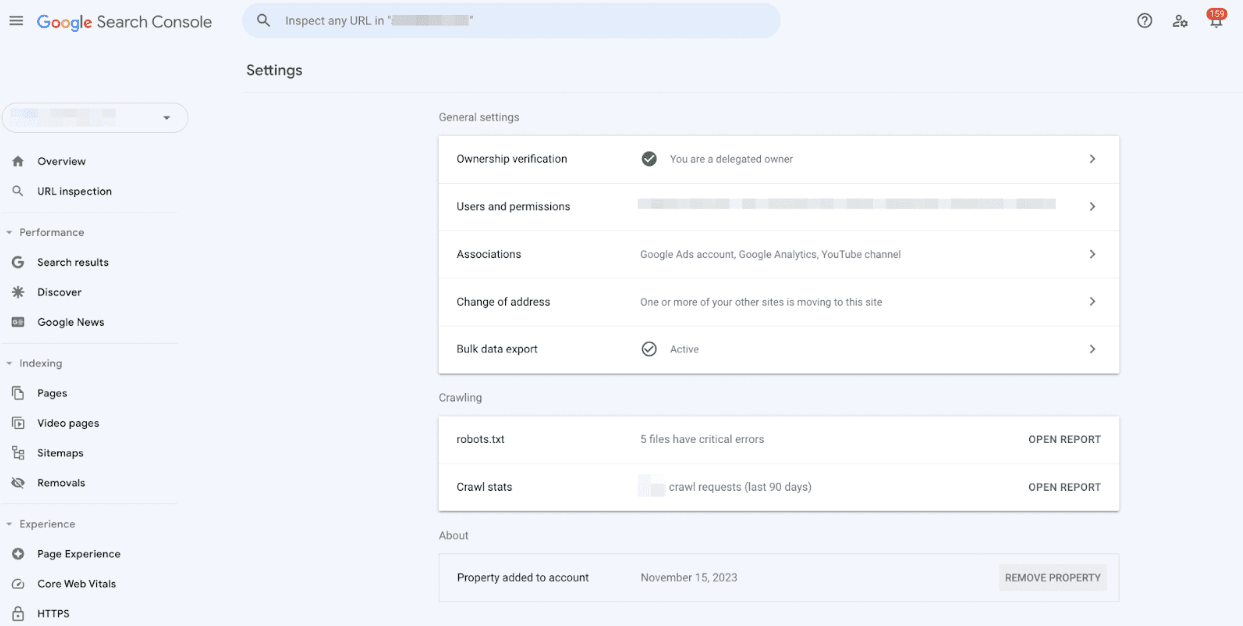
To see and manage the user list, go to Google Search Console Settings and click Users and Permissions.
How to add a user to Search Console
The owner must take the following steps to add a user to Search Console:
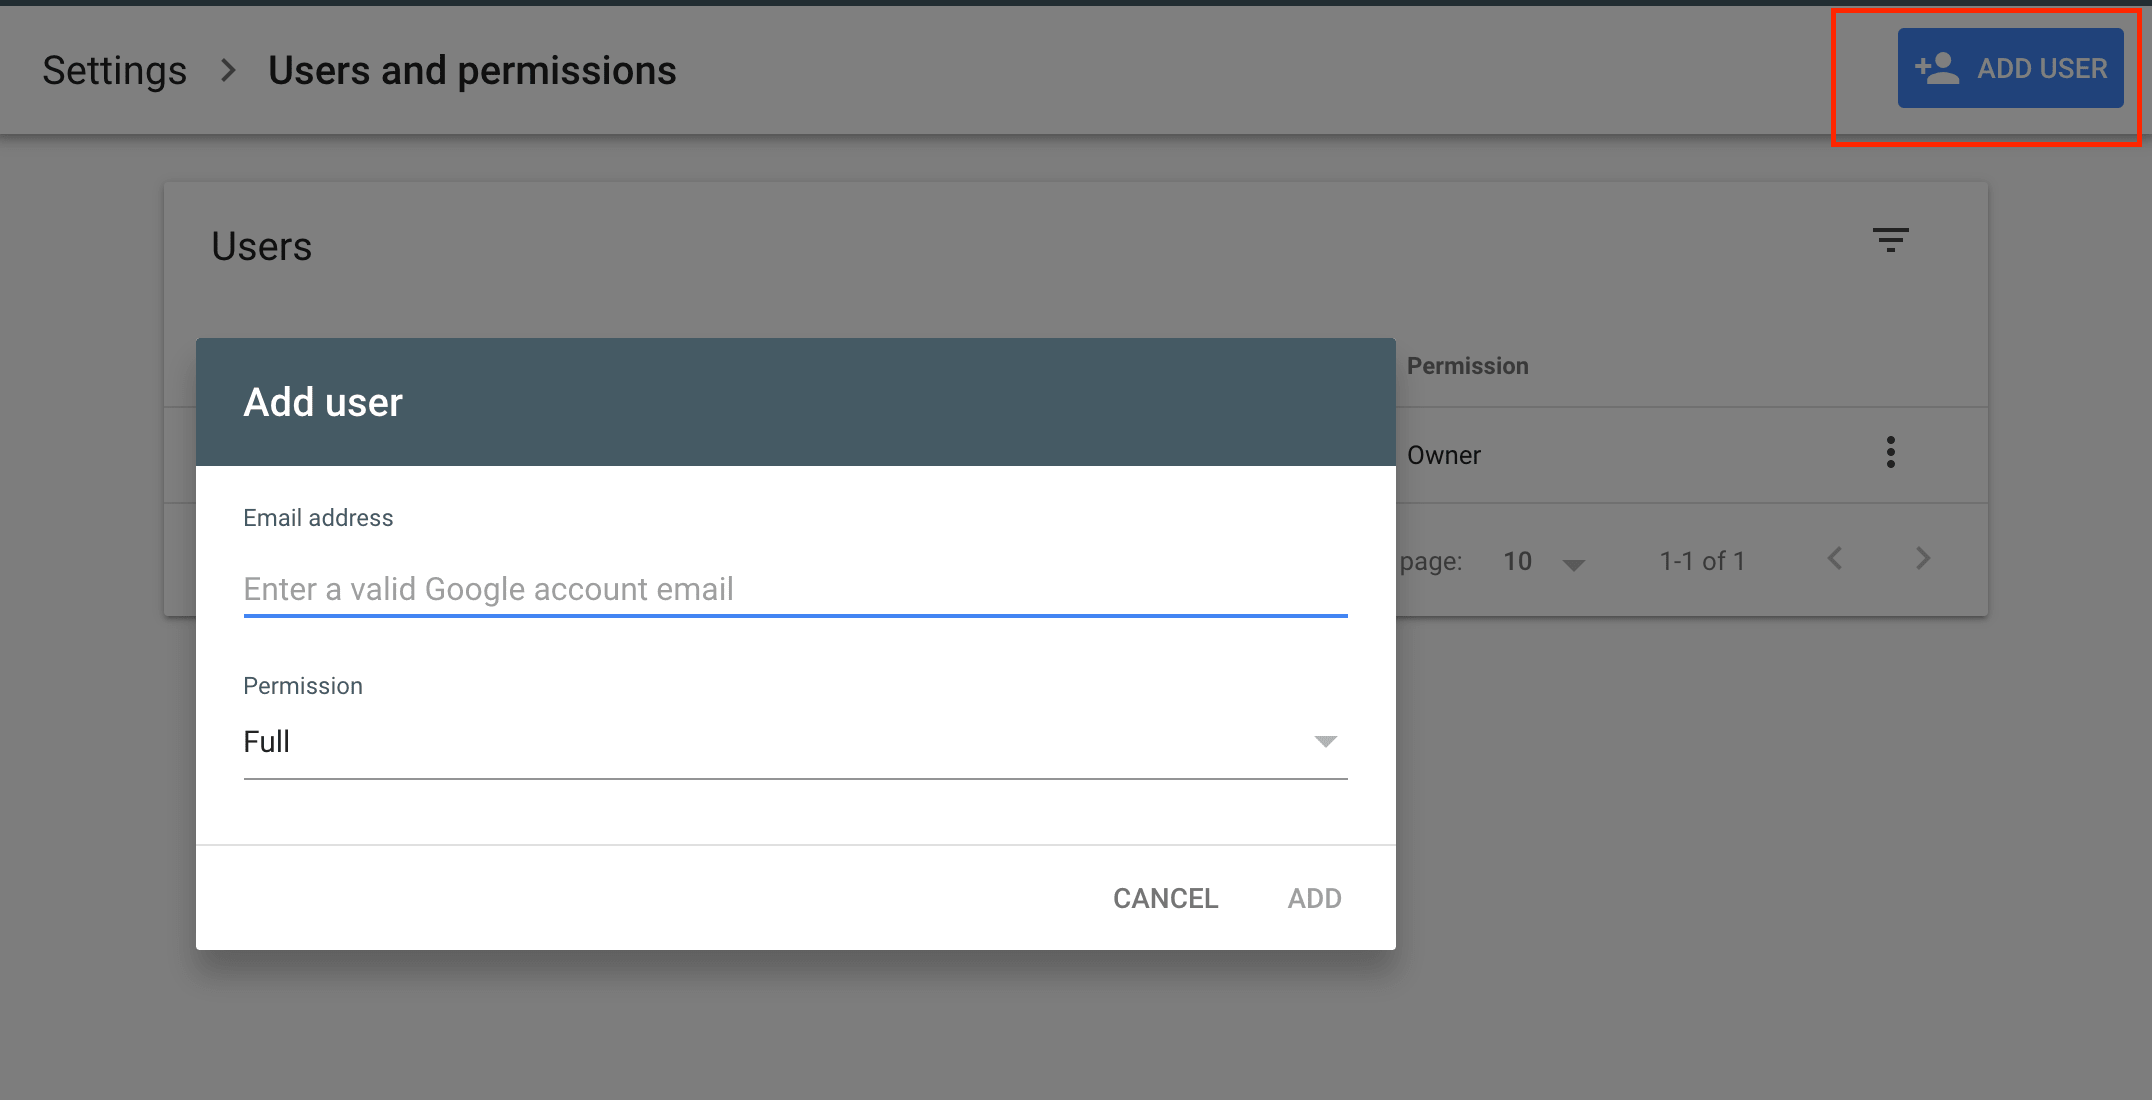
- Choose the property.
- Go to Settings, click Users and permissions.
- Select Add user, enter the user’s email and choose the permission type.
How to delete a user from Search Console
Sometimes, you may need to revoke a user’s access to your Google Search Console property. This process is straightforward and can only be performed by an owner.
Steps the owner must take to delete a user
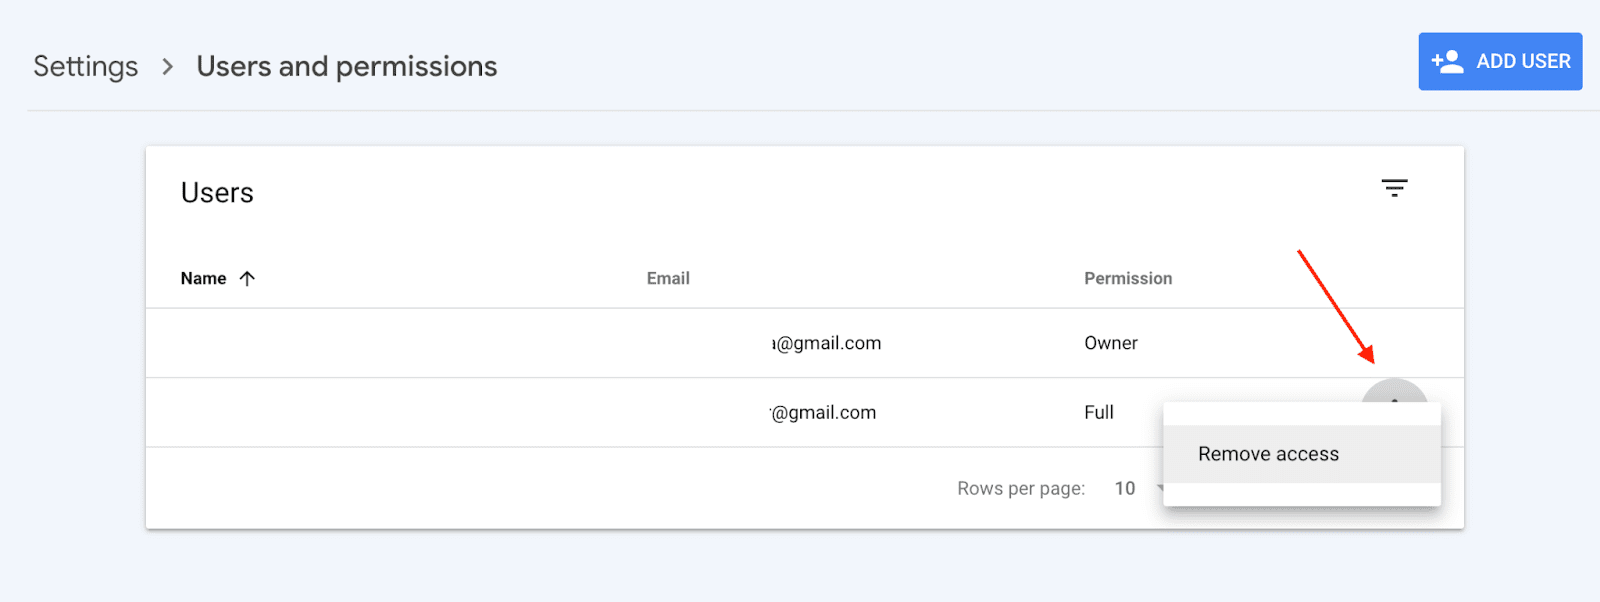
- Choose property.
- Go to Settings, click Users and permissions.
- Go to the three dots menu near the user’s name and choose Remove access.
How to view your GSC account’s ownership history
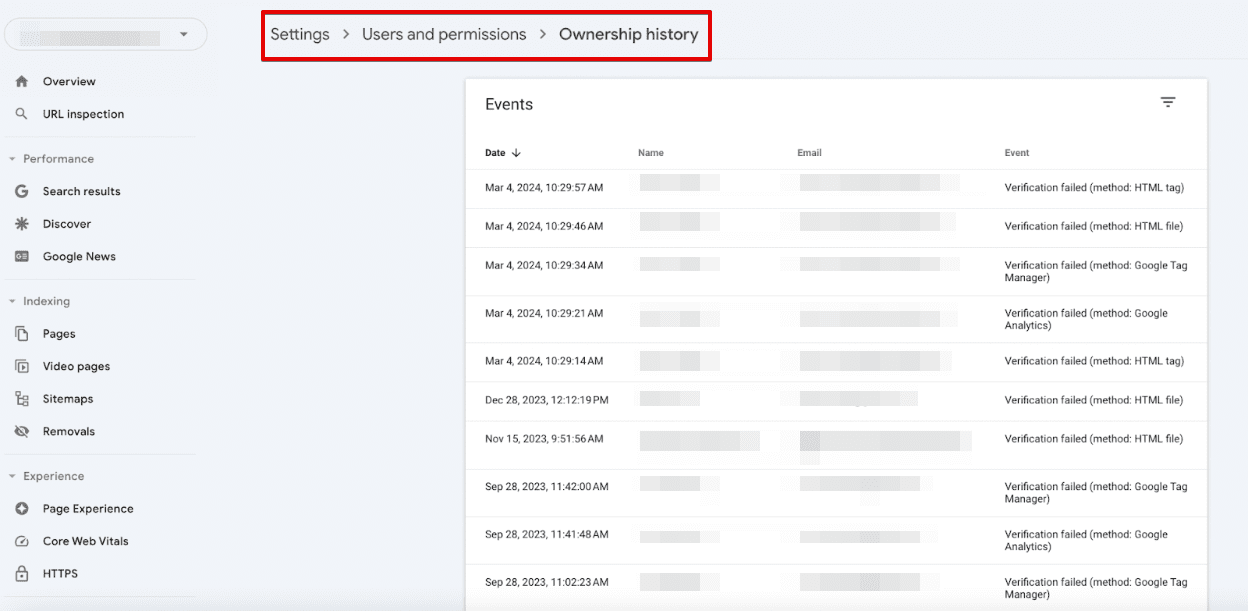
Google Search Console maintains a record of important changes to your account’s ownership and access. This ownership history can be valuable for security and auditing purposes.
This includes:
- All users that were added or removed.
- Successful and unsuccessful attempts to prove website ownership.
- Events where a previously known validation token was deleted.
How to see the GSC account’s ownership history
To access this feature, go to Settings, open the Users and Permissions tab, and click on Ownership History.
How to remove or resubmit a property in Google Search Console
Owners and users have different permissions to remove properties in GSC. Owners can delete properties from anyone’s list, whereas users can only remove properties from their own lists.
To remove a property from your list, go to the property settings and click on Remove Property.
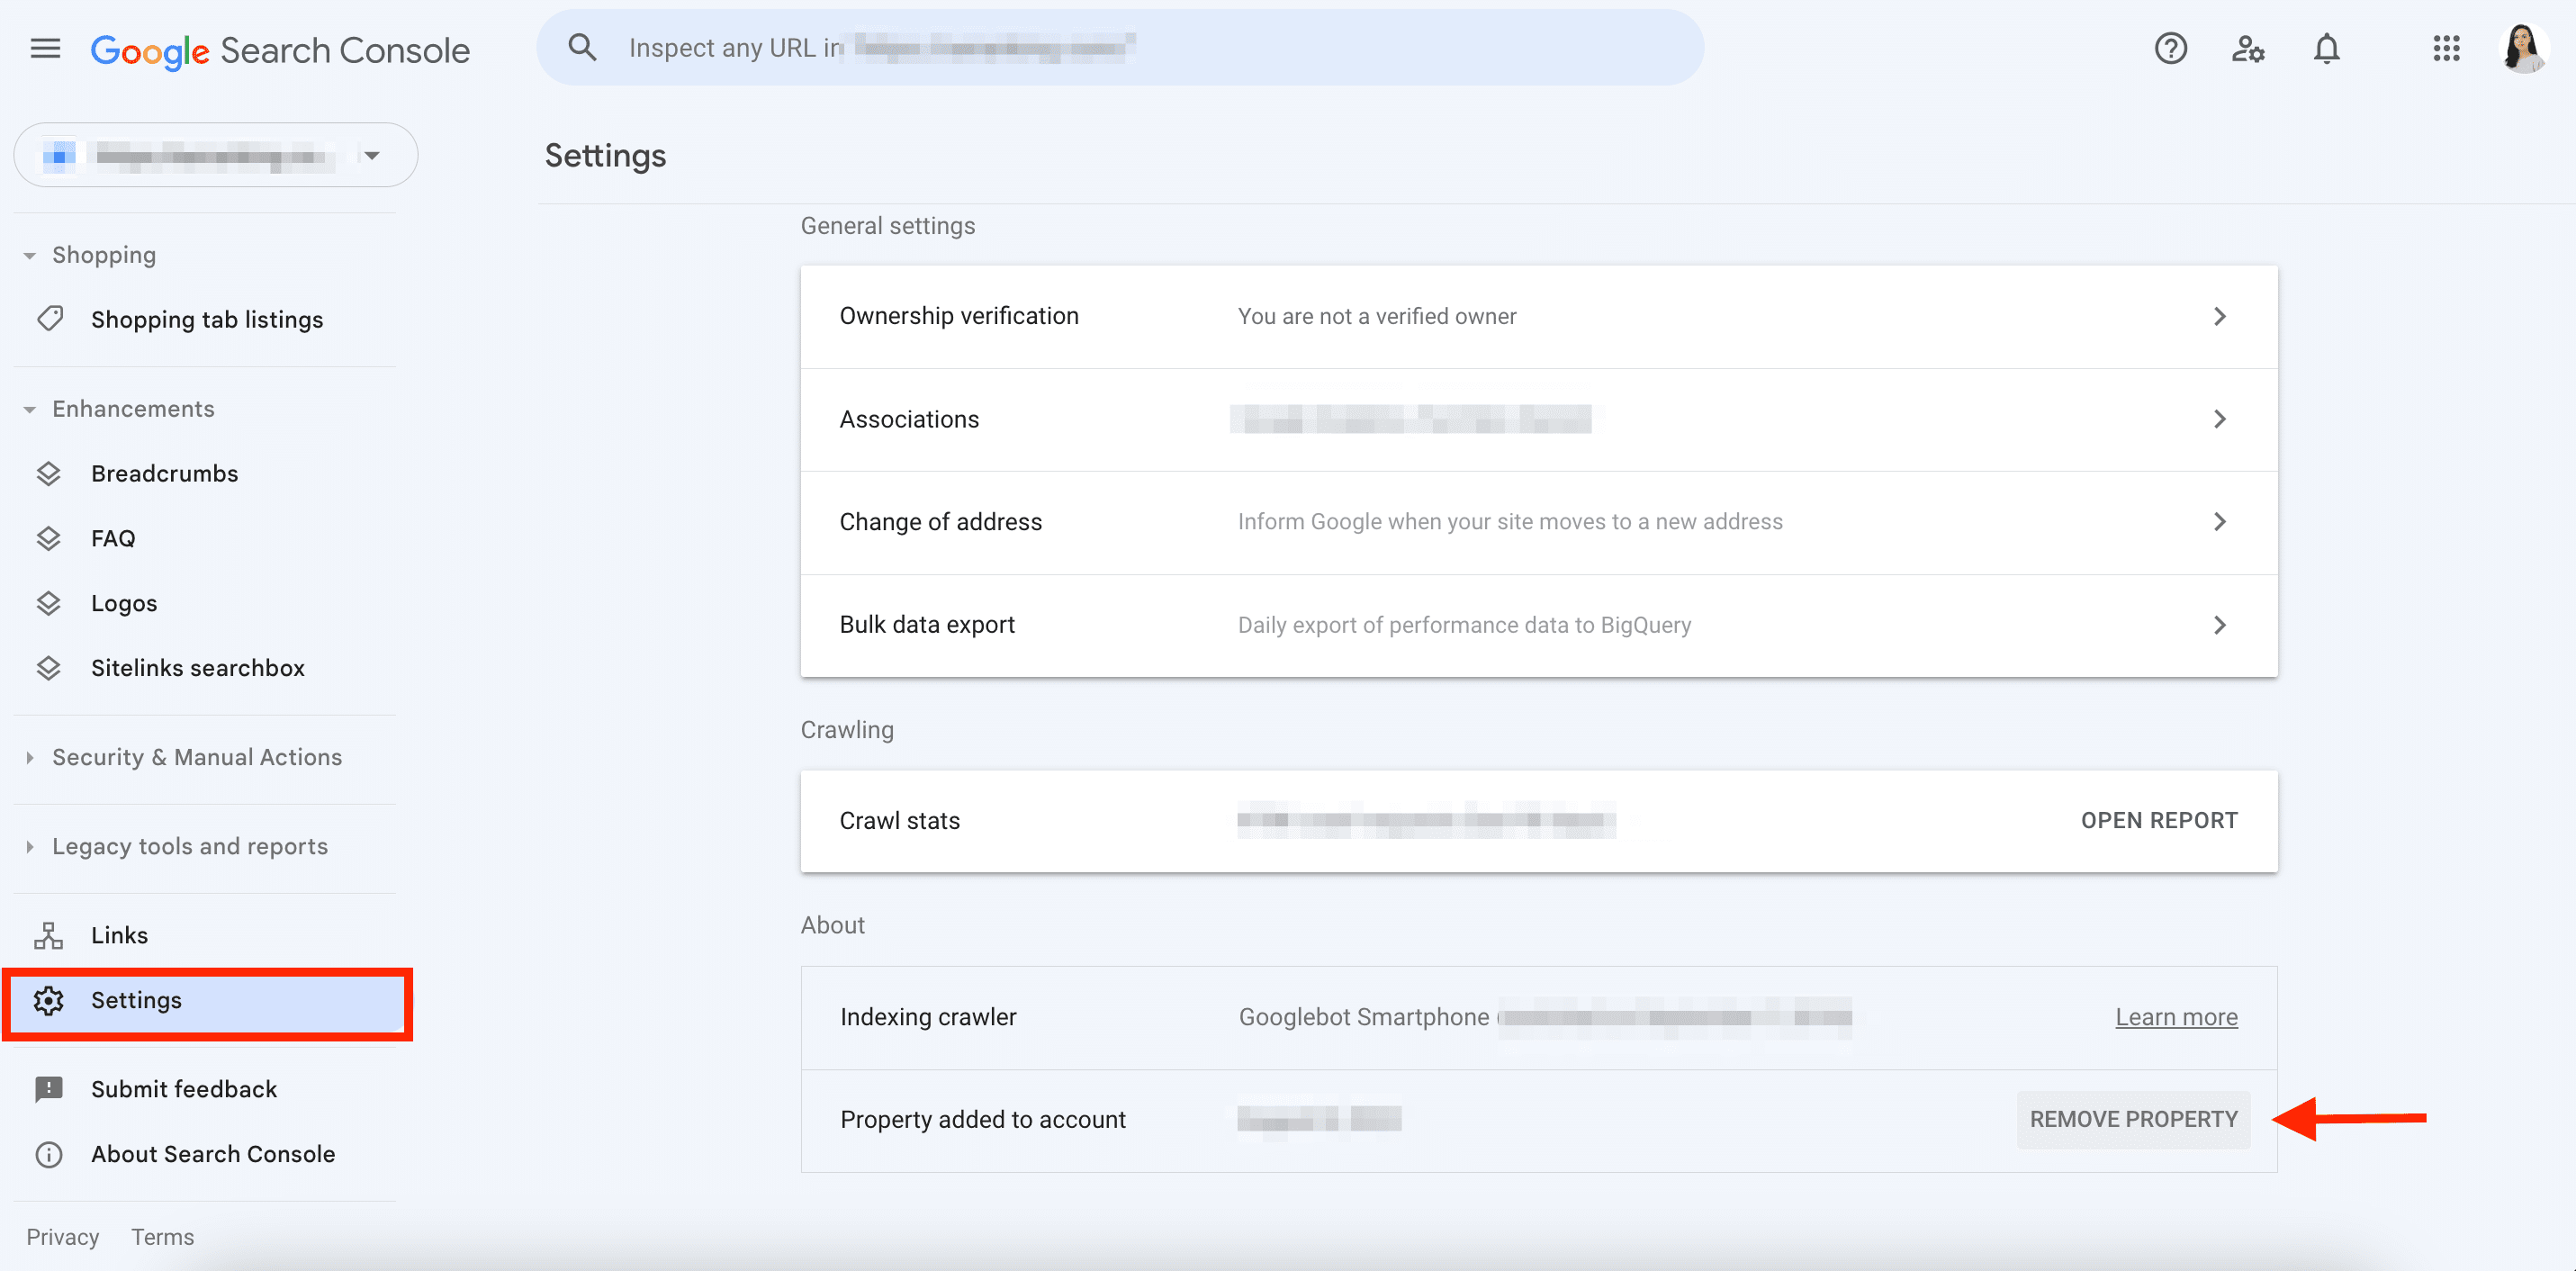
When removing access from another user, follow the procedure described in the previous section. But if one owner needs to terminate another owner’s access, they must also remove that owner’s access token (HTML file, meta tag, etc.). After deleting an owner, you’ll see all tokens for that person listed in the popup. Delete all of them to prevent access from being reinstated once Google detects them.
Removing a property means:
- You will no longer receive notifications about that property.
- You will not be able to see any information or access settings about that property.
- Your message history for that property will be saved.
- If you’re the last verified property owner, removing the property will result in all property users losing access to it in GSC.
You can re-add a removed property without verifying it as long as the property still has one verified owner. Simply add the property as described in the previous section, and it will be automatically revalidated.
Additional GSC settings
GSC provides additional settings and tools to help you get the most out of its service and features. You can export data in bulk, associate your GSC account with another Google service, and inform Google about any changes made to your website’s address. We’ll cover this in more detail below.
Associations
An association refers to linking a GSC property with a property in another Google service. This allows for data integration and insights across both tools. For example, you can connect your GSC and your Google Analytics to access combined data in GSC Insights.
The following properties can be associated with GSC:
- Google Analytics
- Chrome Web Store
- Android Play Store app
- Play Console Developer
- Google Ads
- Google Assistant Actions Console
To view existing associations, go to Settings and choose Associations. Here, you will find a list of connected services and pending requests. To remove an association, click on the three dots next to it and remove it.
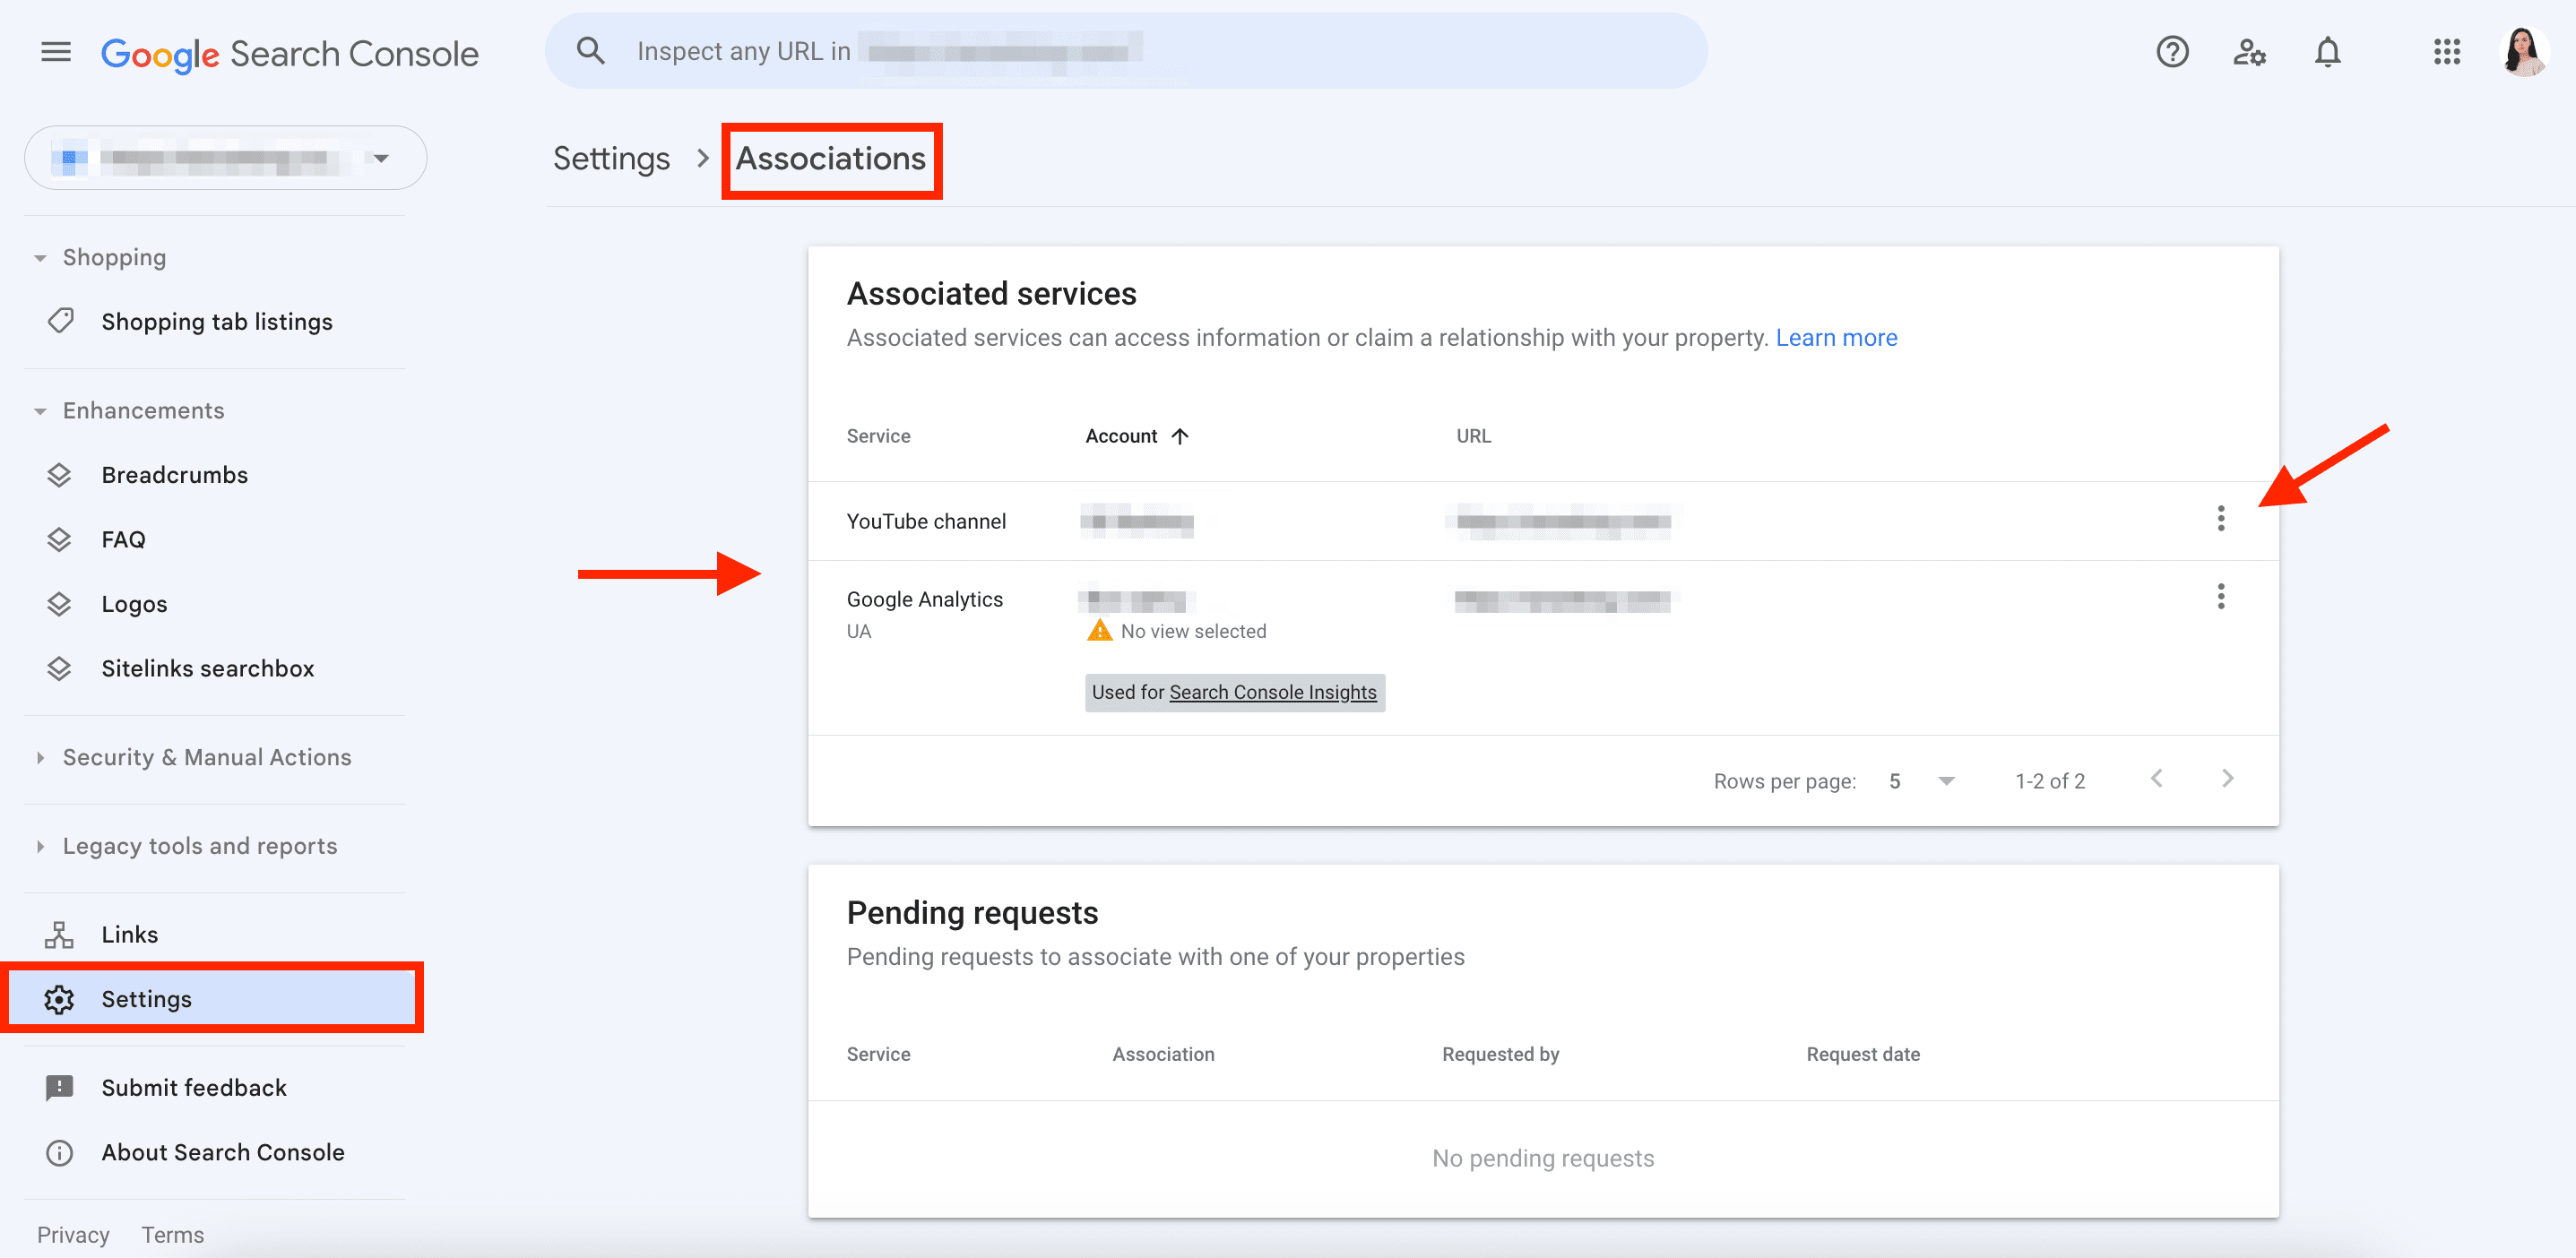
Associations with GA can be established from within GSC, while associations with other services need to be initiated from the respective product.
Change of address
If you are migrating your site from one domain to another, you need to add the new site to GSC and follow the steps outlined in this article to verify your ownership.
When a website undergoes a domain change, it’s crucial to inform search engines about the new domain so that they can update their indexes accordingly. You can accomplish this using the Change of Address tool.
Access it from Settings and follow the instructions provided.
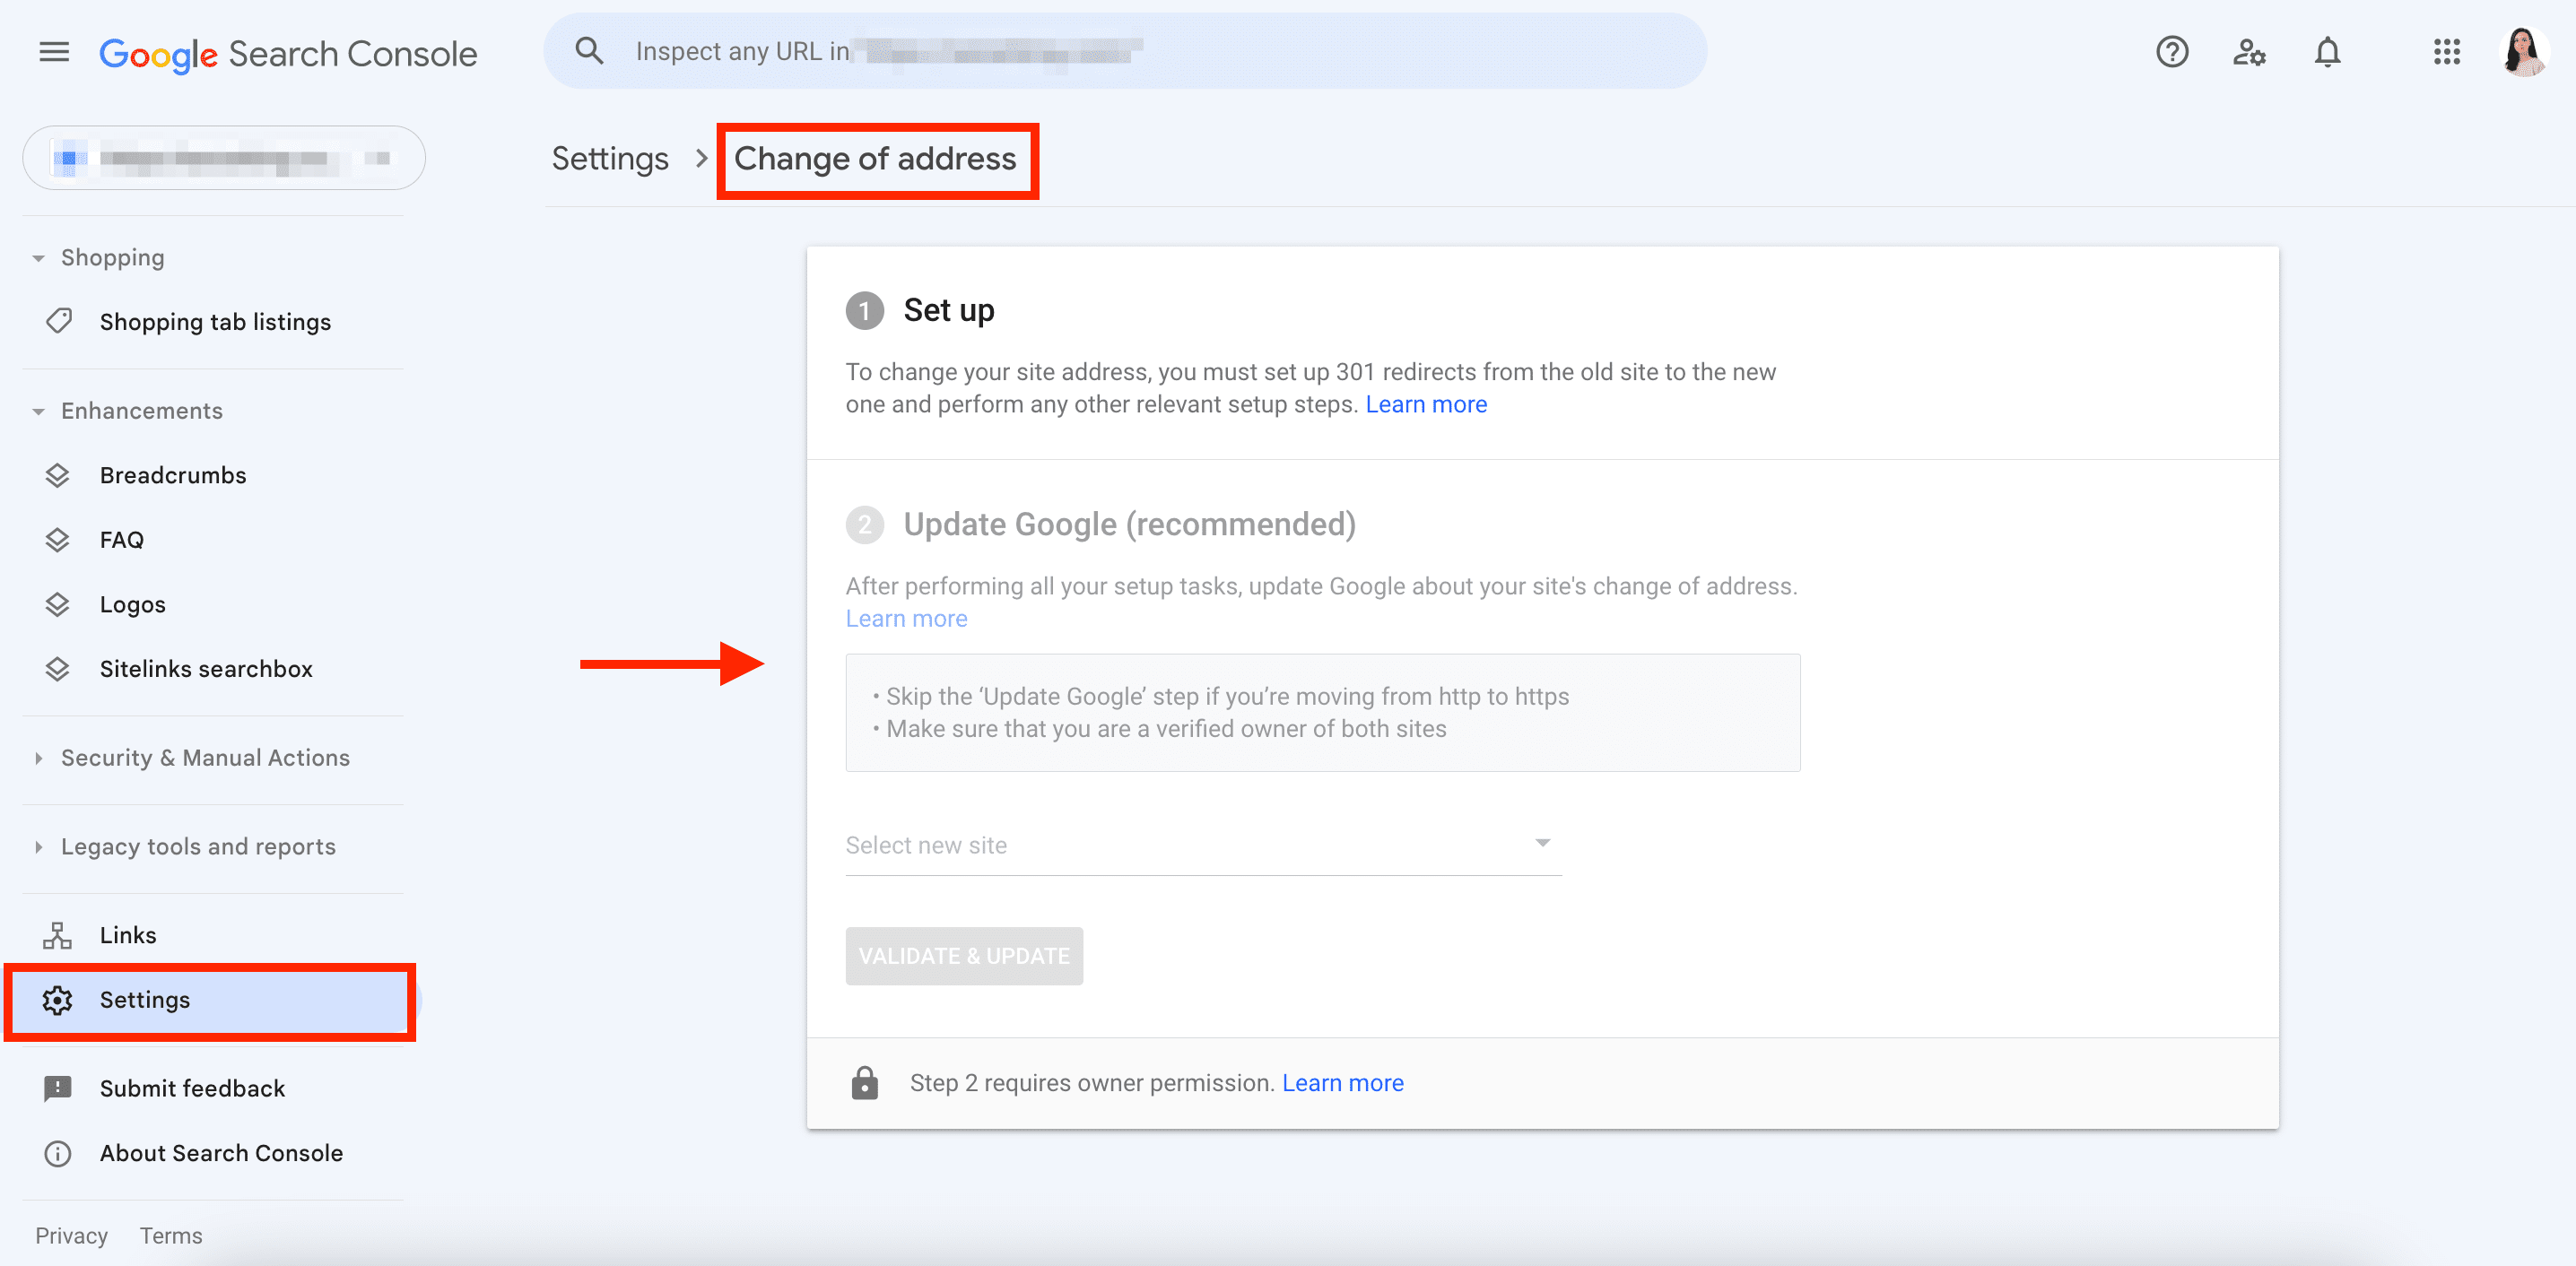
To use this feature:
- You must own old and new addresses.
- Verify both domain-level-properties.
- Ensure your website migration implies URL alterations.
Please note that the Change of Address tool cannot be used for migrating properties at the path level, such as http://sitename.com/blog/.
The tool will automatically move your website’s protocols, but not the subdomains. You will have to move each subdomain separately.
Review the GSC verification of your new site and ensure that the new HTML file or code is correctly placed, or that the GA or Google Tag Manager container snippet is in the appropriate location.
Bulk data export
Bulk data export was released in February 2023 to help users continuously export data from GSC directly to Google BigQuery. The exportable data includes all your performance stats except for anonymized queries. You also won’t be limited to daily data row numbers. This allows you to research your data effectively and combine it with different data sources for deeper investigation.
You can access Bulk data export from Settings.
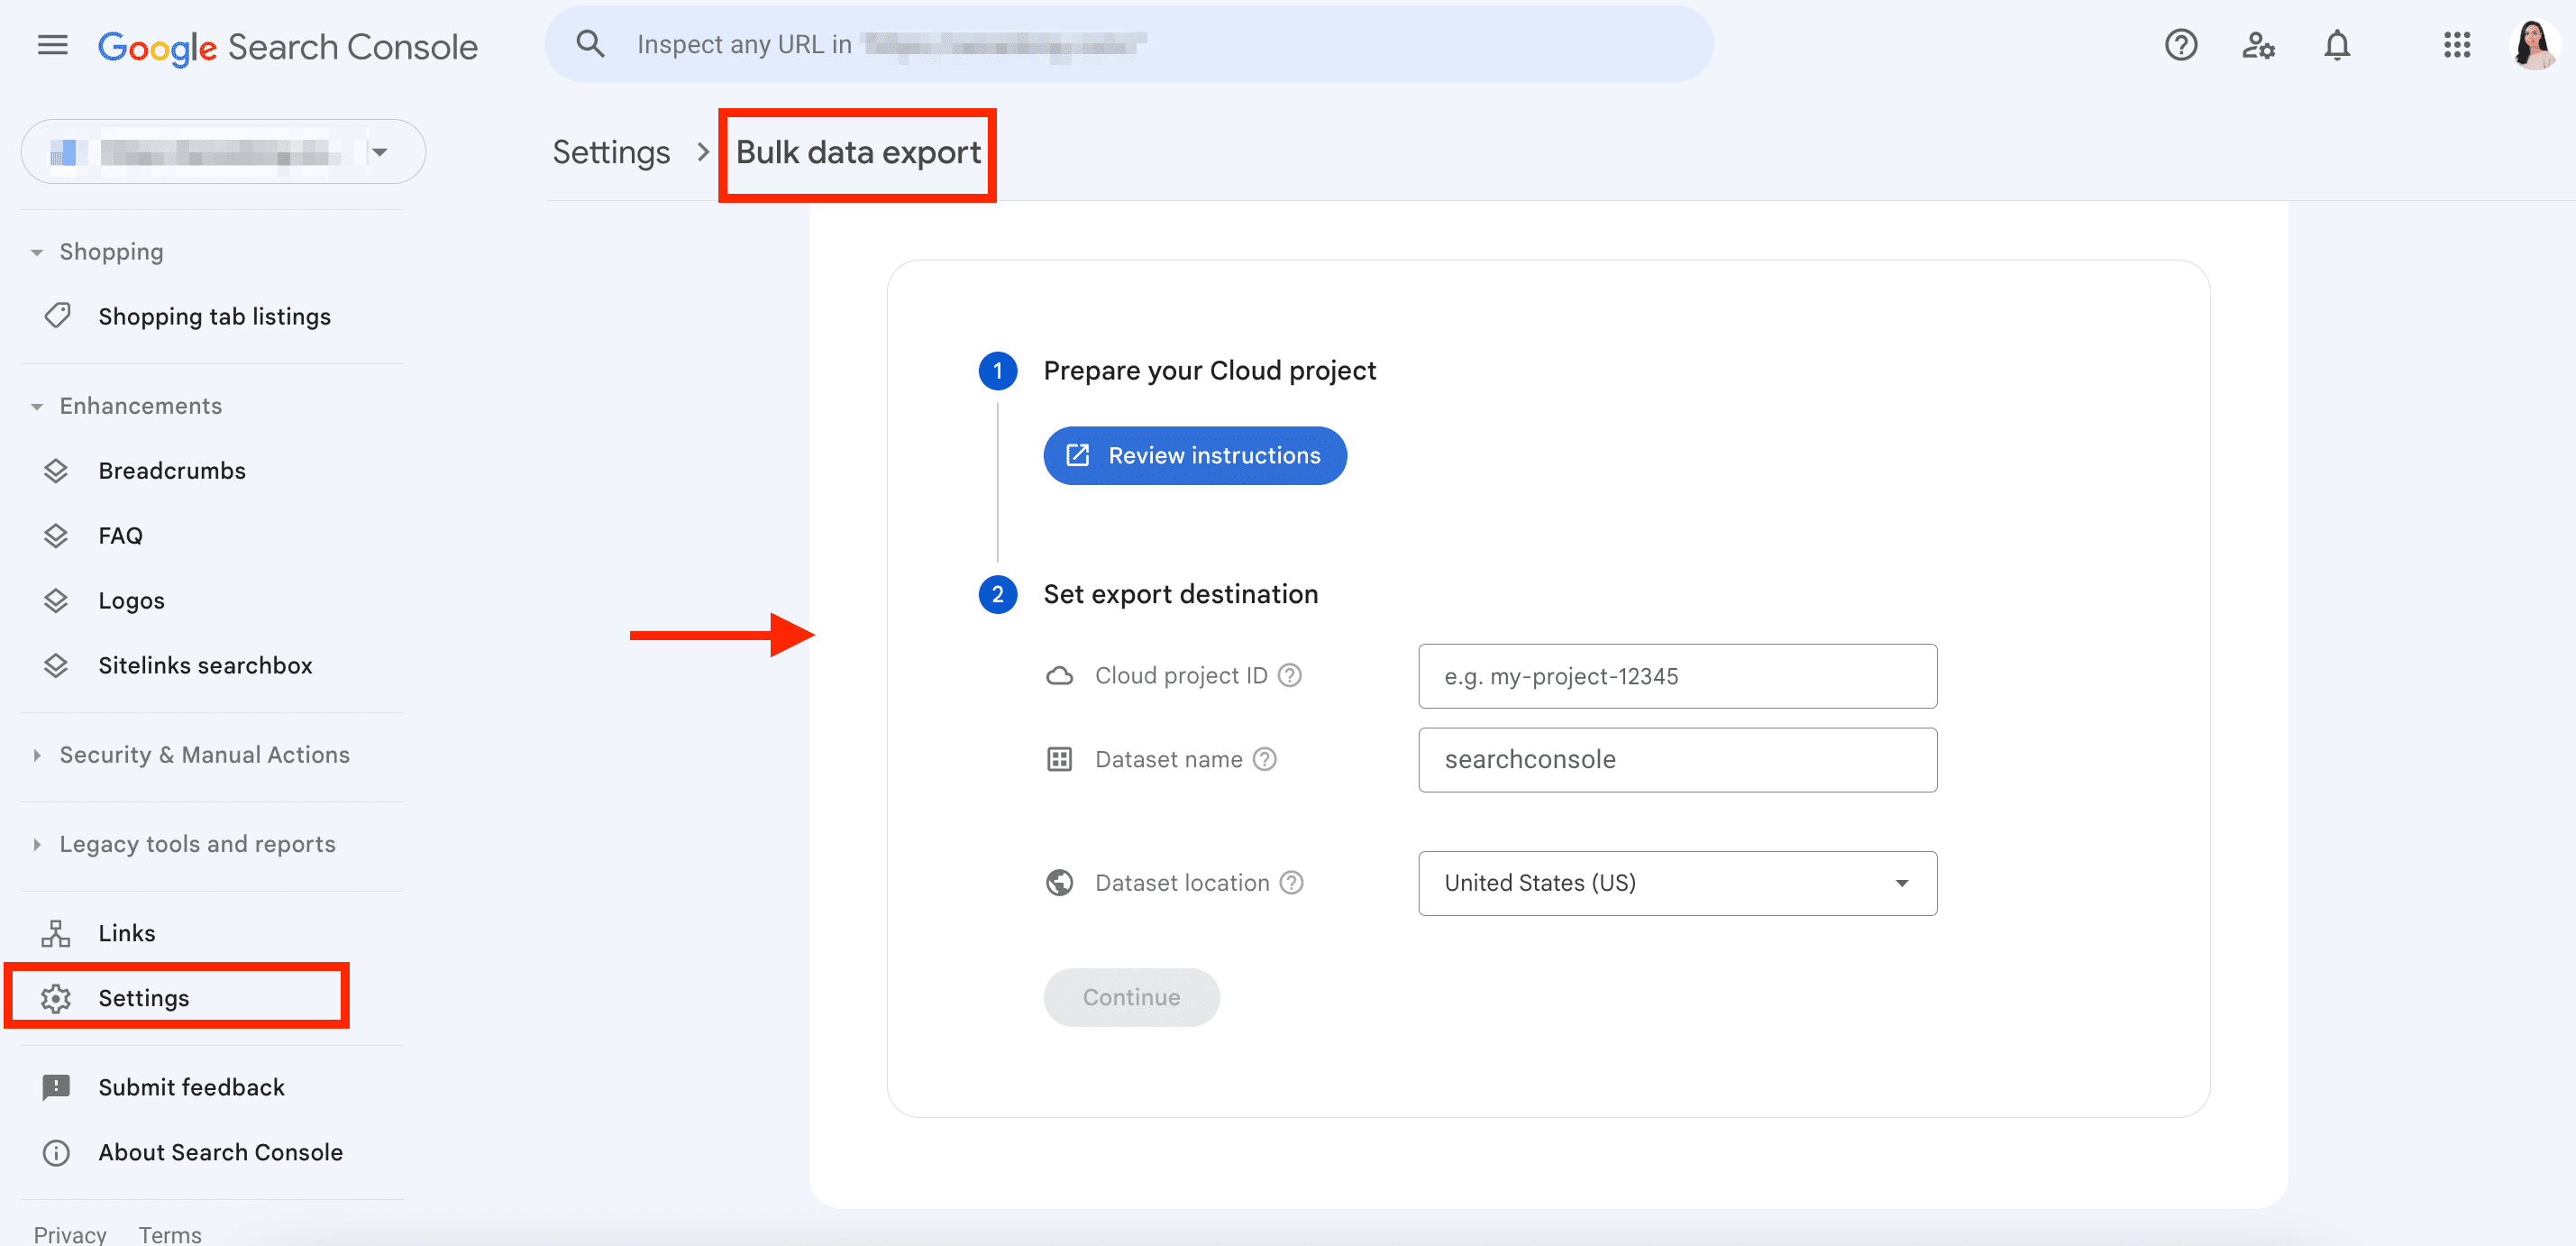
To activate this feature:
- Enable the BigQuery API for your project.
- Grant permission to your Search Console service account.
- Specify your Google Cloud project ID.
- Select a dataset location.
How to connect your Google Search Console account to SE Ranking?
To connect GSC to SE Ranking, log in to your Google account linked to GSC. Click on Connect Google Search Console and select the desired property.
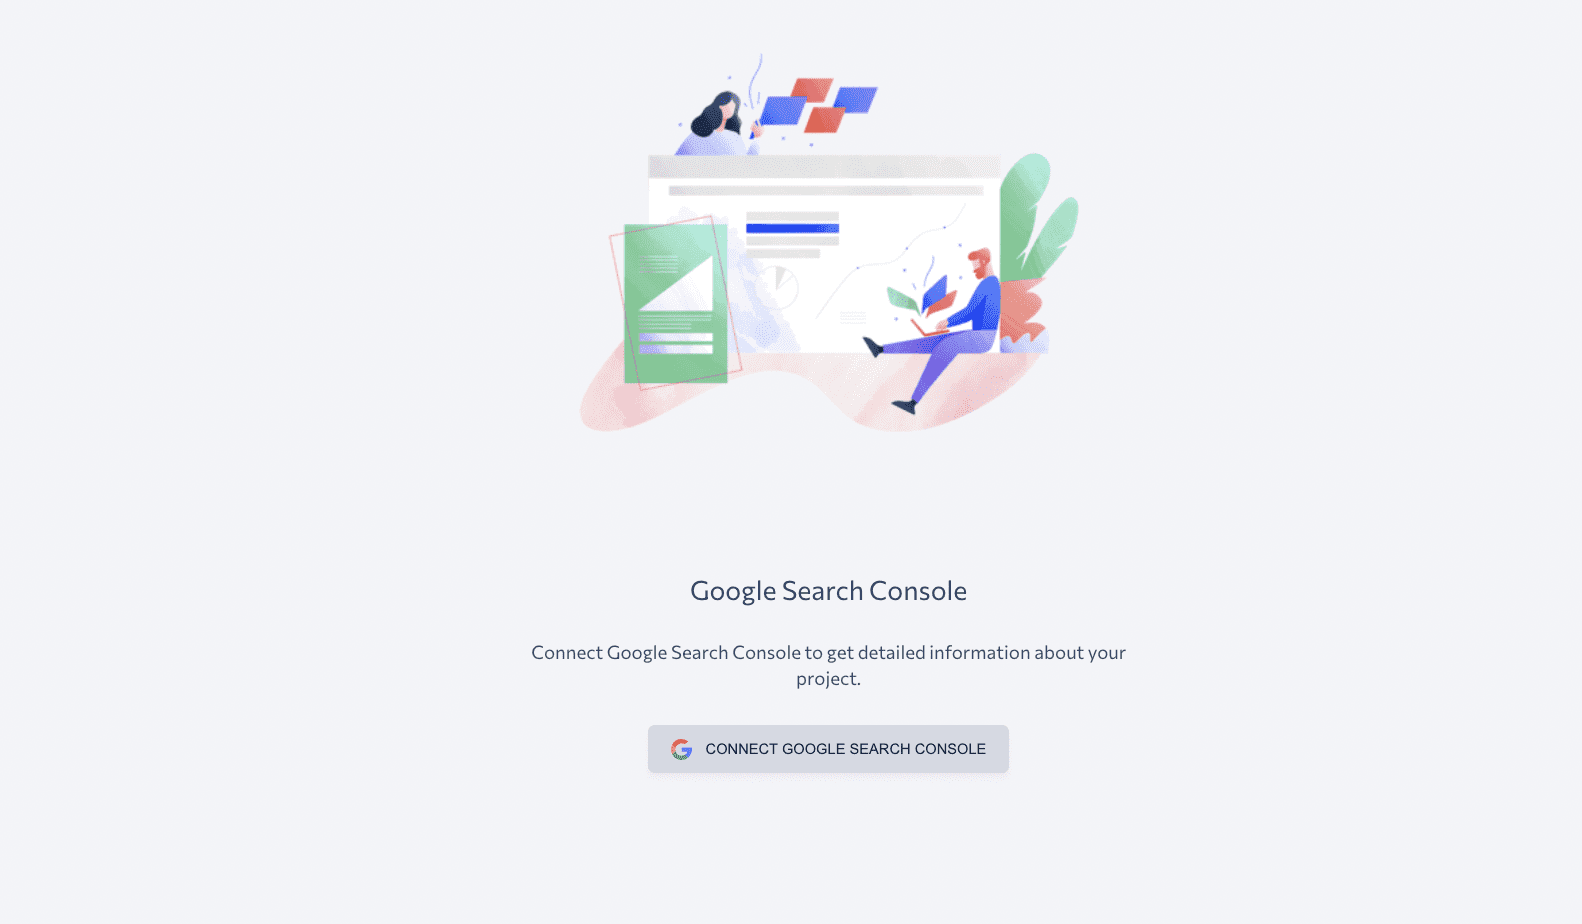
Once connected, you will have access to all GSC data on your SE Ranking dashboard. Here are some actions you can take with this integration:
- Choose a specific date range and analyze the data for that period.
- Compare data between two selected periods to identify trends and changes.
- Analyze metrics such as clicks, impressions, CTR, and position of the site, specific pages, or queries in the search results.
- Filter the data by six different criteria, including search type, device type, country, search appearance, query, and URL.
Benefits of connecting your Search Console account to SE Ranking
Connecting Google Search Console to SE Ranking provides you with a full view of your site’s GSC Performance through its Search Results report. All of this information is neatly displayed on a single user interface, with no need to swipe between screens.
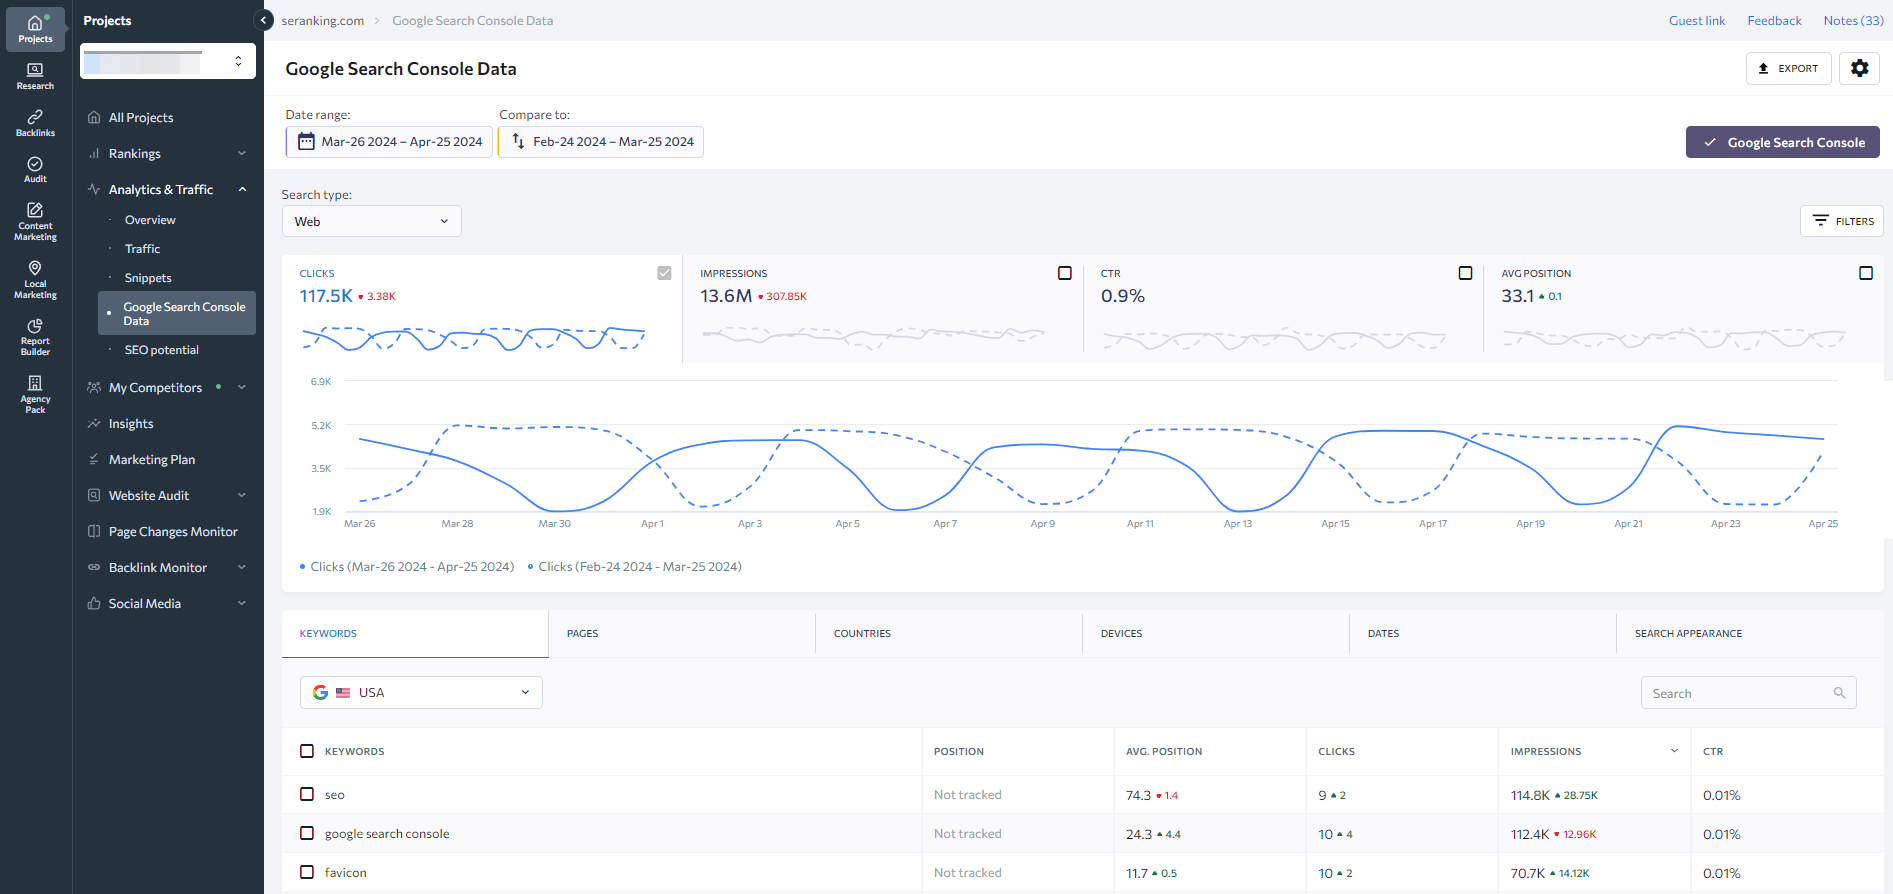
The report displays a list of keywords. You can analyze and filter each according to its ranking position, clicks, impressions, and click through rate (CTR). Apart from the average keyword position displayed by GSC, you can also access the latest data from SE Ranking. Unlike GSC, which typically takes a couple of days to display complete data for a specific date, SE Ranking offers you more precise updates on the same day.
By using this tool, you can not only expand your keyword database but also perform a ranking check to identify keywords that you currently rank for but are not on your target list.
Once identified, you can add them to your project and track their rankings. But make sure to carefully analyze and distribute these keywords across your website to avoid keyword cannibalization.

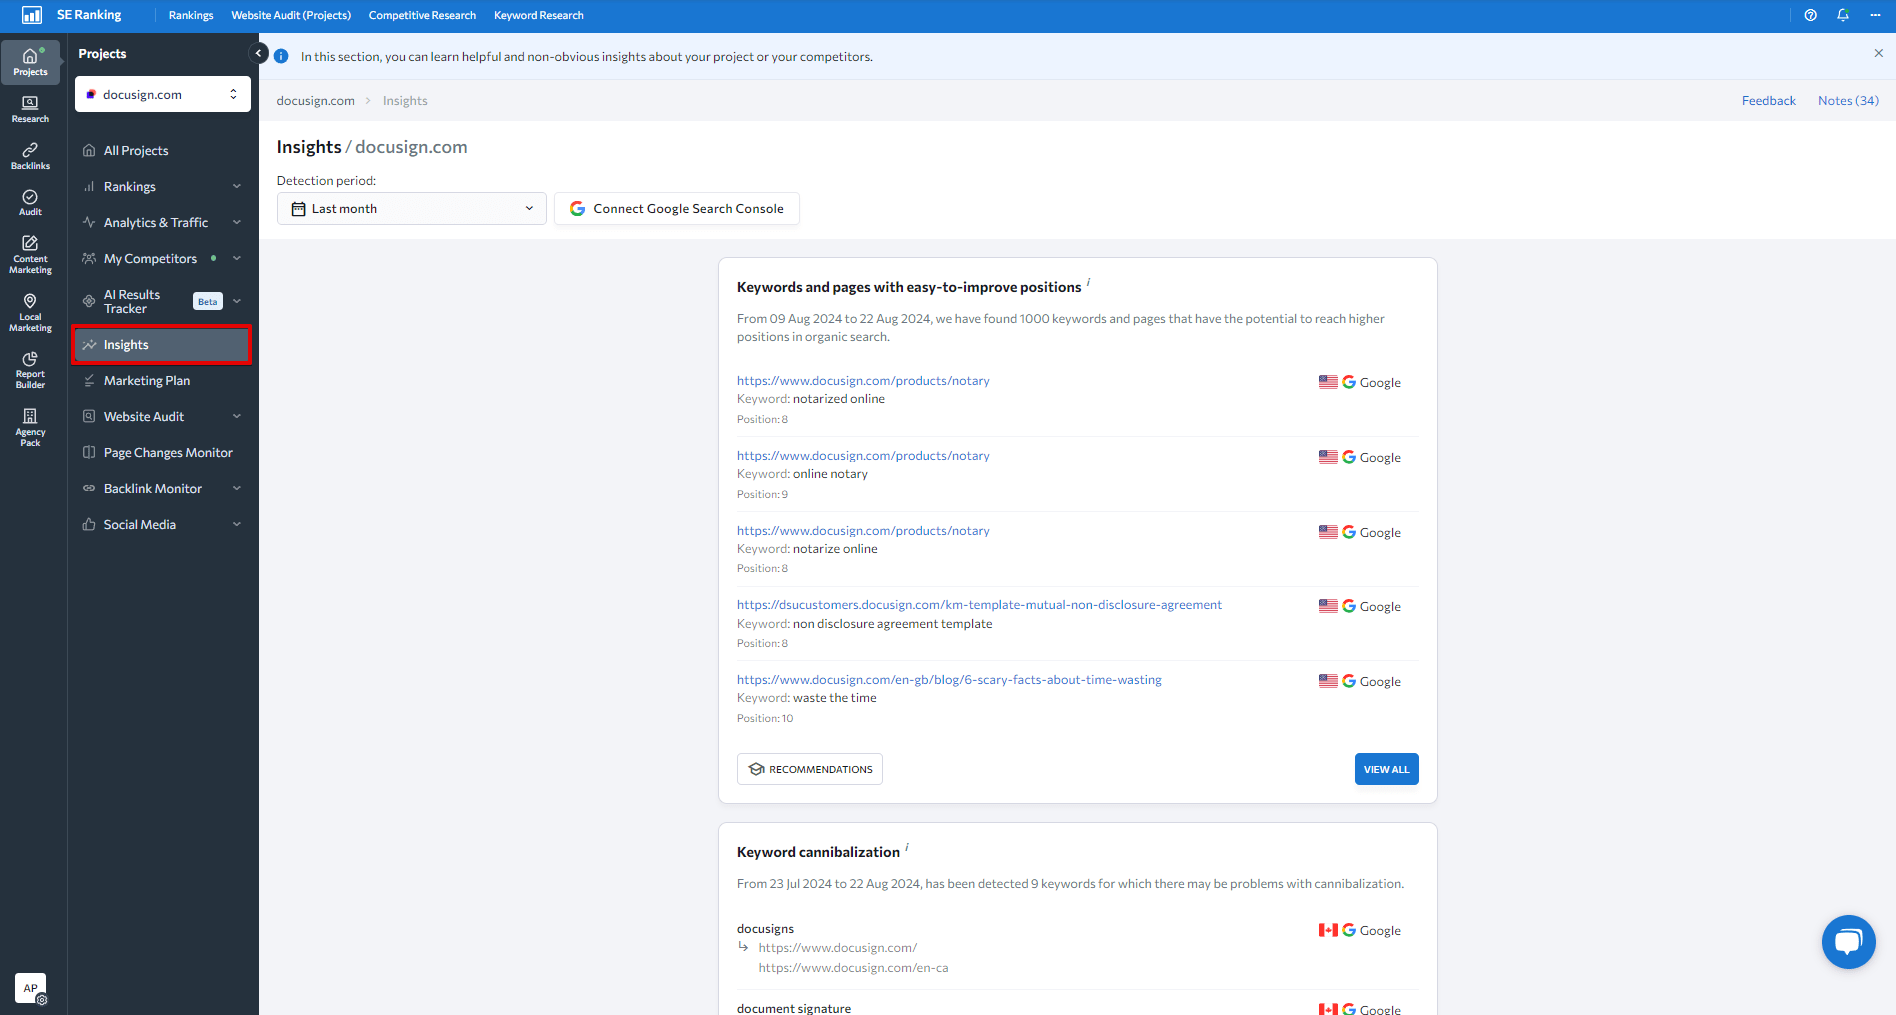
SE Ranking’s Insights feature excels at revealing important and sometimes non-obvious insights for your project based on Google Search Console (GSC) data. The tool displays keywords and pages with easily improvable positions and alerts you to possible keyword cannibalization issues. It notifies you in case of drastic changes in your pages and keyword performance, and also lets you know about competitors who jumped to the Top 10, among many other valuable data.
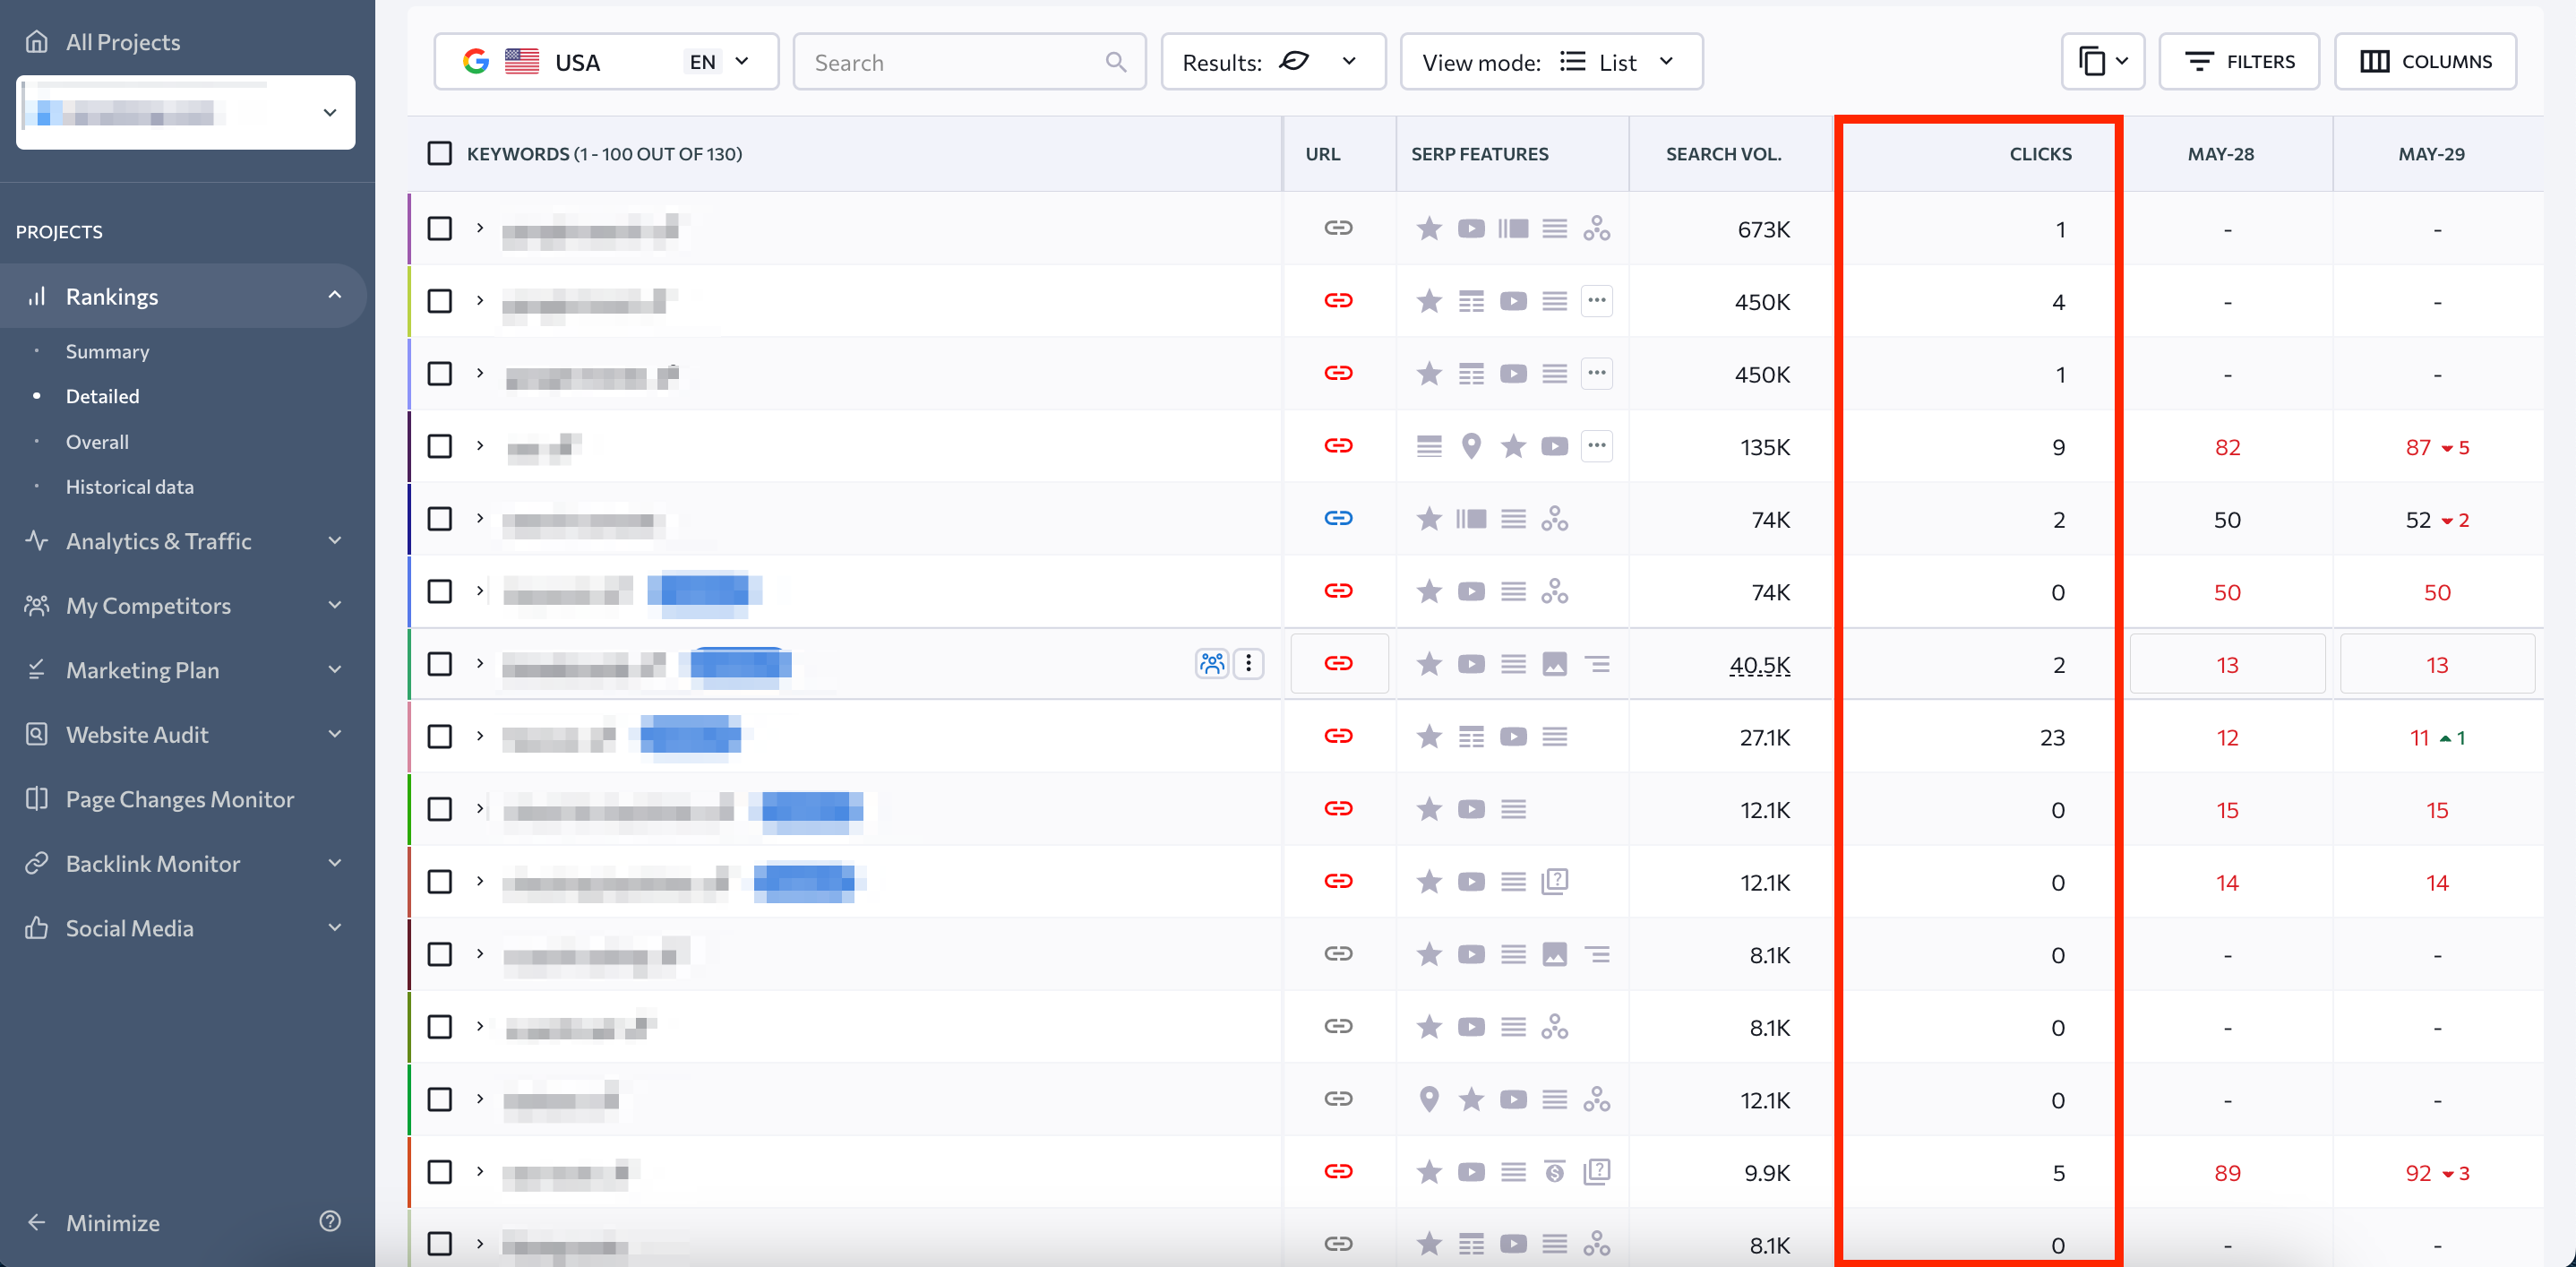
When you connect GSC to your project in SE Ranking, you can also view clicks in the Detailed tab under Rank Tracker. The clicks column in the keyword table shows the number of clicks your website received in Google search results for specific keywords. This data is retrieved from GSC and represents the most recent 30-day period available.
As a result of connecting your Search Console account to SE Ranking, you can:
- Streamline your SEO workflow
- Discover new keyword opportunities
- Improve rankings for underperforming keywords
- Optimize URLs with a low CTR
- Enhance your content strategy
- Optimize SEO efforts more effectively
- Save time on data analysis
How to connect Google Search Console to different Content Management Systems
Here we will guide you on how to connect Google Search Console to your site based on the CMS you are using. Some CMSs are more SEO-friendly than others right out of the box. For detailed information about the benefits and limitations of popular CMSs, consult our guide on the best CMS for SEO.
If you have a WordPress, Shopify or Wix site, you can easily verify it in GSC to optimize for SEO. Follow the simple steps provided for all three of these popular CMSs.
Add your WordPress site to Google Search Console
To verify a WordPress site in Google Search Console, you have to download an HTML file. Please follow the instructions for verifying ownership by uploading an HTML file. You can add the file directly to the header.php file above the <body> tag or use a specific plugin called Insert Headers and Footers for this purpose.
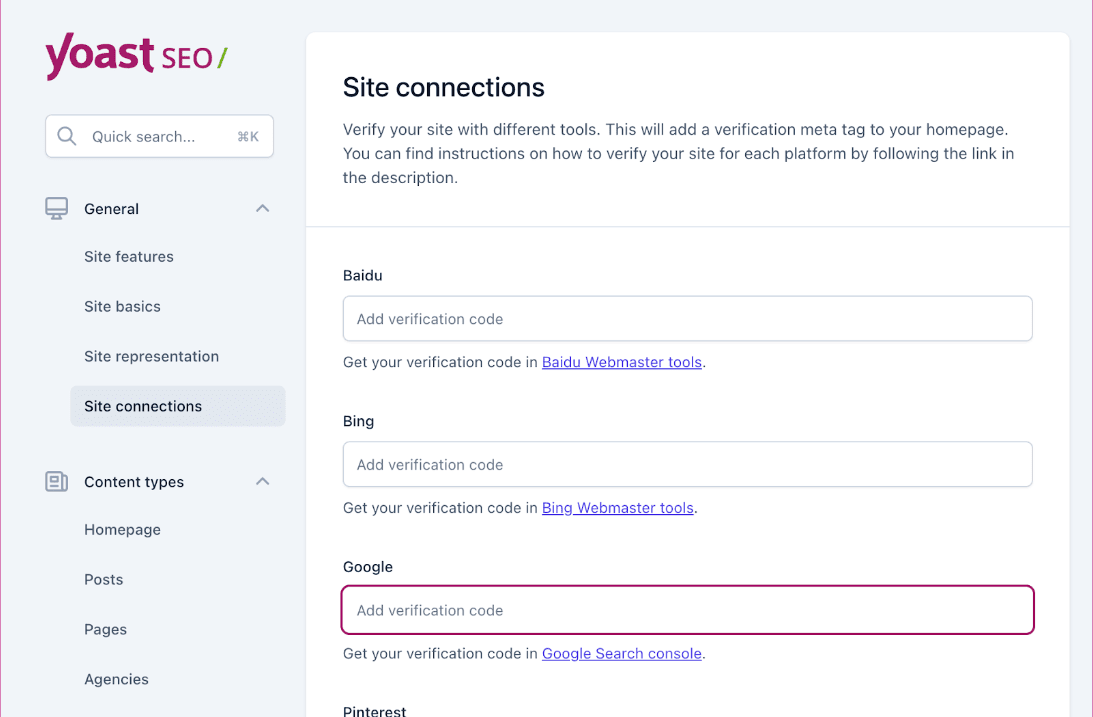
If you have the Yoast plugin installed, you can connect Search Console to your website. Here’s how to do it:
- Copy a meta tag using the method of Verifying your ownership by adding a tag to your site.
- Log in to your WordPress site.
- Select SEO > General > click on the Site connections tab.
- Paste the Google code and save the changes.
- Go to Google Search Console and click Verify.
Google Search Console and Shopify
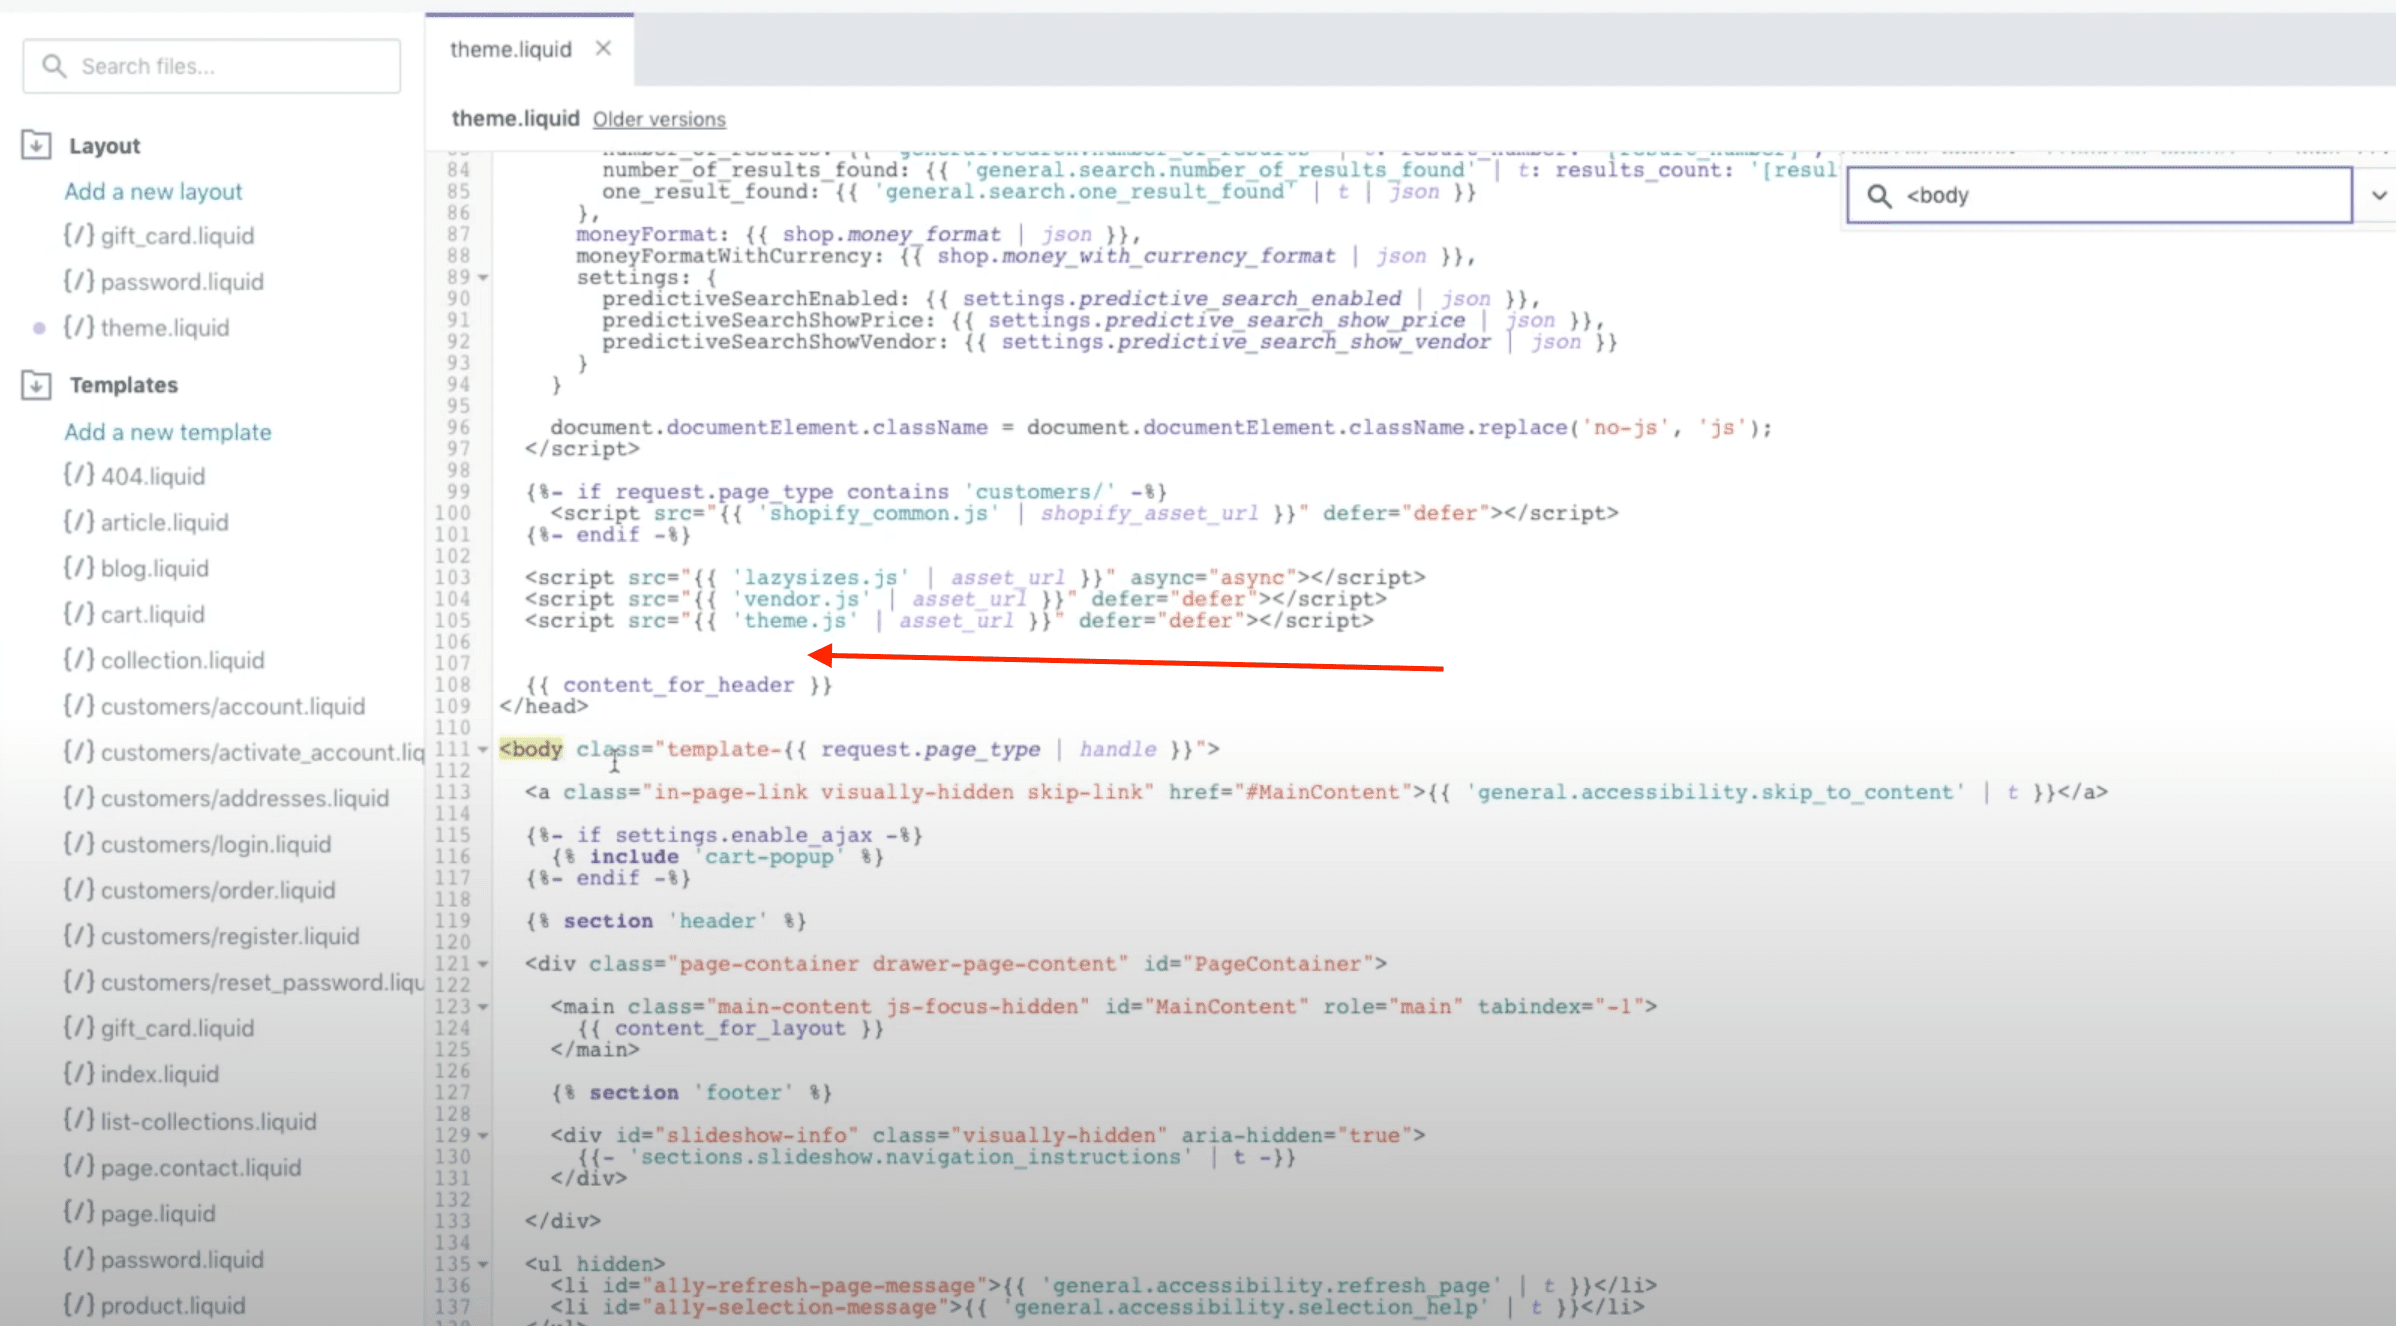
To connect Google Search Console and Shopify, you can use the HTML meta tag. To retrieve the tag, please see the instructions above. Paste the code into your Shopify theme after logging in to the Shopify store. To do this, click Online Stores > Themes > Action > Edit Code. Choose theme.liquid in the Layout folder. Search for the closing <head> tag in the code editor and paste the HTML code right above it. Then hit Save.
Finally, go back to Google Search Console and click Verify.
Connect Wix to Google Search Console
If you are using Wix, you can connect it to GSC by retrieving a meta tag following the instructions mentioned earlier.
To add your tag to the Wix site:
- Go to your Wix dashboard and click SEO Tools.
- Choose Site Verification.
- Click on Google Search Console.
- Insert the meta tag and click Save.
Conclusion
Now you have it: all the instructions and guidelines on how to install Google Search Console. It might not be the most exciting task on your to-do list, but with the insights it provides, you’ll have a better understanding of your website’s organic performance and how everything is operating under the hood. For example, you’ll discover which search terms are driving traffic to your site, identify technical issues that might be hindering your search performance, and learn how Google views and indexes your pages. So dive in, explore the features and reports, and keep optimizing your site based on real, actionable data.

