Moving from HTTP to HTTPS in 5 steps
Back in 2014, HTTPS encryption became another one of Google’s ranking factors, and Chrome has been marking all HTTP websites as not secure since July 2018. Internet browsers like Mozilla and Safari quickly followed the lead, which means that today, whenever you access a non-HTTPS website via one of the popular browsers, you get the following warning:

Even if you handle sensitive information like passwords or banking card details, your site will always get the “not secure” mark if it runs on HTTP, which surely doesn’t help with building user trust.
By browsing across the web, you’ll quickly find that Google’s stick-and-carrot approach has proven effective and that most websites have already switched to HTTPS. But if you’re not yet on the HTTPS bandwagon, here’s another reason to jump on board ASAP.
If you store sensitive user data and your website serves EU customers, running a website on HTTP can get you into legal trouble. According to GDPR, which came into force in May 2018, websites must ensure that all users’ personal data is handled securely. This means that in the case of a data breach, you will be deemed responsible and will have to pay a hefty fine.
To protect both you and your visitors, you’ll have to move to HTTPS. We’ll guide you through the entire process and help you sidestep any possible pitfalls along the way.
What’s the difference between HTTP and HTTPS?
HTTP stands for Hypertext Transport Protocol. Since the early days of the Internet, it has been used for transmitting data between a browser and a server storing website files. One of the major drawbacks of HTTP is that information is passed in plain text and can be intercepted by anyone within the network. This also means it can be altered or stolen.
This issue is solved with the help of encryption. Encoded data is unreadable, so even if malefactors lay their hands on it, they won’t be able to make use of it. This is what differentiates HTTPS from HTTP, as all the messages in HTTPS are transmitted through an encrypted communication channel. For this reason, the letter “S”—which stands for “Secure”—was added to the protocol name.
So, now that you know the difference between HTTP and HTTPS, let’s move on to making the switch, that is, if you haven’t already!
Below is our five-step guide to moving your website from HTTP to HTTPS.
Step 1. Choose an SSL certificate
To make it possible for your website to establish an encrypted connection, you’ll need to get a TLS certificate first—better known as the SSL certificate. The thing is, despite a major upgrade and name change to TLS, the older name stuck around. So, when mentioning SSL and TLS, we usually refer to the same certificate. It is a small file that contains an encryption key along with verified information about the website owner. Depending on how much data you provide about the person/company owning a website, you can get one of three certificate types.
- DV (Domain Validation): This is the most basic certificate. As the name suggests, it only verifies that a person requesting a certificate owns a domain. You can get a DV certificate in no time and it won’t break the bank.
- OV (Organization Validation): This verifies not just the domain ownership, but also the legal organization behind a website. It takes time to verify a company’s business records, so you’ll have to wait longer to get this type of certificate. Plus, it costs more.
- EV (Extended Validation): This is a top-level certification. To issue such a certificate, the certifying authority will do the following: thoroughly check a company’s governmental records and independent business listings, verify the identity of the person requesting the certificate, and finally, arrange a phone call with the issuer. EV certificates are the most expensive and take time to get issued.
The EV certificate is a must for governmental organizations, banks, and big e-commerce websites. But if you have a smaller business, a regular DV certificate should work just fine since your website visitors won’t notice the difference anyway.
Back in the day, websites that obtained an EV certificate would get their company name featured in the address bar next to the padlock. It was highlighted in green to make it visibly clear that the website was secure.

Now, to check if a company has gone through an extended validation, you’ll have to click the padlock sign and look for the company name in the Details section. Also, the reassuring green color is no longer present.

In addition to the validation level, SSL certificates differ by the number of covered domains and subdomains.
- The basic DV certificate only covers one domain without subdomains.
- If you have subdomains on your website (admin.example.com, blog.example.com, etc) you’ll have to obtain a wildcard SSL certificate.
- To protect several domains, you can get a multiple domains certificate.
So, when picking the best type of SSL certificate for your website, pay attention to your desired validation level and the number of domains (including subdomains) you need to cover.
Step 2. Get and install an SSL certificate
Option 1: Buy from your hosting provider
After deciding what kind of SSL certificate you need, check what your hosting provider has to offer. If their pricings are reasonable, choosing from their available options will make the process faster and easier.
Here’s the standard procedure for obtaining and installing an SSL certificate:
- You pick the type of certificate that works best for you.
- You generate a private encryption key and a certificate signing request (CSR) with your hosting provider.
- You order an SSL certificate from your selected vendor. From here, you’ll have to upload the CSR file that you generated earlier.
- Once the certificate signing request is sent, you’ll have to go through the verification procedure, which will vary depending on the certificate type (DV, OV, EV).
- After completing validation, you’ll be able to download your SSL certificate from your vendor’s website and upload it to your hosting server.
As you can see, things get a bit complicated because you need to get files from a hosting provider and then upload them to an SSL certificate vendor, and vice versa. If you buy an SSL certificate directly from your hosting service, there will be no need to exchange any files and you might even be able to skip a few points from the list above. Some providers just have you click a couple of buttons and then they set everything up automatically. But regardless of which method you choose, you’ll want to contact your hosting company to learn how they can help you move to HTTPS. You should also check and see if your hosting plan includes a free SSL certificate, as some providers offer this benefit.
Option 2: Buy from the certifying authority or at a specialized store
If, for some reason, you cannot get an SSL certificate from your hosting provider, you can buy one directly from a company that issues them (Comodo, Symantec, Geotrust). There are also plenty of specialized online stores that sell SSL certificates.
Option 3: Get it for free
Thanks to the Let’s Encrypt initiative, you now have the option to get an SSL certificate absolutely for free. The certificates they issue work in the same way as paid certificates, with only one difference: they are only valid for three months, while regular SSL certificates last for one year. This means you’ll have to constantly renew your Let’s Encrypt certificate. It’s also worth noting that they only provide DV certification.
Once you have installed your SSL certificate, you’ll have to make sure it works properly. You can use the SSL Server Test for this purpose. This service will check whether your certificate is valid, identify which encryption protocol is being used, evaluate the strength of the cipher, and calculate the overall rating of your website. The highest possible score is A+, and if you get a lower rating, the service will explain why.

Step 3. Force using HTTPS
Once you have successfully installed your SSL certificate your website will be accessible through both HTTP and HTTPS protocols. The problem is that search engines will see these as two separate websites that may compete in the SERP. To make sure users and search engines only access your website through HTTPS, you must set up a redirect. As HTTPS-pages of your website are indexed, their HTTP counterparts will eventually drop out of the SERP, and link juice will flow to the HTTPS version of your website.
Now, before setting up redirects, you must replace all absolute URLs on your website with relative ones.
Implementing relative URLs
Let’s begin by defining the difference between relative and absolute URLs. An absolute URL contains the entire address of a page, including the connection protocol and domain name. Most URLs on the Internet are absolute (e.g. https://seranking.com/blog/). Relative URLs, on the other hand, are used for internal linking and do not specify the connection protocol. They may or may not contain the domain name (e.g. seranking.com/blog/ or simply /blog).
If a website uses relative links, the browser itself adds the missing protocol and domain name to the webpage address. It assumes that a relative HTTPS link on a webpage should point to another page on the same website that also uses HTTPS.
You must replace ALL of the following absolute links with relative ones: internal linking, paths to stylesheet, scripts, images, video. Mixed content issues occur when some page elements load over the secure HTTPS connection, while others load over an insecure HTTP protocol.

Webpages like these are vulnerable to man-in-the-middle attacks because the elements loading over HTTP allow malefactors to seize the whole page. Having mixed content on your website is like theft-proofing your home: the lock on your door is reliable and you never forget to close your window. Naturally, browsers mark pages with mixed content as insecure, so you want to make sure all your website resources load through HTTPS.
While you could choose to spend hours fixing internal linking and rewriting file paths to images, videos, scripts, and more after enabling redirection, you could also implement relative links and quickly nip the problem in the bud.
If you have a big website, you won’t be able to implement relative URLs overnight. So, consider replacing your links with relative ones beforehand. Doing this will enable you to set up redirects shortly after installing an SSL certificate, which is before both HTTP/HTTPS versions of your website get indexed and start to compete in the SERPs.
Setting up 301 redirects from HTTP to HTTPS
To redirect both users and search crawlers to your HTTPS website, use the server-side 301 redirect. It tells search engines that the page has been permanently moved to a new address. The setup procedure will vary depending on your webserver type. If your site is hosted on a server that runs Apache—which is often the case with many hosting providers—just add a few lines of code to your .htaccess file.
You can find the file in your website’s root folder, but it may be hidden. If it’s hidden, you’ll have to go to the admin panel settings and check the “Show hidden file” box. Before altering the file, make sure to copy it as a backup in case something goes wrong. If you can’t locate the file, this means your website doesn’t have one. You’ll need to create one using a regular text editor.
To do this, add the following line of code to your .htaccess file, replacing https://example.com with your website address:
RewriteEngine On
RewriteCond %{HTTPS} !=on
RewriteRule .* https://example.com/%{REQUEST_URI} [R=301,L]
To check if it worked, type the HTTP address of your website into the browser’s address bar. This should redirect you to the HTTPS version.
Sometimes, to reach the final destination URL, you’ll need to use redirect chains, which may, for example, look like this:
(A) http://www.site.com/
> (B) https://www.site.com/
> (C) https://site.com/
You can technically go from (A) to (C) directly, but there are several reasons why it is recommended to go through the intermediate redirect (B) in this case.
When a user types in the URL with the “www” subdomain (e.g. http://www.site.com), they may not necessarily be directed to the same website as the non-www version (e.g. http://site.com). In some cases, these may be considered two separate entities, which can create confusion for users and negatively impact your website’s SEO performance.
To decide on whether to make www a part of your website name, read this guide.
By redirecting the www-version to the non-www version (B to C), you can ensure that all traffic is directed to a single, canonical URL for your website. This can help improve consistency and simplify your website’s URL structure.
Additionally, going through the intermediate redirect (B) from HTTP to HTTPS ensures that the user’s connection is secure and encrypted. This can help protect against potential security breaches or data theft, which really matters if your website handles sensitive information or transactions.
Still, keep in mind that redirect chains can have a negative impact on website performance and user experience. Although Googlebot can follow up to 10 redirects in a chain, it’s best to redirect to the final destination directly. If a direct redirect isn’t possible, limit the number of redirects in the chain to three or four.
In fact, a chaining redirect from HTTP to HTTPS can cause latency, which can slow down page load times, potentially leading to a higher bounce rate. Also, not all user agents and browsers support long redirect chains, causing issues for users who are trying to access your site.
Step 4. Update your Google Search Console
Even after you set up the redirect, your HTTP pages will still rank on Google for some time. To get them replaced with HTTPS versions, the latter need to be crawled and indexed. You can speed up the process by uploading an updated version of your XML sitemap to Google Search Console. Before that, you may need to add your HTTPS website to GSC. Or it will be already there—it depends on which method you used to verify your website ownership.
The thing is, in February 2019 Google launched domain properties to let webmasters analyze domain-wide data. Domain property is a URL without protocol (HTTP/HTTPS), www prefix or other subdomains(m, support, help, etc), and paths (es, fr). So if you add yoursite.com to GSC, you’ll get combined data on different versions of your website address including yoursite.com, www.yoursite.com, m.yoursite.com, www.m.yoursite.com, help.yoursite.com, yoursite.com.es and dozens of other possible variations both with HTTP and HTTPS protocols. The only way to create a domain property is by going through DNS record verification.
Now, if you have a domain property set up in your GSC, it will automatically start collecting data on the HTTPS URLs. But if your website has a URL-prefix property status, you’ll have to manually add the HTTPS variation of your website. Again, you have a choice to either add it as a URL-prefix property or verify your ownership through DNS and create a domain property to see aggregated data.
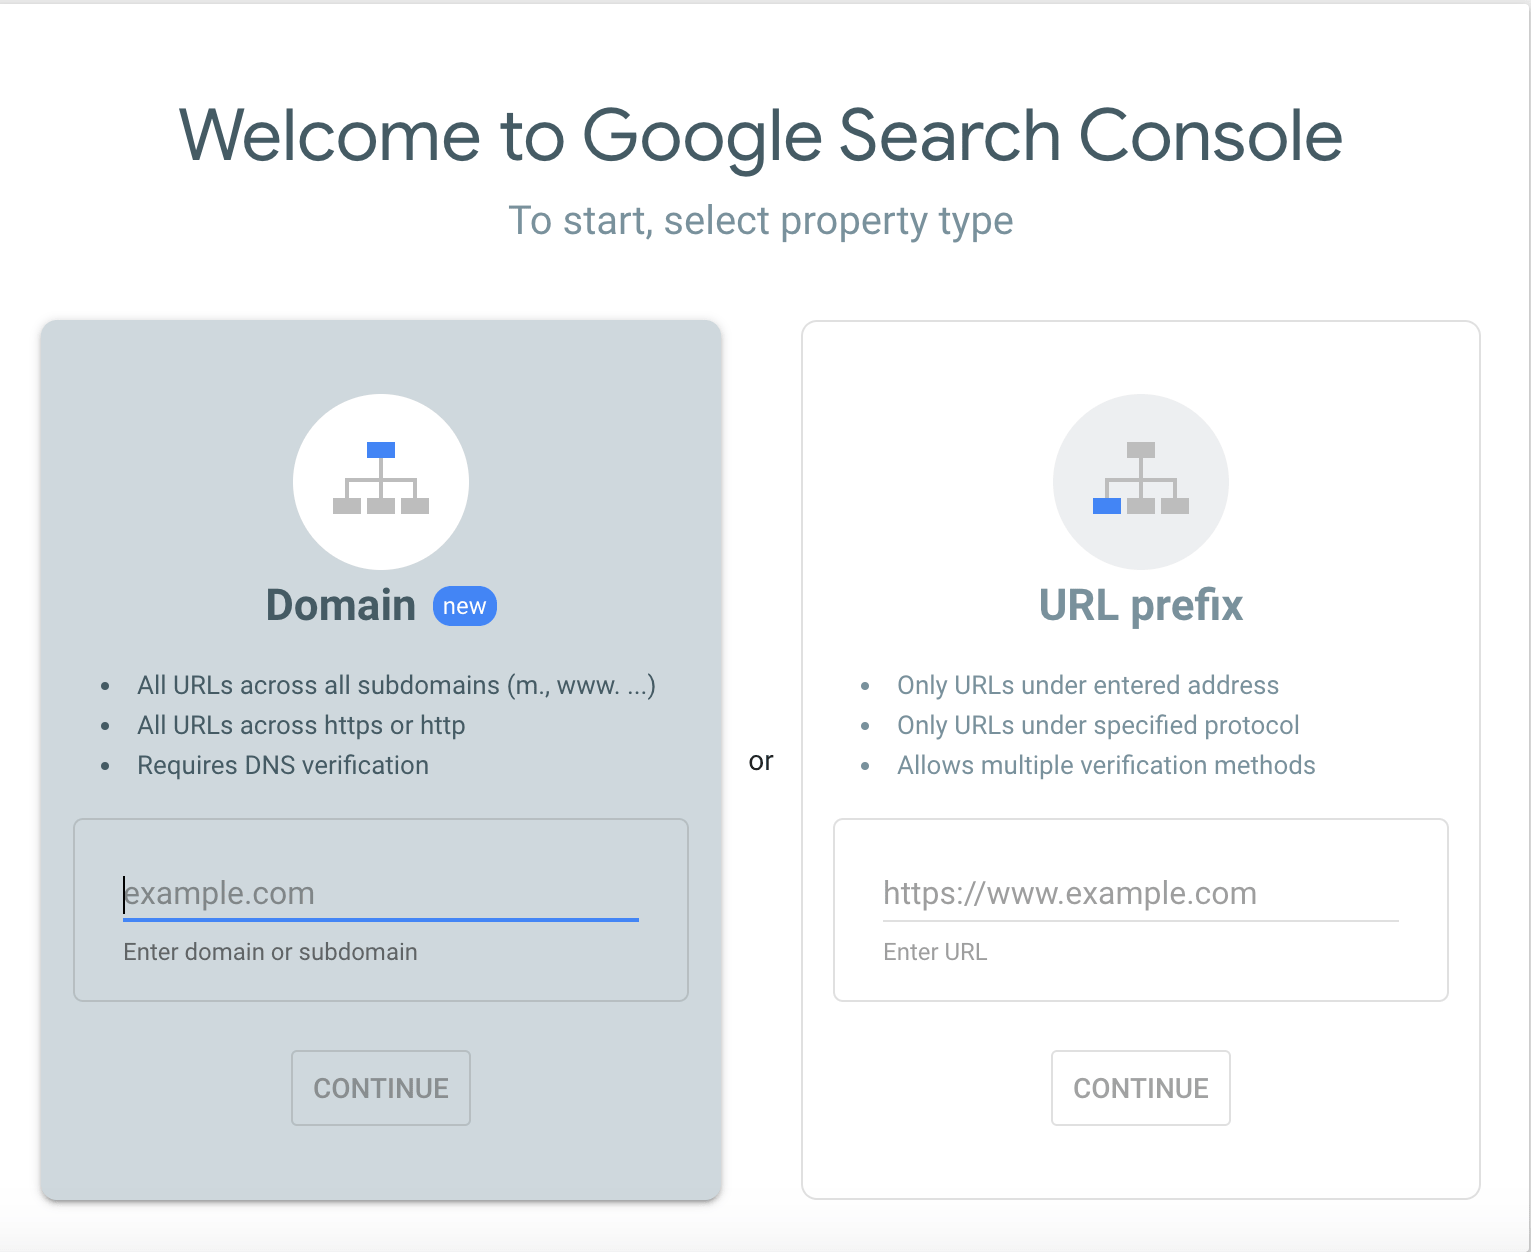
It is important to note that Search Console treats HTTP and HTTPS versions of a website as separate properties. This means that if you have both HTTP and HTTPS versions of your site, you will need to verify both versions in Search Console to access the data for each one. Furthermore, any data collected for one version of the site will not be shared with the other version, even if they are both verified properties in Search Console.
This separation of data can pose a challenge when comparing the performance of the HTTP and HTTPS versions of a site. For example, if you are trying to track the progress of a migration to HTTPS, you will need to monitor the data for each version of the site separately. This can be time-consuming and may require more frequent monitoring to ensure that all data is being accurately tracked. However, despite this extra step, you must verify both versions of your site in Search Console to ensure that you have access to all of the valuable data it provides.
Step 5. Find and fix errors
Since we’ve implemented relative URLs across the website before forcing HTTPS, no critical technical errors should come up after you set up the redirects. Nevertheless, a good practice would be to run a website audit and make sure everything is working properly.
Pay attention to the following issues:
- You should not have redirects pointing to HTTP pages
- rel=canonical as well as hreflang attribute, should point to HTTPS pages;
- Your sitemap.xml should contain HTTPS URLs only
- Pages should not return mixed content errors, meaning every page element should load over the HTTPS protocol.
You can easily detect all these issues with SE Ranking’s Website Audit. After you run an audit for your website, you’ll have access to a detailed report covering 120 potential issues grouped in 19 sections. Take a look at the Website Security section to see if you have any redirects or canonical tags pointing to HTTP pages, HTTP URLs in your sitemap.xml, pages with mixed content, or other website security issues.

To check if you have any potential problems that may stop your pages from indexing, check the Crawling section of the report. You’ll know what pages have been blocked by robots.txt or noindex and nofollow tags.

What’s more, by navigating to the Website Audit tool and clicking on the Found Links tab in the left-hand menu, you can find all of your website’s internal and external links, along with their:
- Status code
- Link type (image, CSS, JS, hyperlink, canonical, hreflang, meta refresh)
- Source URL
- Anchor text
- Anchor type (text or image)
- Alt attribute
- Status data (dofollow/nofollow)
This report comes with a filtering option to make your audit easier. If, for instance, you wanted to check whether a website still has HTTP URLs or internal links to them, you could use the filters in the Internal Links tab. You would just need to look for any URLs that start with “http://”. Alternatively, you could directly type “http://” into the URL filtering box and click Apply Filter to get a list of HTTP URLs, the pages that link to them, as well as additional data.

The Website Audit tool is available under the free trial, so all you need to do is sign up to SE Ranking. You’ll have 14 days to test out all the other tools SE Ranking offers including our Keyword Rank Tracker.
To ensure your website transitions smoothly to HTTPs, it’s crucial to watch your server access and error logs closely. Pay particular attention to crawling activities by Googlebot, unexpected HTTP error codes, and user traffic patterns.
It’s also recommended that you use web analytics software or your CMS’s analytics tools to monitor your website’s traffic. By doing so, you can track the migration progress of your old site to the new one. Google Analytics provides real-time reporting, making it an invaluable tool during the initial migration phase. During this period, it’s common to see a decrease in traffic on the old site, while the new site’s traffic rises.
HTTPS and page experience
In addition to providing security benefits, HTTPS is also an important factor in determining page experience, which in turn affects user engagement and search rankings.
To monitor page experience, you can use the Search Console Experience report. It assesses page experience based on three factors: Core Web Vitals, mobile usability, and HTTPS usage. Still, you should consider that the Page Experience report provides the overall HTTP/HTTPS usage for your website and not URL-level data. If this ratio is too high in favor of HTTP URLs, you’ll receive a warning banner on your site and the HTTPS section of the report will indicate that it’s failing. In particular, the report highlights any pages on the website that are not being served over HTTPS.

It’s worth noting that a page must be served over HTTPS in order to be eligible for a Good page experience status. This means that you should ensure that all pages on your website are being served over HTTPS, rather than just a subset of pages. In addition to improving page experience, serving all pages over HTTPS can also help to improve search rankings and protect user data.
Keep an eye on your rankings
Transitioning to HTTPS is critical for the success of a website in search engines today. Google prioritizes websites that have implemented HTTPS, as it provides a secure and encrypted connection for users. This means that websites using HTTPS are more likely to rank higher in SERPs than those that are not.
On the other hand, not using HTTPS could result in a warning message being displayed to users when they try to access your website, which can lead to a drop in traffic and negatively impact your rankings. Some browsers may even block access to non-HTTPS websites altogether, further reducing traffic.
It’s true that you may see some ranking fluctuations in the first couple of weeks. But if you’ve taken good care of all the technical details when switching to HTTPS, you shouldn’t suffer drastic ranking drops.
At the same time, the amount of time needed for a website to be reindexed after switching to HTTPS can vary depending on several factors, such as the number of pages to be indexed, frequency of site updates, and more. But this is only an estimate, and the actual time may vary depending on server load, search engine algorithms, and more.
Remember that HTTPS is a ranking factor. Though it is a minor one, you may be among the lucky websites that actually experience a boost in rankings after moving to HTTPS.
In any case, you’ll want to keep an eye on your ranking fluctuations after moving to HTTPS. Then, in case of a ranking drop, you’ll be able to figure out what may have caused it and fix the issue ASAP.
As was mentioned, SE Ranking also has a handy and reliable tool for ranking monitoring. Keyword Rank Tracker allows you to keep track of all your target keywords across your selected locations.
You can also use this tool to compare keyword rankings before and after moving to HTTPS. To get the most accurate results, you’ll need to check how your rankings looked from before you transitioned to HTTPS to at least several weeks after that.
Doing this is simple. Here’s how:
1. Use the calendar to choose the time period that you’re interested in.
2. Apply filters to select a specific group of keywords. If you don’t need to group keywords or want to export rankings history for all keywords, you can skip this step.
3. Click on the “Export” button. A new window will appear, giving you the option to download the data in either .XLS or .CSV file formats. You can choose to export rankings data for all search engines or just one, and you can also choose to include rankings changes in the file.
You’ll then get a ranking table that looks something like this:

By examining the URL section of the table, you can determine which HTTP pages are still ranking for your targeted keywords. This information can help you identify any pages that need optimization or updating, as well as any cannibalized pages. By addressing these issues, you can improve your website’s overall SEO performance and increase your visibility in search engine results pages. So, to fully optimize your website, review the URL section of the table and make any necessary changes.
Whenever you redirect pages, you must update all external links pointing to your website’s content. This will prevent you from losing traffic and rankings while helping you improve user experience and minimize server load. One strategy that can be effective in achieving this goal is to contact sites linking to your old content and ask them to update their links to your new site. It’s also important to review and update any internal links that may be pointing to the old pages and replace them with new HTTPS links. By doing so, you’ll ensure a seamless experience for your users and avoid any potential confusion or broken links.
To prioritize your efforts in updating the HTTP pages that are receiving backlinks, consider using SE Ranking’s Backlink Checker. In the Pages tab of this tool, you can get a list of all HTTP pages that are being linked to, along with the total number of links pointing to each page and the number of domains linking to them. Simply navigate to the URL filter section and specify “http:” to generate all URLs along with the total number of backlinks/referring domains on the page that’s linked to, as shown in the screenshot below.

What is HSTS and how can it help your website transition from HTTP to HTTPS?
Google recommends supporting HSTS (HTTP Strict Transport Security) for HTTPS sites, which is a crucial step in enhancing online security. By implementing HSTS, website owners can instruct the user’s browser to automatically request HTTPS pages, ensuring that all sensitive data and information transmitted between the user’s device and the website are encrypted and protected from potential malicious attacks. HSTS also notifies Google to serve secure URLs in the search results, which further reduces the risk of exposing users to unsecured content.
While HSTS is a powerful tool for enhancing security, it can also add complexity to a website’s rollback strategy. Once a website has implemented HSTS, it becomes more challenging to revert to HTTP since the browser will still request HTTPS pages automatically. Because of this, website owners must carefully consider the implications of using HSTS and have a comprehensive plan in place to handle any potential issues. Nevertheless, the benefits of implementing HSTS far outweigh its potential drawbacks because it provides a much-needed layer of security for both website owners and users.
Why and how to check which HTTP pages are indexed when switching to HTTPS
When switching to HTTPS, it is important to check which HTTP pages are currently indexed by search engines and ensure that they are properly redirected to the corresponding HTTPS pages. This is important for several reasons:
- Preventing Duplicate Content: Search engines might view both HTTP and HTTPS versions of a page as separate pages with duplicate content, resulting in a negative impact on the website’s search engine rankings.
- Preserving Link Juice: External links pointing to the HTTP version of the page may lose their value when the website switches to HTTPS. By redirecting the HTTP version to the corresponding HTTPS version, the link juice (the value passed by the external links) is preserved and transferred to the new URL.
- Maintaining User Experience: If users bookmarked or saved links to the HTTP version of a page, they may be confused or encounter errors if they are not redirected to the HTTPS version.
To check which HTTP pages are still in the index, you can perform a site search. Just enter the URL of your website with the HTTP protocol in the search bar of search engines like Google. Then, use the “site:” operator, along with the URL of the site you want to check, to see which HTTP pages are indexed by Google.
Let’s say you wanted to check which HTTP pages are indexed for the site “example.com”. You can use Google to search for “site:http://example.com/”. This will display a list of all the HTTP pages that Google has currently indexed for the site.
However, for a more in-depth way to monitor your site’s the indexing status, you can use the Indexing report in Google Search Console. This tool provides detailed information about the status of each URL on your site, including indexing, crawling, and any errors or issues that may be affecting your site’s visibility in search results. By regularly monitoring this report, you can identify and address any potential issues and ensure that your site is being properly indexed by Google.

The “Your connection is not private” message and its relation to HTTP/HTTPS protocols
The “Your connection is not private” message is a warning message that appears on web browsers when a website’s security certificate cannot be validated. This message indicates that the connection between the user’s browser and the website is not secure and is at risk of being intercepted by a third party.

As a website owner, it is crucial to use HTTPS to secure your website and protect your users’ data. If your website does not have a valid SSL/TLS certificate or is not configured correctly, visitors will see the “Your connection is not private” message. This can deter users and can negatively affect your website’s reputation and search engine rankings.
Here are some steps that you can take to avoid this message:
- Install an SSL/TLS certificate: An SSL/TLS certificate encrypts the connection between the user’s browser and the website’s server, which makes it more difficult for hackers to intercept the data being transmitted. You should always install an SSL/TLS certificate from a trusted certificate authority (CA) to ensure that their website is secure.
- Keep the SSL/TLS certificate up to date: SSL/TLS certificates typically expire after a certain period of time, so make sure that their certificate is up to date and has not expired.
- Enable HTTPS: Enabling HTTPS ensures that all traffic between the user’s browser and the website’s server is encrypted. You can do this by configuring their server to redirect all HTTP requests to HTTPS.
- Ensure that the domain matches the SSL/TLS certificate: The domain name listed in the SSL/TLS certificate should match the domain name used to access the website. If they don’t match, web browsers will display the “Your connection is not private” message.
- Use a reputable web hosting service: Choose a reputable web hosting service that provides secure hosting services and regularly updates their servers with the latest security patches.
Moving to HTTPS is inevitable
Moving to HTTPS may seem like a daunting task. You need to bear dozens of details in mind and messing up is not an option as your rankings and traffic are at stake. And still, you cannot afford to stick to HTTP as you will compromise the security of your users and lose their trust. Besides, in the nearest future, search engines may also stop tolerating websites running on HTTP.
Back in 2018, Google claimed that in the long run, they want to remove secure indicators from Chrome and only mark non-secure websites. The final goal is to transform the Internet into a place where every website user access is secure by default. It is still unclear how Google plans to use to further encourage websites to switch to HTTPS. But it’s quite probable that they will choose the stick method and HTTP protocol will become a negative ranking factor. In any case, my advice is not to sit on the fence and move to HTTPS without further delay. And our guide will help you to do it right.